The Prophecy of Power: Priestess is a two-week solo event that runs from February 26, 2025 until March 12, 2025. During the event, players complete challenges related to the new Priestess mini to unlock and upgrade the mini and earn various other rewards.
In this event guide, I will show you the best rewards and optimal path through the reward tree and provide strong army comps for the special event missions.
Priestess Event Missions
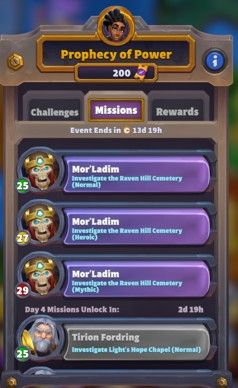
The Priestess event is the first time Blizzard uses their new event missions tech. You access event missions directly from the event island: open the Priestess event, and you will see a new Missions tab in addition to Challenges and Rewards.
Event missions can use any existing maps in the game, they can be timegated and progress-gated, and use various modifiers to make the encounters more difficult.
In the Priestess event, there are three difficulty levels for event missions, each with a specific progress requirement:
- Normal: all minis in your army, including the Leader, have to be of Uncommon rarity or better
- Heroic: all minis in your army, including the Leader, have to be of Rare rarity or better
- Mythic: Your army must include at least 3 minis of Epic rarity or better
Each difficulty level is based on your average army level:
- Normal: 2 levels below your average army level
- Heroic: Same as your average army level
- Mythic: 2 levels above your average army level, no lower than one level below your highest-level mini
Because both your average army level and your highest-level mini affect the mission level, you may want to off-slot some minis to keep their levels close together.
Blizzard has not announced how the protection against skewed armies works, but the current top hypothesis is that all minis that are more than -4 levels from your highest-level mini will count as -4 levels from it for determining the opponent's level. The average army level shown in your army screen does not matter, and the enemy level shown in the mission list may be incorrect if your army is heavily skewed.
As practical consequences:
- You can have one mini that is +1 compared to the boss in Mythic (Assuming all other minis at -4 from the highest, with a total of 3 levels available to use between them on top)
- You can have up to 3 minis at the same level as a Mythic (Assuming other minis at -4 from the highest, with a total of 2 levels available to use between them on top)
- You can usually offslot 2 (sometimes 3) minis, preferably ones that bring utility, to lower the mission level by 1
- You cannot significantly outlevel Mythic missions
In addition to increasing levels, each difficulty level has additional modifiers that make the encounters more difficult.
At the start of the event, there was a bug that made the harder difficulty levels much easier: if you restarted the mission or lost and chose try again, the levels of the enemy minis were reset to normal difficulty levels. Blizzard fixed the issue on Wednesday, March 5, after which manipulating enemy levels was no longer possible.
There was also a bug with the event missions on some mobile clients where tapping the mission did not do anything at all. This was also fixed in a subsequent patch.
Investigate the Raven Hill Cemetary - Mor'Ladim Mythic
Rend with the Living Bomb talent (optional) and Chimaera:

A Resistant Chimaera can handle huge swarms of minis: use Faerie Dragon with the Fae Blessing talent to give your Chimaera Resist. If you can get a flyer push to Mor'Ladim with Rend that is equipped with the Living Bomb talent, the explosion when Rend dismounts may take Mor'Ladim out in one push. Witch Doctor and Pyromancer are here to defend the right side as needed while you push through left.
You can see this build in action here:
Jaina with Execute:

Turtling it up with Jaina and Execute never goes out of style. Use Witch Doctor and Pyromancer to defend, and add Gryphon Rider to your defense if you meet a Meat Wagon, Abomination, or Gargoyle. Play Jaina, preferably on the right lane to keep her alive as long as possible, and unload your spell power on the boss. Eclipse works with either the Burn talent or the spell levels talent. Cycle through Moonfire on boss or on troops to get to Sunfire for big damage.
You can see this build in action here:
Charlga with Chimaera:

Chimaera is an excellent mini for taking out Mythic Mor'Ladim. Send the Chimaera up the right lane, give it Resist with Faerie Dragon, and a bit of support, for example with Priestess. Use your other minis to defend the left side and ideally take the Tower there, if possible. Note that Charlga disables Towers when channeling on them, making their capture easier. As your Chimaera reaches Mor'Ladim, tank Mor'Ladim with Quilboar, and add more damage with Execute. Mor'Ladim poisons all your minis and clears all poison from himself at phase transitions, so you may need to send another push to take it down. Send that push after phase transition to avoid poison on your new minis. If Mor'Ladim barely survives or is very close to a phase transition, you can use Execute to push the final bit of damage.
You can see this build in action here:
Defeat a Prophecy of Power Mythic Mission with Full Base Health
The full base health challenge can be completed in any of the missions, and Mor'Ladim is extremely well-suited for it: the boss has no unbound minis, and while it does have Blizzard, I have never managed to get it to shoot the Blizzard at my base. Therefore, you do not need a Frostwolf Shaman with Earthwall Totem to heal your base as long as you can intercept all attackers.
Rend with Flaming Soul:

A Resistant Chimaera can handle huge swarms of minis: use Faerie Dragon with the Fae Blessing talent to give your Chimaera Resist. If you can get a flyer push to Mor'Ladim with Rend that is equipped with the Living Bomb talent, the explosion when Rend dismounts may take Mor'Ladim out in one push. Witch Doctor and Pyromancer are here to defend the right side as needed while you push through left.
Ragnaros with Earth Elemental:

You can defend a little easier if you have Ragnaros guarding your base. With Ragnaros defending, Beetles and Batlings will be destroyed in no time and you can focus on attacking and taking out the bigger threats: Gargoyle, Meat Wagon, and Abomination. You still need to defend at the start to get Ragnaros in place, and sometimes you may want to even take the left Tower before playing Ragnaros, if he is not immediately available.
Resistant Chimaera remains a strong option, and this deck also includes Earth Elemental and Living Bomb. Earth Elemental can do some damage thanks to the damage reflect it gains from Ragnaros, and if you play it between the boss and his mini area, you can Living Bomb to deal even more damage. One such combo can take out a full phase of health.
You can see the above builds in action here:
Investigate Light's Hope Chapel - Tirion Fordring Mythic
Tirion sends vast quantities of Footmen your way: he spawns additional Footmen from all Towers that he controls every 10 seconds, starting from 3:25 (so also at 3:15, 3:05, 2:55, and so on). His minis will apply frost on hit, slowing your minis' attack and movement speed. Finally, he will frost all your minis at phase transitions, and they will explode for 150 Elemental damage when the frost wears off. Any minis killed by the explosions then respawn as Skeletal Mages by Tirion's side.
Some good ways to handle incoming Footmen include Bat Rider and Flamewaker, although you need to watch out for Tirion's regular minis, especially Huntress. Pyromancer and S.A.F.E. Pilot can also cause trouble. If you lack anti-air, Tirion's Bat Riders may also be an issue.
At the start of the battle, try to send your miner to the opposite side of where you intend to push: this will secure gold from both sides for you and prevent the boss from mining your weaker side.
Drakkisath with Flamewaker:

Drakkisath with Armor from Frostwolf Shaman's Earth Shield talent is a strong tank against Tirion. Note how I have off-slotted some minis because otherwise Drakkisath would have been one of my lowest minis and you want your tank to be one of the highest.
Bat Rider can guard your off-lane while Drakkisath army pushes through the other side. Add more Drakkisaths to the push when you can. Flamewaker is your main damage dealer against the armies of Footmen.
Sylvanas with Abomination:

Abomination is an even stronger tank than Drakkisath and can more easily live without Armor. Frostwolf Shaman is equipped with Earthwall Totem to heal any scratches on your base to also get the full base health challenge. You can also use Earth Shield for an easier kill.
Bat Rider can guard the other lane at the start again. Abominations are strong enough that you can take all Towers and converge at Tirion from all directions. Living Bomb can potentially finish off Tirion if your army falls at a phase transition.
Jaina with Living Bomb:

Jaina takes a bit of a different approach: the goal is to defend, let Tirion mass up Footmen by his side (his regular spawns do not attack in this mode), and then one-shot Tirion with Living Bomb. Jaina+Living Bomb alone is not quite enough, you need either Eclipse with Celestial Focus to add some more levels to your Bomb or Polymorph with Explosive Sheep to deal some extra damage.
Ghoul, Pyromancer, Witch Doctor, Priestess (extra event mini), and Jaina are able to push a bit on one side while Bat Rider defends the other lane. Use your spells to help your troops while Tirion summons more Footmen by his side, save up to 10 gold and play Jaina + Polymorph + Living Bomb on Tirion.
You can see the above three comps in action here:
Investigate Stratholme - Ramstein the Gorger Mythic
Mythic Ramstein the Gorger is currently the most difficult encounter in Warcraft Rumble: it is more difficult than Onyxia.
If you want to give Mythic a try, Rend seems to be the top Leader for it:

You need to get a Tower early or you will be overrun. If necessary, reroll your seed by winning the normal difficulty to get Rend close to your opening hand, as Rend discounts on flyers are very important. Try to take both Towers if you can to control the gold, and push at Ramstein with Rend and Chimaera.
Chimaera is your top asset as it can hit both big and small targets at the same time. Rend with Living Bomb talent may blow up Ramstein when dismounted, depending on how many minis are around it at the time. Soundbite is the best Dire Batling talent for this as it allows them to take out small minis while shooting at a big one. Witch Doctor's Amplify Curse talent is the best for this encounter as it can kill large waves of small minis.
You can see a full-difficulty victory over Ramstein with this army here:
The below armies worked for mythic with the level bug and continue to work for normal and heroic versions.
Anub'arak:

Try to grab a chest with an unbound mini at the start if you can; Quilboar is the strongest option. Defend the first wave and send your Anub'arak towards the top Tower. After you have taken over the Tower, use it as a base to attack Ramstein. You may need to replay Anub at phase changes, so try to save some gold for them.
Vultures with Migration talent will provide you with a stream of free defenders against Beetles and Batlings. Soundbite is the best Dire Batling talent for this as it allows them to take out small minis while shooting at a big one. Exploding Spiderlings will take out nearby flyers if they die. Witch Doctor's Amplify Curse talent is the best for this encounter as it can kill large waves of small minis.
Rend:

Defend against the first wave especially with Chimaera, Batlings, and Rend. Use Earth Elemental to tank a Tower when your flyers approach one. When you have taken a Tower, you can either take another one or just use the one you took to send Chimaeras and Rends towards the boss.
Chimaera is your top asset as it can hit both big and small targets at the same time. Rend with Living Bomb talent may blow up Ramstein when dismounted, depending on how many minis are around it at the time. Vultures with Migration talent will provide you with a stream of free defenders against Beetles and Batlings. Soundbite is the best Dire Batling talent for this as it allows them to take out small minis while shooting at a big one. Witch Doctor's Amplify Curse talent is the best for this encounter as it can kill large waves of small minis.
You can see the above builds in action here:
Investigate the Monastery Courtyard - Bloodmage Thalnos Mythic
There are a couple of options on how to defeat Mythic Thalnos.
- Thalnos is made of paper, so Whelp Eggs + Quilboar is a viable strategy. With Eggs at -1 level compared to Thalnos, they can take a full phase, so you need to drop the combo on him three times.
- You can push up the left lane with teams that can handle Banshees, such as range-talent Sylvanas, Darkspear Troll, or Cenarius.
Cenarius with Fire Elemental:

I consider Cenarius with Fire Elemental the easiest way to beat Mythic Thalnos: Cenarius with the Treant talent following a Fire Elemental can clear the entire left lane and take all the chests (sometimes you lose some of the top chests to incoming minis). They can also kill Thalnos through all three phases with minor assistance: use Cheat Death whenever Fire Elemental is about to die. Phase change can be a good time for it, but it can also be in the middle of a phase. Use Sunfire to kill a respawning Banshee so that it does not steal your Cenarius.
Banshee, Bat Rider, and Harpies are used for defense. Try to steal an Abomination by placing a Banshee outside of its frontal cleave when the Abomination has started hitting at your base. Deploy Bat Rider and Harpies whenever casters have committed to shooting your base.
You can see this team in action here:
Ysera with Unbounds:

Your goal is to deploy Whelp Eggs followed by Quilboar on the opposite sides of Thalnos three times. As long as your Eggs are -1 level or better, they should be able to take a phase with each cycle. Note that you want to drop the Eggs a little further away from Thalnos than the Quilboar, and you want to deploy the Quilboar during Thalnos' attack animation. By doing this, Thalnos will acquire a new target as the Eggs die, and Quilboar will be closer than the Whelps, so Thalnos will turn around to shoot at Quilboar. The Footmen and other troops spawning at Thalnos may be a minor inconvenience if your Whelps shoot at them instead of Thalnos, so pay some attention to any spawns. Usually, things should go fine even if you drop things while there are other minis around though.
Darkspear Troll has one job: take the chests at the start. Deploy Troll on the edge and it can take out Banshees even at -3 levels.
The other minis are used for defense. Priestess is in the deck mainly to enable faster cycle, but she can also heal your Chimaera and distract enemies. Chimaera has the main responsibility to take out the enemies, while Bog Beast can also distract them a little. You may also consider using something like Polymorph instead of Bog Beast to help Chimaera in a different way. When deploying the Chimaera, it is important to let casters commit on your base so that they do not immediately start shooting at it.
You can see this team in action here:
Investigate the Slaughter House - Baron Rivendare Mythic
There are several ways to kill Baron Rivendare.
- Whelp Eggs + Execute can work in an Orgrim Doomhammer deck (first strike)
- There are various ways to beat it with Living Bomb because there are huge swarms of Skeletons around Baron
- You can also take a Tower or both and push, for example with Drakkisath
Charlga and Living Bomb:

This is the fastest way to kill Rivendare, people have done it as fast as in 6 seconds with the right start. Yes, 6 seconds. No, you probably won't be able to do it that fast, but you can do it very quickly with the right setup.
You need to manipulate your opening hand by moving minis to the right army slots and you may also need to reroll the costs of minis by winning a normal. This is only doable with Charlga because she can cheat on the costs. You also want the Explosive Sheep talent on Polymorph and Chain Reaction on Living Bomb.
The plays:
- Sheep the minis to the right of Rivendare
- Play Quilboar in the pile to make Rivendare move to the thick of it
- Play Living Bomb
- If Rivendare still lives, finish the job with Whelp Eggs and Execute
That's it.
You can see this army in action here:
Drakkisath push:

You want the Amplify Curse talent on your Witch Doctor for this one.
Send Drakkisath up the left side with Witch Doctor to protect it and some healers to keep it topped up. The Witch Doctor will kill all the swarms, and Drakkisath will take the Tower.
Use Vultures, Pyromancer, and Dire Batlings to defend the other side.
Play another Witch Doctor from the Tower when Rivendare is about the get a group of skeletons: if your original Witch Doctor is already shooting at Rivendare, it will not switch targets, so you need a new one to handle them.
You can see this army in action here:
Ysera and Living Bomb:

For this strategy, you need Living Bomb with the Blast Radius talent and Witch Doctor with the Amplify Curse talent. It is also preferable to not use Recurring Dream with Ysera to be able to cycle faster. Priestess is in the deck to thin your deck: if you do not have it in your deck, one is added there by the mission.
The plan is to Living Bomb the right side of Baron's Skeletons with each wave. You want Living Bomb in your opening hand to be able to take out the first wave, and then you defend and cycle to your Living Bomb in time to take out new waves as they come. You can use Sunfire to finish the boss if you get close enough with the Bombs.
Send a Witch Doctor to contest the Chest if you can. If you cannot, it is often better to wait a while and start fighting as the enemies get closer to your base. Witch Doctor and Pyromancer are your main defensive tools.
With Amplify Curse, Witch Doctor can take out any minis Rivendare sends at you, but not directly! To take out Flamewakers and Firehammers, you want to hit Beetles and Batlings and have the explosions chain to those bigger minis. If there are no smaller minis in front of them, Sunfire can help you to deal with them.
You can see this strategy in action here:
Investigate Rattlegore's Lair - Rattlegore Mythic
The main ways to take out Mythic Rattlegore are:
- Use small minis and when they die to the frost explosion at a phase change, blow up the summoned Skeletons with a Living Bomb effect
- Use a few big and sturdy minis that can survive the frost explosion so that there won't be many skeletons and your big minis can beat Rattlegore
Rend with Flaming Soul:

This one is my personal favorite. You make a huge flock of Vultures and send them at Rattlegore together with Rend. Turn Rattlegore around with Earth Elemental as they approach so that Rattlegore does not kill them all. The Vultures will die to the frost explosion, and Rend will be dismounted, and a huge army of skeletons will spawn and immediately get hit by Rend's Living Bomb from the talent, killing Rattlegore.
Use Whelp Eggs to control some of the Meeting Stones to reduce the number of Footmen that attack your base. With Doctor, Drake, and Chimaera provide additional damage to support your Vultures. If you cannot build a flock of Vultures, the Eggs from Drake's Mother Drake talent can sometimes take their place.
You can see this build in action here:
Drakkisath with Bat Rider:

Drakkisath takes the opposite approach: you do not want lots of small things that die to the explosion. Rather, your goal is to get a big push with multiple Drakkisaths to Rattlegore and have Drakkisaths survive the phase transitions and kill Rattlegore. There are healers to keep Drakkisaths topped up while they travel to Rattlegore, Earth Elemental to turn Rattlegore around when they arrive, Whelp Eggs to take some Meeting Stones to reduce pressure on your base, and Witch Doctor and Bat Rider to provide some area damage for your push. You want the flaming pools on the ground at the phase change to kill most of the Skeletons so that Drakkisaths will not have problems with them, and you want to be ready to deploy Witch Doctor or Bat Rider after phase change to take out any remaining Skeletons.
You can see this build in action here:
Challenges and Tickets
Full reward tree cost: 83,100 tickets
Tickets from Event challenges: 111,200 tickets
However, there are some caveats because many of these tickets require specific purchases or account progress:
- Azeroth’s Blessing ($4.99): 12,000 tickets
- Purchase a Priestess Bundle (incl. Coin bundle that comes on March 5): 12,000 tickets
- 7+ Rare minis to access Heroic missions: 14,000 tickets
- 3+ Epic minis to access Mythic missions: 22,000 tickets
- Claim a Legendary Core: 15,000 tickets
Tickets from Daily Offers: 500 tickets each
Daily Offer bug

The Daily Offer tickets have been bugged for some time and are bugged at the start of this event as well.
When you claim a Daily Offer with Coins, you are not immediately awarded the tickets. The tickets are only added to your ticket count when your ticket total is updated: when you either earn more tickets by claiming an event challenge or when you buy a reward from the event reward tree.
Note that there is no animation acknowledging the additional tickets, they just appear.
This bug can be a problem on the last day of the event if you claim a Daily Offer and have no challenges left to claim. In that case, you cannot get your tickets.
There is also another bug specific to this event: you get 500 tickets from Daily Offers instead of the 200 that you are supposed to get.
The Reward Tree

Available rewards:
- 11 Priestess Stars
- 4 Tirion Fordring Stars
- 2 Holy Nova Stars
- 3 Modest Tomes
- 2 Major Tomes
- 2 Mega Tomes
- 400 Coins (600 with Booster)
- 3600 Arc Energy
- 1 Star Tome
- 1 Major Tinker’s Gem
- 2 Troop Choices
- 1 Rare Core
- 1 Epic Core
The most important rewards are the Coins and the Priestess stars.
Optimal Path Through the Reward Tree
Step 1: Get Common Priestess (blue line, 1800 tickets)
Step 2: Get Uncommon Priestess (green lines, 5600 tickets)
Step 3: Get the Coins and remaining Priestess Stars (grey lines, 37,200 tickets)
This is the cheapest path through the tree (44,600 tickets) to get the most important rewards. Optionally, you may want to pick up the Arc Energy from the first row instead of the Modest Tomes at a slightly higher cost (+600 tickets).

How to Get Priestess Stars
Priestess is not immediately available on the Grid. Blizzard has not explicitly said when Priestess will be available on the Grid, but it will most likely be added to the Grid at the start of Season 13, on March 20, 2025.
You can get 11 Priestess Stars from the reward tree, enough to get it to Uncommon.
On March 5, a Coin offer will be added to the in-game store that includes 10 Priestess Stars, enough to get it to Rare together with the Stars from the reward tree.
The Coin offer will cost 2500 Coins, and includes:
- 10 Priestess Stars
- Major XP Boost
- Mega Alliance Tome
- 4500 Arc Energy
The nominal value of these items in the in-game store is 2500 Coins, the same as the bundle cost.
The only way to get the Priestess beyond Rare before the event ends is to buy bundles with real money. There are four bundles that are offered one after another if you buy the previous one:
- 10 Stars for $9.99 - Follower of Holy Light (enough to make it Rare)
- 15 Stars for $14.99 - Prayer of Strength (enough to make it Epic if you also buy the Coin offer)
- 15 Stars for $19.99 - Light-Given Power (enough to make it Epic without the Coin offer)
- 20 Stars for $39.99 - Hymn of Hope (enough to make it Legendary without the Coin offer)
How to Claim a Legendary Core
There are not many good ways to get a Legendary Core for the Priestess event. There is a Legendary Core in Molten Core, but the Priestess event takes place just between Molten Core cycles, so that is unavailable.
Available ways to get a Legendary Core include:
- Guild War Chest final reward (if you have not claimed it yet this season)
- Heroic Blackrock Mountain or Heroic Moonglade (if not yet completed)
- Daily Offer for 4000 Coins (rare)
- Convert 5 Epic Cores (25 Rare Cores) in the Store
Core conversion is the only universally available way to claim a Legendary Core for the Priestess event.
