Gnomeregan Dungeon Guide
Learn how to complete the Gnomeregan mission in Warcraft Rumble. Follow our suggested build and strategy for Gnomeregan.
In this guide to the Gnomeregan dungeon in Warcraft Rumble, I showcase strong armies for completing the dungeon at red difficulty with various Leaders and go through each boss fight in detail.
The comps include quick instructions for the fights and you can refer to the boss descriptions for full details on all mechanics.
This dungeon is not the current active dungeon.
Go to Active DungeonBest Builds
-
 Alliance
-
 Beast
Beast
-
 Blackrock
-
 Cenarion
-
 Horde
Horde
-
 Undead
Malfurion


rumblo:CDkQAhoECBUQAhoECDYQARoECDMQARoECC8QARoECFkQAhoECFgQAQ==
Important talents
- Rocket Powered Turbo Boots are needed for Goblin Sappers to survive to the Rocket Tower
- Flame Burst is important to get immediate damage from Whelp Eggs
Crowd Pummeler 9-60
- Take the Meeting Stone
- Send Ranged minis at the boss from both sides
- Take Gnomish Harm Prevention Belts when you can to prevent extra S.A.F.E. Pilots, but you can skip some too
Electrocutioner 6000
- Defend against the first push in the middle, close to your base
- Try to take Towers while defending when either is unguarded
- Tank boss with Bog Beast
Mekgineer Thermaplugg
- Send troops to both sides to cover as much of the map as possible and get most of the Amp Switches
- Mine gold whenever possible
- Use Whelp Eggs against Molten Giants
Watch it in action
Arthas


rumblo:CF4QABoECEQQAhoECB0QARoECFkQAhoECC8QARoECFgQARoECF0QAg==
Important talents
- Death Grip on Arthas is excellent against Darkspear Trolls that tend to sit behind other minis
- Rocket Powered Turbo Boots are needed for Goblin Sappers to survive to the Rocket Tower
- Flame Burst is important to get immediate damage from Whelp Eggs
Crowd Pummeler 9-60
- Take the Meeting Stone
- Send Ranged minis at the boss from both sides
- Take Gnomish Harm Prevention Belts when you can to prevent extra S.A.F.E. Pilots, but you can skip some too
Electrocutioner 6000
- Defend against the first push in the middle, close to your base
- Try to take Towers while defending when either is unguarded
Mekgineer Thermaplugg
- Send troops to both sides to cover as much of the map as possible and get most of the Amp Switches
- Mine gold whenever possible
- Use Whelp Eggs against Molten Giants
Watch it in action
Jaina


rumblo:CDcQARoECD0QAhoECB0QARoECAMQABoECFgQARoECC8QARoECFkQAg==
Important talents
- Rocket Powered Turbo Boots are needed for Goblin Sappers to survive to the Rocket Tower
- Flame Burst is important to get immediate damage from Whelp Eggs
Crowd Pummeler 9-60
- Take the Meeting Stone
- Send Ranged minis at the boss from both sides
- Take Gnomish Harm Prevention Belts when you can to prevent extra S.A.F.E. Pilots, but you can skip some too
Electrocutioner 6000
- Defend against the first push in the middle, close to your base
- Try to take Towers while defending when either is unguarded
Mekgineer Thermaplugg
- Send troops to both sides to cover as much of the map as possible and get most of the Amp Switches
- Mine gold whenever possible
- Use Whelp Eggs against Molten Giants
Watch it in action
Charlga


rumblo:CBgQARoECBkQABoECEcQAhoECC8QARoECFkQAhoECCwQABoECEQQAg==
Important talents
- Rocket Powered Turbo Boots are needed for Goblin Sappers to survive to the Rocket Tower
Crowd Pummeler 9-60
- Take the Meeting Stone
- Send Ranged minis at the boss from both sides
- Take Gnomish Harm Prevention Belts when you can to prevent extra S.A.F.E. Pilots, but you can skip some too
Electrocutioner 6000
- Defend against the first push in the middle, close to your base
- Try to take Towers while defending when either is unguarded
- Distract the boss with a tank and send Plague Farmer or Chimaera to shoot it in the back
Mekgineer Thermaplugg
- Send troops to both sides to cover as much of the map as possible and get most of the Amp Switches
- Mine gold whenever possible
Watch it in action
Old Murk-Eye
rumblo:CEIQARoECBkQABoECEcQAhoECCwQABoECFkQAhoECC8QARoECEQQAg==
Important talents
- Rocket Powered Turbo Boots are needed for Goblin Sappers to survive to the Rocket Tower
Crowd Pummeler 9-60
- Take the Meeting Stone
- Send Ranged minis at the boss from both sides
- Take Gnomish Harm Prevention Belts when you can to prevent extra S.A.F.E. Pilots, but you can skip some too
Electrocutioner 6000
- Defend against the first push in the middle, close to your base
- Try to take Towers while defending when either is unguarded
- Distract the boss with a tank and send Plague Farmer or Chimaera to shoot it in the back
Mekgineer Thermaplugg
- Send troops to both sides to cover as much of the map as possible and get most of the Amp Switches
- Mine gold whenever possible
Watch it in action
Hogger
rumblo:CDUQARoECBkQABoECEcQAhoECCwQABoECFkQAhoECC8QARoECEQQAg==
Important talents
- Rocket Powered Turbo Boots are needed for Goblin Sappers to survive to the Rocket Tower
Crowd Pummeler 9-60
- Take the Meeting Stone
- Send Ranged minis at the boss from both sides
- Take Gnomish Harm Prevention Belts when you can to prevent extra S.A.F.E. Pilots, but you can skip some too
Electrocutioner 6000
- Defend against the first push in the middle, close to your base
- Try to take Towers while defending when either is unguarded
- Distract the boss with a tank and send Plague Farmer or Chimaera to shoot it in the back
Mekgineer Thermaplugg
- Send troops to both sides to cover as much of the map as possible and get most of the Amp Switches
- Mine gold whenever possible
Anub'arak

rumblo:CBAQARoECB4QABoECEcQAhoECEQQAhoECE0QAhoECC8QARoECFkQAg==
Important talents
- Rocket Powered Turbo Boots are needed for Goblin Sappers to survive to the Rocket Tower
- Explosive Shells are needed for Anub'arak to make Beetles useful
Crowd Pummeler 9-60
- Take the Meeting Stone
- Send Ranged minis at the boss from both sides
- Take Gnomish Harm Prevention Belts when you can to prevent extra S.A.F.E. Pilots, but you can skip some too
Electrocutioner 6000
- Defend against the first push in the middle, close to your base
- Try to take Towers while defending when either is unguarded
- Distract the boss with a tank and send Plague Farmer to shoot it in the back
Mekgineer Thermaplugg
- Send troops to both sides to cover as much of the map as possible and get most of the Amp Switches
- Mine gold whenever possible
Watch it in action
Emperor Thaurissan


Important talents
- Rocket Powered Turbo Boots are needed for Goblin Sappers to survive to the Rocket Tower
- Hubris on Emperor Thaurissan enables Goblin Sapper to take a Tower even if they are 3 levels below the Tower level (-1 level Sappers kill a Tower)
- Flame Burst is important to get immediate damage from Whelp Eggs
Crowd Pummeler 9-60
- Take the Meeting Stone
- Send Ranged minis at the boss from both sides
- Take Gnomish Harm Prevention Belts when you can to prevent extra S.A.F.E. Pilots, but you can skip some too
Electrocutioner 6000
- Defend against the first push in the middle, close to your base
- Try to take Towers while defending when either is unguarded
- Use Hubris to power up your Sappers, if they are more than -1 level compared to the Tower
Mekgineer Thermaplugg
- Send troops to both sides to cover as much of the map as possible and get most of the Amp Switches
- Mine gold whenever possible
- Use Whelp Eggs against Molten Giants
Watch it in action
Ragnaros
Important talents
- Rocket Powered Turbo Boots are needed for Goblin Sappers to survive to the Rocket Tower
- Flame Burst is important to get immediate damage from Whelp Eggs
Crowd Pummeler 9-60
- Take the Meeting Stone
- Send Ranged minis at the boss from both sides
- Take Gnomish Harm Prevention Belts when you can to prevent extra S.A.F.E. Pilots, but you can skip some too
Electrocutioner 6000
- Defend against the first push in the middle, close to your base
- Try to take Towers while defending when either is unguarded
Mekgineer Thermaplugg
- Send troops to both sides to cover as much of the map as possible and get most of the Amp Switches
- Mine gold whenever possible
- Use Whelp Eggs against Molten Giants
Watch it in action
Doomhammer
rumblo:CB8QAhoECFkQAhoECFgQARoECC8QARoECCwQABoECEQQAhoECEcQAg==
Important talents
- Rocket Powered Turbo Boots are needed for Goblin Sappers to survive to the Rocket Tower
- Flame Burst is important to get immediate damage from Whelp Eggs
Crowd Pummeler 9-60
- Take the Meeting Stone
- Send Ranged minis at the boss from both sides
- Take Gnomish Harm Prevention Belts when you can to prevent extra S.A.F.E. Pilots, but you can skip some too
Electrocutioner 6000
- Defend against the first push in the middle, close to your base
- Try to take Towers while defending when either is unguarded
Mekgineer Thermaplugg
- Send troops to both sides to cover as much of the map as possible and get most of the Amp Switches
- Mine gold whenever possible
- Use Whelp Eggs against Molten Giants
Watch it in action
Cenarius
Important talents
- Pyroblast on Pyromancer is essential to keep it viable even when it is in a non-bonus slot
- Rocket Powered Turbo Boots are needed for Goblin Sappers to survive to the Rocket Tower
- Flame Burst is important to get immediate damage from Whelp Eggs
Crowd Pummeler 9-60
- Take the Meeting Stone
- Send Ranged minis at the boss from both sides
- Take Gnomish Harm Prevention Belts when you can to prevent extra S.A.F.E. Pilots, but you can skip some too
Electrocutioner 6000
- Defend against the first push in the middle, close to your base
- Try to take Towers while defending when either is unguarded
- Tank boss with Quilboar
Mekgineer Thermaplugg
- Send troops to both sides to cover as much of the map as possible and get most of the Amp Switches
- Mine gold whenever possible
- Use Whelp Eggs against Molten Giants
Watch it in action
Ysera
Important talents
- Rocket Powered Turbo Boots are needed for Goblin Sappers to survive to the Rocket Tower
- Flame Burst is important to get immediate damage from Whelp Eggs
Crowd Pummeler 9-60
- Take the Meeting Stone
- Send Ranged minis at the boss from both sides
- Take Gnomish Harm Prevention Belts when you can to prevent extra S.A.F.E. Pilots, but you can skip some too
Electrocutioner 6000
- Defend against the first push in the middle, close to your base
- Try to take Towers while defending when either is unguarded
- Tank boss with Quilboar
Mekgineer Thermaplugg
- Send troops to both sides to cover as much of the map as possible and get most of the Amp Switches
- Mine gold whenever possible
- Use Whelp Eggs against Molten Giants
Watch it in action
Malfurion
rumblo:CDkQAhoECBUQAhoECDYQARoECDMQARoECC8QARoECFkQAhoECFgQAQ==
Important talents
- Rocket Powered Turbo Boots are needed for Goblin Sappers to survive to the Rocket Tower
- Flame Burst is important to get immediate damage from Whelp Eggs
Crowd Pummeler 9-60
- Take the Meeting Stone
- Send Ranged minis at the boss from both sides
- Take Gnomish Harm Prevention Belts when you can to prevent extra S.A.F.E. Pilots, but you can skip some too
Electrocutioner 6000
- Defend against the first push in the middle, close to your base
- Try to take Towers while defending when either is unguarded
- Tank boss with Bog Beast
Mekgineer Thermaplugg
- Send troops to both sides to cover as much of the map as possible and get most of the Amp Switches
- Mine gold whenever possible
- Use Whelp Eggs against Molten Giants
Watch it in action
Grommash
rumblo:CDAQARoECFkQAhoECC8QARoECFgQARoECEQQAhoECCwQABoECEcQAg==
Important talents
- Rocket Powered Turbo Boots are needed for Goblin Sappers to survive to the Rocket Tower
- Flame Burst is important to get immediate damage from Whelp Eggs
Crowd Pummeler 9-60
- Take the Meeting Stone
- Send Ranged minis at the boss from both sides
- Take Gnomish Harm Prevention Belts when you can to prevent extra S.A.F.E. Pilots, but you can skip some too
Electrocutioner 6000
- Defend against the first push in the middle, close to your base
- Try to take Towers while defending when either is unguarded
Mekgineer Thermaplugg
- Send troops to both sides to cover as much of the map as possible and get most of the Amp Switches
- Mine gold whenever possible
- Use Whelp Eggs against Molten Giants
Watch it in action
Cairne
rumblo:CBYQABoECFkQAhoECEcQAhoECEQQAhoECCwQABoECFgQARoECC8QAQ==
Important talents
- Rocket Powered Turbo Boots are needed for Goblin Sappers to survive to the Rocket Tower
- Flame Burst is important to get immediate damage from Whelp Eggs
Crowd Pummeler 9-60
- Take the Meeting Stone
- Send Ranged minis at the boss from both sides
- Take Gnomish Harm Prevention Belts when you can to prevent extra S.A.F.E. Pilots, but you can skip some too
Electrocutioner 6000
- Defend against the first push in the middle, close to your base
- Try to take Towers while defending when either is unguarded
Mekgineer Thermaplugg
- Send troops to both sides to cover as much of the map as possible and get most of the Amp Switches
- Mine gold whenever possible
- Use Whelp Eggs against Molten Giants
Watch it in action
Sneed
rumblo:CE4QARoECFkQAhoECEcQAhoECC8QARoECCwQABoECEQQAhoECFgQAQ==
Important talents
- Rocket Powered Turbo Boots are needed for Goblin Sappers to survive to the Rocket Tower
- Flame Burst is important to get immediate damage from Whelp Eggs
Crowd Pummeler 9-60
- Take the Meeting Stone
- Send Ranged minis at the boss from both sides
- Take Gnomish Harm Prevention Belts when you can to prevent extra S.A.F.E. Pilots, but you can skip some too
Electrocutioner 6000
- Defend against the first push in the middle, close to your base
- Try to take Towers while defending when either is unguarded
Mekgineer Thermaplugg
- Send troops to both sides to cover as much of the map as possible and get most of the Amp Switches
- Mine gold whenever possible
- Use Whelp Eggs against Molten Giants
Watch it in action
Sylvanas
rumblo:CFIQABoECCwQABoECEQQAhoECC8QARoECFgQARoECFkQAhoECEcQAg==
Important talents
- Rocket Powered Turbo Boots are needed for Goblin Sappers to survive to the Rocket Tower
- Flame Burst is important to get immediate damage from Whelp Eggs
Crowd Pummeler 9-60
- Take the Meeting Stone
- Send Ranged minis at the boss from both sides
- Take Gnomish Harm Prevention Belts when you can to prevent extra S.A.F.E. Pilots, but you can skip some too
Electrocutioner 6000
- Defend against the first push in the middle, close to your base
- Try to take Towers while defending when either is unguarded
Mekgineer Thermaplugg
- Send troops to both sides to cover as much of the map as possible and get most of the Amp Switches
- Mine gold whenever possible
- Use Whelp Eggs against Molten Giants
Watch it in action
Doomhammer
rumblo:CB8QAhoECFkQAhoECFgQARoECC8QARoECCwQABoECEQQAhoECEcQAg==
Important talents
- Rocket Powered Turbo Boots are needed for Goblin Sappers to survive to the Rocket Tower
- Flame Burst is important to get immediate damage from Whelp Eggs
Crowd Pummeler 9-60
- Take the Meeting Stone
- Send Ranged minis at the boss from both sides
- Take Gnomish Harm Prevention Belts when you can to prevent extra S.A.F.E. Pilots, but you can skip some too
Electrocutioner 6000
- Defend against the first push in the middle, close to your base
- Try to take Towers while defending when either is unguarded
Mekgineer Thermaplugg
- Send troops to both sides to cover as much of the map as possible and get most of the Amp Switches
- Mine gold whenever possible
- Use Whelp Eggs against Molten Giants
Watch it in action
Arthas
rumblo:CF4QABoECEQQAhoECB0QARoECFkQAhoECC8QARoECFgQARoECF0QAg==
Important talents
- Death Grip on Arthas is excellent against Darkspear Trolls that tend to sit behind other minis
- Rocket Powered Turbo Boots are needed for Goblin Sappers to survive to the Rocket Tower
- Flame Burst is important to get immediate damage from Whelp Eggs
Crowd Pummeler 9-60
- Take the Meeting Stone
- Send Ranged minis at the boss from both sides
- Take Gnomish Harm Prevention Belts when you can to prevent extra S.A.F.E. Pilots, but you can skip some too
Electrocutioner 6000
- Defend against the first push in the middle, close to your base
- Try to take Towers while defending when either is unguarded
Mekgineer Thermaplugg
- Send troops to both sides to cover as much of the map as possible and get most of the Amp Switches
- Mine gold whenever possible
- Use Whelp Eggs against Molten Giants
Watch it in action
Sylvanas
rumblo:CFIQABoECCwQABoECEQQAhoECC8QARoECFgQARoECFkQAhoECEcQAg==
Important talents
- Rocket Powered Turbo Boots are needed for Goblin Sappers to survive to the Rocket Tower
- Flame Burst is important to get immediate damage from Whelp Eggs
Crowd Pummeler 9-60
- Take the Meeting Stone
- Send Ranged minis at the boss from both sides
- Take Gnomish Harm Prevention Belts when you can to prevent extra S.A.F.E. Pilots, but you can skip some too
Electrocutioner 6000
- Defend against the first push in the middle, close to your base
- Try to take Towers while defending when either is unguarded
Mekgineer Thermaplugg
- Send troops to both sides to cover as much of the map as possible and get most of the Amp Switches
- Mine gold whenever possible
- Use Whelp Eggs against Molten Giants
Watch it in action
Anub'arak
rumblo:CBAQARoECB4QABoECEcQAhoECEQQAhoECE0QAhoECC8QARoECFkQAg==
Important talents
- Rocket Powered Turbo Boots are needed for Goblin Sappers to survive to the Rocket Tower
- Explosive Shells are needed for Anub'arak to make Beetles useful
Crowd Pummeler 9-60
- Take the Meeting Stone
- Send Ranged minis at the boss from both sides
- Take Gnomish Harm Prevention Belts when you can to prevent extra S.A.F.E. Pilots, but you can skip some too
Electrocutioner 6000
- Defend against the first push in the middle, close to your base
- Try to take Towers while defending when either is unguarded
- Distract the boss with a tank and send Plague Farmer to shoot it in the back
Mekgineer Thermaplugg
- Send troops to both sides to cover as much of the map as possible and get most of the Amp Switches
- Mine gold whenever possible
Watch it in action
Dungeon Strategy
Crowd Pummeler 9-60
Minis in Crowd Pummeler 9-60’s army
- Angry Chickens
- Chain Lightning (-1 level)
- Defias Bandits
- Gryphon Rider
- Harvest Golem
- Mountaineer
- S.A.F.E. Pilot
Other minis and map mechanics
Two Gnomish Harm Prevention Belts spawn on the map periodically. All minis that touch a Harm Prevention Belt receive a buff that gives them immunity to damage and knockback effects for 11 seconds. The Belt is consumed upon use, so usually only one mini can get the effect, but if the Belt spawns right on top of multiple minis, they all get the effect. If no minis pick up a Belt within 15-20 seconds, a S.A.F.E. Pilot will spawn to pick it up.
Crowd Pummeler has multiple knockback abilities that can knock your minis off the platform and into instant death. There is a targeting reticle that moves counterclockwise around the map: if it touches any of your minis, Crowd Pummeler will shoot a rocket that deals damage and knocks back minis. If you approach Crowd Pummeler, it will do a whirlwind attack, also with a knockback effect. Flying minis cannot be destroyed by throwing them off the platform because they will just fly back. Other minis may also survive if they land on top of the platform.
General strategy
Take the Meeting Stone in the middle and start attacking Crowd Pummeler with ranged minis from both sides so that the boss cannot reach all of your minis at once. Any ranged minis can be used to defeat the boss, although Plague Farmer with range is particularly effective as it can hit from outside Crowd Pummeler’s aggro range.
Flying minis are also strong, especially Gargoyle and Chimaera, because they are not destroyed by the knockback effect. Harpies are weaker because they have low Health and are destroyed by the damage.
You can also use Swole Troll that is naturally immune to knockback to tank for your minis.
Picking up Gnomish Harm Prevention Belts is useful both for the protection and for avoiding extra S.A.F.E. Pilots, but you can afford to miss some. The right Belt is usually the more important one because its effect lasts long enough for your minis to attack the boss. The left Belt is only useful defensively, so you should pick it up if you struggle with survival.
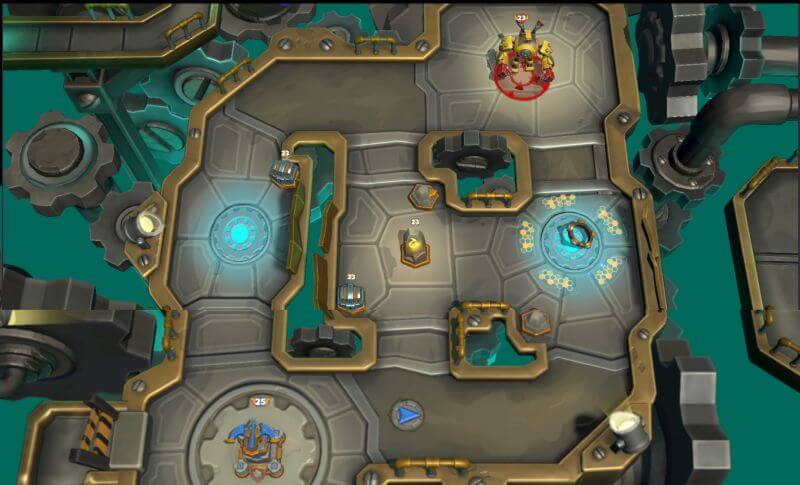
Electrocutioner 6000
Minis in Electrocutioner 6000’s army
- Chain Lightning (-1 level)
- Darkspear Troll
- Gryphon Rider
- Harvest Golem
- Mountaineer
- Spiderlings
Other minis and map mechanics
Electrocutioner has Rocket Towers and they are surrounded by a poisonous mist that deals damage to the player’s minis for as long as they stay in it.
Three Leper Gnomes spawn at 45-second intervals (3:30, 2:45, 2:00, 1:15, 0:30). The Leper Gnomes are weak melee units who are surrounded by the same mist as the Rocket Towers, dealing constant damage to any of your minis around them.
General strategy
While there is a direct path to Electrocutioner through the middle, it is very hard to make good use of it because the Rocket Towers deal so much damage. Rocket Towers also cannot be outranged, not even by a Meat Wagon. To make matters even worse, they deal piercing damage, so neither Armor nor Resist helps against them.
You usually want to take at least one Tower, preferably both, to keep your base safe, enable you to use the middle path to take the chest as it respawns, and to attack the Electrocutioner from multiple directions.
Goblin Sappers are the strongest tool for taking a Rocket Tower. If Sappers have Rocket Powered Turbo Boots, they are fast enough to evade the rocket. A pair of Sappers can take down a Tower if they are one level lower than the Tower. If the level difference is bigger, you need some way to deal additional damage to the Tower, such as Whelp Eggs.
Electrocutioner itself deals Elemental damage, so a Resistant tank can be useful against it. You can either attack with one from a Tower or you can drop a Quilboar next to the boss to turn it whichever way you want.
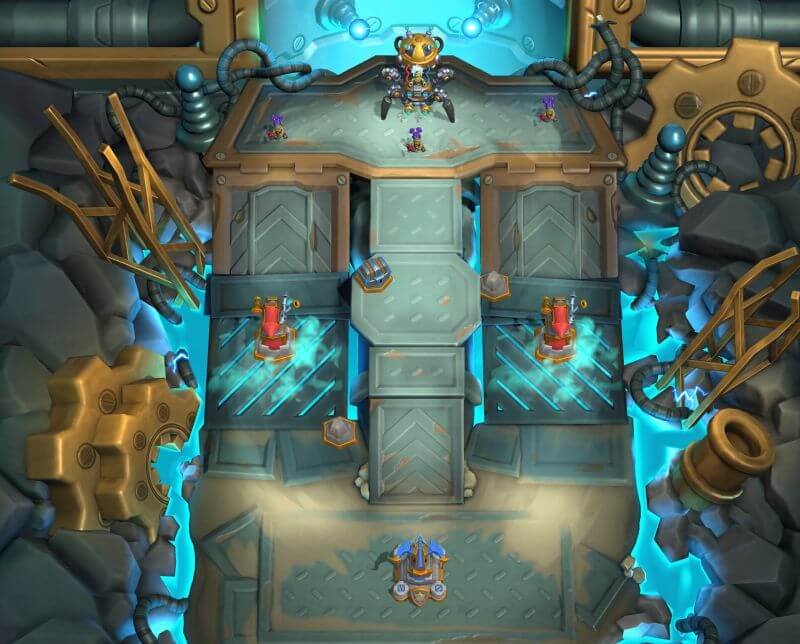
Mekgineer Thermaplugg

Minis in Mekgineer Thermaplugg’s army
- Defias Bandits
- Gnoll Brute (-1 level)
- Molten Giant
- Ogre Mage
- Prowler
- S.A.F.E. Pilot
Other minis and map mechanics
Mekgineer Thermaplugg has an 85% damage reduction and a whopping 20,000 Health. He is designed to be killed mainly by using the map mechanics, even though Execute is able to deal its full boss damage on Thermaplugg.
The damage-dealing map mechanic is Amp Switches that periodically spawn on both sides of the map. The party that destroys an Amp Switch sends a walking bomb toward the other: if you destroy one, a bomb walks to Thermaplugg, and if Thermaplugg’s minis destroy one, a bomb walks towards your base. The bombs cannot be destroyed or affected in any way.
Amp Switches cannot be destroyed by Flying units, but they can be claimed by both ground units and by spells.If you use Execute with Overpower, you can even move the spawn positions of the switches.
General strategy
Mekgineer Thermaplugg is a game of whack-a-mole. You send minis to both sides of the map and try to cover as much of it as you can so that you would be the first to claim any Amp Switches that spawn. Left, right, left, right.
In addition to sending minis on both sides, it is crucially important to mine as much as possible. Gold veins are located right next to your base, so whenever you reach a Kobold Miner, send it out. Pay attention to incoming minis so that you don’t end up losing miners and delaying important resources.
Even though Flying minis cannot be used to claim Amp Switches, they can be strong against Molten Giants and Prowlers, so if you have any in your army, you may still find good opportunities to play them.