Talent Builds
Class Tree Talent Builds
The Class and Spec Tree both have some variation of choice pending raid and M+ content,and which hero talent structure you choose to follow in Deathbringer or San’layn.
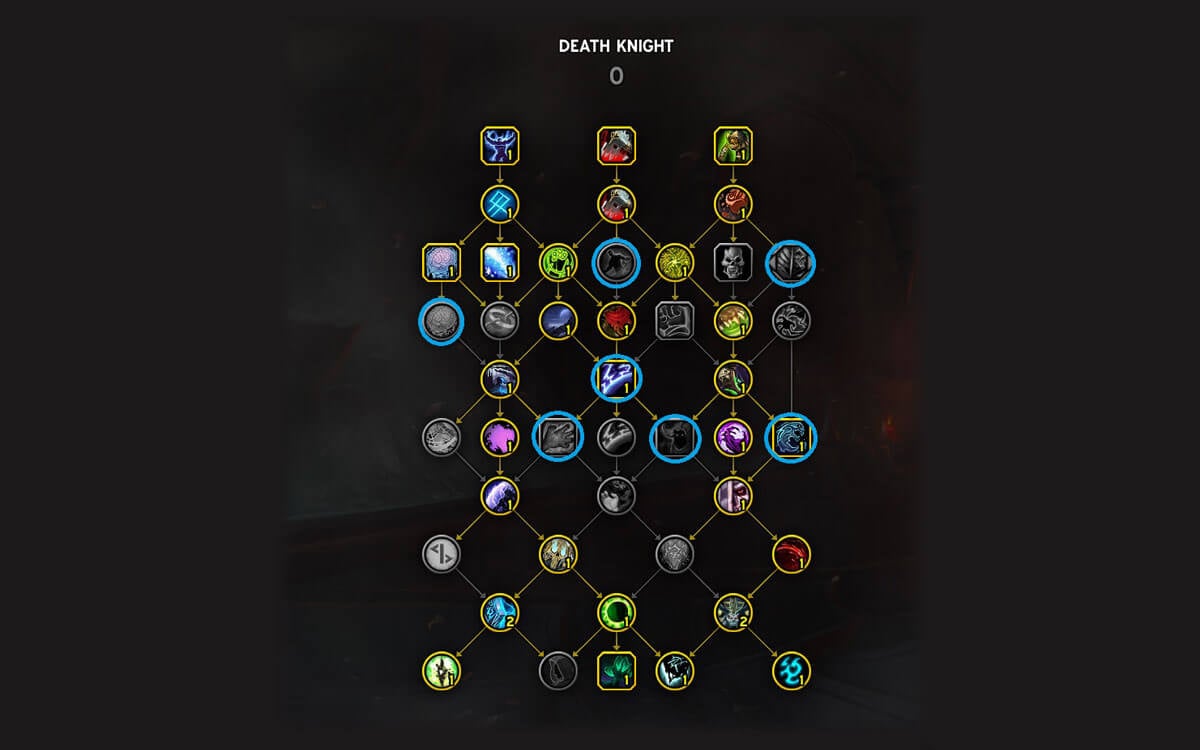
On the class tree you have the following options, you can pick 2 of the Blue Circled talents, in this build I’ve selected Soul Reaper and Anti-Magic Zone. As a default this is a build that I would recommend for all forms of content, you can drop your interrupt and blinding sleet for a raid build if not required and move points into something like Enfeeble, March of Darkness or Wraith Walk.
For M+ options if you needed another stun for example, you might elect to pick up Asphyxiate, but this is the most set and forget build for all forms of content.
Spec Tree Talent Builds
The spec tree allows you a few choices, pending again what hero talents and what content you’re doing and what is required of you in that content.

If you were set on getting Gorefiend’s Grasp then you can drop Hemostasis or Voracious to do so, I wouldn’t advise this, as again you need to think about what you’re giving up to obtain this. However, if the encounter calls for it, or you just want it cause you think it makes you cool, then go ham.
If you wanted to juice as much damage for lower or trivial content, then you could drop Purgatory and pick up Carnage which makes for a powerful combo combined with Consumption. In a raid setting you could swap out Voracious for Bloodworms also, and change Consumption to Blooddrinker (you won’t run carnage with Blooddrinker though).
You also might see lot’s of top .IO DK’s running things like Rune Tap and Umbilicus Eternus and the general thought process is I should just copy what they are doing. It’s not as simple as that though, there are niche situations where Rune Tap and Umbilicus Eternus actually have a function, but it’s generally in the 0.1% of the Blood DK population and there is every chance that it is not you.
So, what do you lose out on by copying these setups? Generally a lot of throughput both offensively and defensively, and these talents have an ability to cover up misplays to an extent which make you feel like you’re winning. I would always encourage new players to the class or lower skilled players, to fix and improve the basic fundamentals of their gameplay rather than thinking a magical talent is the answer to you dying.
Let’s start with Rune Tap and I’m paraphrasing all this from my good friends in Acherus, which I would always encourage players to go and join. When you spec into Rune Tap it means you either give up the talent Hemostasis, which is a huge amount of extra healing in *AoE scenarios, or Heartbreaker, which generates significant amounts of extra RP (aka Death Strikes) on AoE.
Pressing Rune Tap costs Runic Power; due to the fact that rune could have been used on a Heartbreaker Heart Strike instead, which in M+ situations you can generally get 1 Death Strike from Each Heart Strike.Due to this, Rune Tap comes with a significant tradeoff in overall survivability and damage all for the sake of a fairly weak cooldown that you can likely manage with the Blood DK toolkit anyway. Again there are niche situations for this, but it’s not widespread.
Another way to look at it is that using Rune Tap sacrifices long term survivability for a mild short term gain. This can create a 'death spiral' situation where using Rune Tap once makes it feel like further uses are required to stabilize, yet doing so only puts you further behind as you continue to borrow against future Death Strikes.
In cases that people have claimed to 'need' Rune Tap, it was found that they were neglecting their baseline (and free!) cooldowns, efficient usage of which would have allowed them to survive while also being able to do more overall healing to keep themselves even safer.
While you can of course play however you like, if you are finding that you feel like you need Rune Tap to survive it is recommended to first evaluate your cooldown usage (logs/log reviews are a great tool for this) and see if whatever problem you are using Rune Tap to solve could not be solved in a more optimal manner.
Now to Umbilicus Eternus.
Taking this talent means giving up Bloodshot, which I always see people throwing around comments on without actually understanding how the talent works. Bloodshot is a consistent benefit. Blood Shield is applied before damage of every Death Strike, which means all your Death Strike have the damage modifier from Blood Shot, not just when you have a Blood Shield up.
Umbilicus generally gets a lot of omg this is amazing due to it looking good on meters, however, it's absorb usually ends up stealing from other sources of healing like Death Strike/Blood Plague (since they overheal during the effect), causing it's value to be inflated.
Since absorbs are prioritized based on whichever was last applied, using Death Strike during UE causes Blood Shield to be used first, wasting it and leaving you with nothing for when UE times out.
However, not using Death Strike during UE (as the large shield incentivizes and a mistake commonly seen on UE logs) is even worse due to dropping Coagulapathy stacks and risking overcapping RP. Meaning you are forced to inefficiently Death Strike and then suffer the resulting window of vulnerability.
Umbilicus activates after Vampiric Blood, commonly the point where your health is stable and you have managed to create a significant Blood Shield, meaning this is usually the least relevant time for an additional strong shield (and often ends up causing wastage).
As mentioned with Rune Tap there are situations where Umbilicus Eternus is uniquely useful, and it should not be ignored as an option for those in those situations.
To this date not a single M+ log has been presented where Umbilicus was the only realistic way to have survived, meaning that in practice it is used as a method of covering for mistakes (which also inhibits learning) at a cost to overall performance. It is up to you to decide if that is a worthwhile trade.
Deathbringer Mythic+
CoPAAAAAAAAAAAAAAAAAAAAAAghxMzYMzMmZYGzMz0MMMzYGDAAAAAmZmZmZmZmNzMjBAAAzMzMAAAAjltBGwSwywEYYBgZwG
The general moves you’ll see in each build will be from Mythic+ build we will swap Blinding Sleet to March of Darkness you can also change this to Wraith Walk if you’d prefer. You do also have the option to swap Death’s Echo to Osmosis if you need the extra healing on sections via an activation through Anti-Magic Shell.
Deathbringer Raid
CoPAAAAAAAAAAAAAAAAAAAAAAghxYGjZmxMDzYmZmmZMMzYGDAAAAAmZmZmZmZmNzMjBAAAzMzMAAAAjltBGwSwywEYYBgZwG
If the encounter you’re doing has no need of an interrupt/add management, and you will remember to change when you leave the raid then you could use this raid build.
From the class tree we have moved Mind Freeze and Blinding Sleet to March of Darkness and Enfeeble, you can also change one of these to Wraith Walk if you like.
You do have another flex point with Soul Reaper, though I would absolutely recommend taking it, you could shift this to any of the other options listed above or Assimilation if for whatever reason that was required of you.
San’layn Mythic+
CoPAAAAAAAAAAAAAAAAAAAAAAghxMzYMzMmZYGzMz0MMMzYGDAAAAAmZmZmZmZmNzMjBAAAzMzMAAAAGYgZMassAyyA2AYGsB
The general moves you’ll see in each build will be from Mythic+ build we will swap Blinding Sleet to March of Darkness you can also change this to Wraith Walk if you’d prefer. You do also have the option to swap Death’s Echo to Osmosis if you need the extra healing on sections via an activation through Anti-Magic Shell.
San’layn Raid
CoPAAAAAAAAAAAAAAAAAAAAAAghxYGjZmxMDzYmZmmZMMzYGDAAAAAmZmZmZmZmNzMjBAAAzMzMAAAAGYgZMastByyA2AYGsB
If the encounter you’re doing has no need of an interrupt/add management, and you will remember to change when you leave the raid then you could use this raid build.
From the class tree we have moved Mind Freeze and Blinding Sleet to March of Darkness and Enfeeble, you can also change one of these to Wraith Walk if you like.
You do have another flex point with Soul Reaper, though I would absolutely recommend taking it, you could shift this to any of the other options listed above or Assimilation if for whatever reason that was required of you.
Class Talents
The Death Knight class tree is incredibly strong and offers a good variety of talents that allow Blood access to many things we haven’t had recently. We’ll go over some of the core talents, ones that you will be taking no matter what and that have a direct impact on how you play, and then situational and utility talents.
Core Talents
Icebound Fortitude
Icebound Fortitude is a 30% DR and a stun immunity for 8 seconds, Icebound Fortitude is a powerful cooldown in the Blood DK Kit. It has also seen a change from Dragonflight to TWW with it now being a 2 minute baseline cooldown without the need to use a talent point to reduce the cooldown anymore.
Improved Death Strike
Improved Death Strike is a very powerful talent that we gain access to very early on into the tree. The 5% increased Death Strike healing is nice, but the real power comes from the 5 runic power cost reduction. This, tied with other talents like Ossuary, allows us to cast Death Strike very frequently due to the heavily reduced runic power.
Cleaving Strike
Another talent that buffs Death and Decay, Cleaving Strike allows you to cleave an additional 3 enemies whilst standing inside your Death and Decay. You also retain this bonus effect for 4 seconds when you leave your Death and Decay.
Anti-Magic Barrier
Anti-Magic Barrier has been incredibly powerful for a very long time, it just had the unfortunate situation of sharing the row with Will of the Necropolis. Now, with the talent trees, we gain access to it with very little cost. In situations where AMS is good this talent just makes it better.
Unholy Ground
Unholy Ground is one of the many talents that buffs Death and Decay, Unholy ground provides you with 5% increased haste while standing inside your Death and Decay. Similar to Improved Bone Shield and many other haste effects, this effect is multiplicative.
Permafrost
While it looks rather bland, Permafrost tied with other talents like Gloom Ward and Icy Talons on the class tree, and Sanguine Ground on the spec tree, become a very powerful passive ability. Being a 2-handed weapon spec, Blood’s melees typically hit for a decent amount. This tied with the auto attack speed increase from Icy Talons and haste, along with the absorb size increases from Gloom Ward, Sanguine Ground, and Vampiric Blood, allow for Permafrost to be quite a potent talent and absorb a lot of damage that comes your way.
Icy Talons
The 18% increased auto attack speed that Icy Talons gives is a very strong effect. Not only does it increase the amount of damage that our auto attacks do, but it also provides a lot of defensive benefit from Permafrost, and minor benefit from Runic Attenuation. In fact the benefit is so potent that you should strive to have 100% uptime on this buff throughout any encounter.
Gloom Ward
Gloom Ward is another simple, but very powerful talent. A flat 15% increase to absorbs is incredibly powerful once you start looking at how many absorbs blood actually has. Permafrost, as mentioned above, Anti-Magic Shell, and Blood Shield, from our mastery, all benefit. Gloom Ward also increases the value of external absorbs as well. So abilities like Power Word: Shield and Life Cocoon are increased, as well as absorb based trinkets.
Anti-Magic Zone
Anti-Magic Zone is a great raid cooldown that Death Knights bring. 20% magic damage reduction is very strong in certain encounters and your raid leader will love you for taking it. Do note that it is not increased by Gloom Ward despite stating that it is an absorb, this is similar to how Will of the Necropolis is treated.
Soul Reaper
Soul Reaper is VERY strong on pure single target fights, especially with the change to be copied by Dancing Rune Weapon and the rework of Eternal Bond to have the second weapon apply its own debuffs. The new talent tree moves enables us to flex pick this talent and now basically provides us with an easy to pick up execute. You do gain the talent also in a sense via Grim Reaper, but that comes linked to Reaper’s Mark, Soul Reaper is a fantastic addition to the kit for Raid and M+ now with no real downside to picking it up.
Unholy Endurance
Unholy Endurance is actually a rework of a mainstay Conduit from Shadowlands, Hardened Bones. In fact, it’s been buffed from its Shadowlands version to give even more damage reduction as well as increase the duration of Lichborne by 2 seconds. This adds another powerful cooldown to Bloods arsenal and is definitely a must take.
Will of the Necropolis
This staple of Blood is making a return yet again and is just as potent as ever. This effect allows you to dip below 30% without much worry and provides a very good safety net. I will note that even though the game displays Will of the Necropolis as an absorb, and things like Details! and Warcraft logs treat it as one, it is not affected by Gloom Ward, and it showing up as an absorb is just the game’s way of presenting it to you.
Abomination Limb
Abomination Limb has been redesigned in The War Within, with the talent no longer granting bone shield charges. However, pairing this talent up with Bone Collector will see the talent generate more bone shield charges in AOE situations than we had in Dragonflight so the talent is still a strong choice in that avenue.
Vestigial Shell
Vestigial Shell causes Anti-Magic Shell to additionally grant 2 nearby allies a lesser version of the spell, that will reduce magic damage taken, but also reduce the duration of harmful magic effects against them by 50%. This is going to have fantastic applications in both M+ and Raid.
Subduing Grasp
Subduing Grasp causes enemies you grip to deal 6% reduced by damage to you for 6 seconds. This coupled with Abomination Limb and death grip means you can take advantage of an easy access DR if the mob is grippable.
Null Magic
Null Magic: Magic Damage taken is reduced by 8% and the duration of harmful magic effects is reduced by 35%. This furthermore powers Blood DK’s toolkit and its ability to deal with magic debuffs.
Situational Talents
Blinding Sleet
Blinding Sleet is very good for Blood. It’s an uncapped AoE stop that doesn’t share diminishing returns with many other stops. It’s relatively short cooldown of 1 minute and the 50% slow afterwards make it a very powerful tool for M+.
Coldthirst
Coldthirst causes successful Mind Freeze interrupts to grant an additional 10 runic power and reduce mind Freezes cooldown by 3 seconds.
Asphyxiate
Asphyxiate, the single target stun we have come to know and love is still available to us. It’s a bit outshined by Blinding Sleet, but there are certain situations where it’s still very powerful and it’s a good tool to have in Blood’s toolkit.
Death’s Echo
Whilst not as heavily required in The War Within, thanks to the change to Cleaving Strikes and that Perseverance of the Ebon Blade is now a default pick in the spec tree, Death’s Echo is still a very solid quality of life talent choice. It not only nets you an extra charge of Death Grip, but it also allows you to maintain an incredibly high uptime on Death and Decay with minimal effort or proc reliance.
Osmosis
Osmosis enables you to turn AMS into another increased healing cooldown. It’s need will likely be very niche and not an often choice for a pathway in the tree, but it’s good to have the option if certain encounter checkpoints called for it.
Never take these
Blood Scent
Blood Scent only grants leech which has never really been a strong secondary for Blood and nothing has changed.
Proliferating Chill
Chains of Ice is a button you almost never ever press as Blood, so spending a talent point on Proliferating Chill to make it hit an additional target is worthless and should be avoided at all costs.
Death Pact
Death Pact is just a worse Death Strike on a two minute cooldown with downsides. Never ever take this.
Spec Talents
Dancing Rune Weapon, Insatiable Blade, and Everlasting Bond
Dancing Rune Weapon is an offensive and defensive button packed into 1 cooldown, you gain 35% parry chance on its activation, plus its ability to copy abilities in our toolkit. Insatiable Blade causes your activation of Dancing Rune Weapon to grant 5 Bone Shield Charges, and when a Bone Shield charge is consumed the cooldown of Dancing Rune Weapon is reduced by 5 seconds. Everlasting Bond summons an additional copy of the Rune Weapon and increases its duration by 6 seconds.
Coagulopathy
Coagulopathy is a flat 5% damage increase to targets affected by your Blood Plague. This means you always want to have Blood Plague up on every target you are attacking. Additionally, your rune weapons also benefit from this, so make sure to apply their Blood Plagues as soon as they are summoned. The second part of Coagulopathy is a damage increase to Blood Plague itself by 30%, stacking up to 5 times for a total of 150%. This makes Blood Plague hit VERY hard, especially in AoE, and is the second buff you gain that requires you to Death Strike often to keep it up.
Sanguine Ground
Sanguine Ground is another reason to always be inside Death and Decay. A 6% damage increase and 5% healing increase is nothing to scoff at. This talent alone would be enough to warrant standing in Death and Decay as much as possible.
Shattering Bone
Shattering Bone does an absurd amount of damage, both on single target and in AoE, and is the biggest reason to strive for 100% uptime on Death and Decay. The damage done by Shattering Bones is tripled while you are inside Death and Decay. This, on top of it being uncapped AoE makes this talent one of the strongest ones on the Blood spec tree.
Bloodshot
Bloodshot is absolutely amazing. Currently how the game works is that when you Death Strike, Blood Shield is applied before the damage event, meaning you get the 25% physical damage increase to every single Death Strike. However, this is a bug, and the devs have stated that they will fix it, but until they do this talent is an incredibly potent damage option for both raid and M+. Once it’s fixed, you’ll likely drop it for M+, but it will still be worth it in raid.
Bone Collector
Bone Collector makes it when you pull an enemy you generate 1 charge of Bone Shield. With the change that came to Abomination Limb in removing gained charges of Bone Shield, this talent is a huge addition to plugging that hole. This actually works out better in large AoE-situations than the previous version. It does suffer in single target in comparison with the old version of Limb, but we can certainly make do. This talent also feeds very nicely into the Season 1 tier set bonus.
Red Thirst
Red Thirst got an upgrade coming into The War Within. It was condensed from a 2 point node to a single spend node, now giving you the full value at only a 1 point spend. This reduces the cooldown on Vampiric Blood by 2 seconds per 10 runic power spent. This talent brings the total uptime of Vampiric Blood to around 45-50% and just adds to the power of this cooldown.
Tombstone
Tombstone has had a hell of a glow-up the last few tiers. While the spell itself hasn’t changed, the interactions it has with other abilities has caused its value to skyrocket. In season 3 and 4 of Shadowlands it was primarily used to reduce the cooldown of Dancing Rune Weapon to obtain very high levels of uptime on the ability. In Dragonflight, it has done so much more. In fact, it does so much that it has become our single most important and impactful cooldown.
There are 3 considerations you should make around your Tombstone usage
- You’ll gain more than 20 seconds of CDR from Tombstone on your DRW
- You’ll consume 5 Bone Shield charges
- You’re standing inside your Death and Decay
When you use Tombstone correctly it will:
- Give you a 30% max HP absorb shield
- 30 runic power
- Up to 25 seconds of cooldown reduction on Dancing Rune Weapon from Insatiable Blade
- Deal 160% AP uncapped AoE damage from Shattering Bones
Proper usage of Tombstone will make or break how much damage you do.
Consumption
Consumption is back! Not like it was in Legion, but at least we can press it again. This strikes all enemies in front of you and heals you for 150% of the damage done on a 30 second cooldown. The real value however comes in the fact that it causes your Blood Plague damage to occur 30% quicker for 6 seconds, which feeds amazing into Infliction of Sorrow if you’re playing San’layn, and also directly interacts with Coagulopathy causing a big amp to your damage and bonus healing via Blood Plague. To ice the cake you also get 2 runes refunded each time you press this.
Blooddrinker
Blooddrinker is a solid raid talent choice, the big advantage with Blooddrinker is that you can actually be channeling this as you run into melee range on the boss, and cast Dancing Rune Weapon at the same time without breaking the channel. Whilst channeling the selected enemy deals 15% reduced damage to you, which also lasts for a further 5 seconds after completion of the channeled cast.
Carnage
Carnage is the new talent on the block, this causes Blooddrinker and Consumption to now contribute to your Mastery: Blood Shield. Each time an enemy strikes your Blood Shield, the cooldowns of Blooddrinker and Consumption (whichever you have talented) have a chance to be reset. This proc is hasted, and the talent is very valuable in M+ when paired with consumption though due to the nature of raiding and varied uptime on taking direct damage from the boss it’ll be unlikely that this is a recommended raid talent choice.
Bonestorm
It took a long time, but we are finally back. Bonestorm is once again a standard pick in your talent pathways, due to the huge ability to impact cooldown reduction on Dancing Rune Weapon. Bonestorm can consume up to 5 Bone Shield charges at once, netting you a max of 25 seconds CDR on your Dancing Rune Weapon. You combine this with Tombstone and you have some nutty uptime on DRW. Bonestorm also feeds into Shattering Bone making this a very satisfying button press once again.
Hero Talents
Hero Talents become available at level 71 and as you level you unlock each talent slot on the chosen trees. Blood Death Knights have a choice between San’layn (the right side) and Deathbringer (the left side).
It’s important to highlight, straight off the bat, that unless you’re chasing the boundaries of cutting edge content in a raid environment or mythic+, both hero talents are viable and suitable for all available content.
Deathbringer
In the iced up halls of the mountain kings, deathbringer sits on a throne of rewarding gameplay loops and cool ass visuals. Deathbringer offers a reward for solid gameplay and delivers a thematic point that I honestly think San’layn failed to capture. (Shit this guide bro is biased).
Deathbringer’s gameplay revolves around the talent Reaper’s Mark, this ability impacts a single enemy, with a 10 second debuff, this debuff stacks to a max of 40, then explodes for damage.
The way you build these 40 stacks is linked to your rotational gameplay. Good rotational gameplay will see you making 40 stacks for a big bang, poor rotational gameplay will see fall short. The Deathbringer hero talent tree is built to assist you though, thus striking an awesome balance between the hero talents and the class itself.
How Do The Stacks Work?
Explain the stacks to me like I’m 5, do I get 1 stack per button press or what’s the go? Is it spammy to reach 40 stacks?
Your stacks are generated via shadow damage, with special shadowfrost damage netting you extra stacks. The Deathbringer talent tree arms you with a range of talents that make all of this very manageable just by executing your rotation. To highlight some of these key talents
- Bind In Darkness causes your Blood Boil’s damage type to be changed to Shadowfrost damage. It also causes Shadowfrost damage to apply 2 stacks to Reaper’s Mark and 4 stacks for Critical Strikes.
- Wither Away causes your Blood Plague to tick 100% faster meaning more stacks.
- Dark Talons - This causes your Marrowrend and Heart Strikes to have a 25% chance to grant 3 stacks of Icy Talons and increase its max stacks. It also causes your Runic Spending abilities to count as Shadowfrost damage whilst Icy Talons is active.
What’s The Chop With Reaper’s Mark?
If you have Reaper’s Mark on a target and the debuff detonates, or that target dies before the debuff can actually detonate OR if that target falls below 35% health, then your next 2 Marrowrend casts will come at a reduced cost of one rune and summon 2 scythes to strike your enemies.
So the good thing from this straight away is that for all your marrowrends now you will basically be always casting them at a reduced cost, which is amazing for our gameplay loop. When you cast your empowered marrowrend it will also trigger the capstone of the Deathbringer hero talent tree Exterminate, this causes thematically awesome Scythes to strike out at enemies around you, Exterminate also has a small chance to re-apply Reaper’s Mark to a target (build the stacks again and away you go).
So When Do I Send Reaper’s Mark?
From a rotational aspect you want to be hitting Reaper’s Mark just before your Dancing Rune Weapon in your set up, but you also want to get the most out of your Wave of Souls as it deals a huge portion of your damage, as the cd is a short 45 seconds, it’s not worth holding for long periods if you can line it up with a large pack in M+ then it’s worth a few seconds, otherwise just send it on down the line.
The Deathbringer Hero Talents
- Wave of Souls - causes your application of Reaper’s Mark to send forth a large burst of damage by sending shadowfrost damage both ways (out and back) through enemies caught in its path. Wave of Souls is always a critical strike on the pathway back through enemies also, causing enemies to take 5% increased shadowfrost damage for 15 seconds. The reason you want to send this just prior to your Dancing Rune Weapon is to maximize stacks and damage, that doesn’t mean you want to overly delay in casting, but do use your brain around getting max value in a pack from it, rather than casting it into a single mob then moving into a pack etc.
- Soul Rupture when Reaper’s Mark detonates it explodes dealing 20% of the damage dealt to nearby enemies. There is also a defensive gain to this, in that enemies hit by this deal 5% reduced physical damage to you for 10 seconds.
- Grim Reaper, Reaper’s Mark initial strike grants 3 charges of Bone Shield. Reaper’s Mark explosion deals up to 30% increased damage based on your target's missing health.
- Reaper of Souls - When you apply your Reaper’s Mark the cooldown of Soul Reaper is reset. Your next Soul Reaper costs no runes, and it explodes on the target regardless of their health (instead of the 35%) Soul Reapers damage is also increased by 20%.
- Rune Carved Plates gives us extremely high uptime on 7.5% Physical and Magic DR. Rune Carved Plates create a really fine balance between your ability to spend runes and generate runes. Having a 5 stack of each (spent and earned) nets you 7.5% DR and this can refresh at 5 stacks; however, the window is very tight and rotational misplays will punish you in regard to this buff uptime. At higher haste values, it should become easier, but for the first season 1 of the TWW this is going to require some brain power in your rotation.
- Swift and Painful - If no enemy is struck by your soul rupture, you gain 10% strength for 8 seconds. Wave of Souls is 100% more effective on the main target of your Reaper’s Mark.
Your Deathbringer Talent setup will look like this.
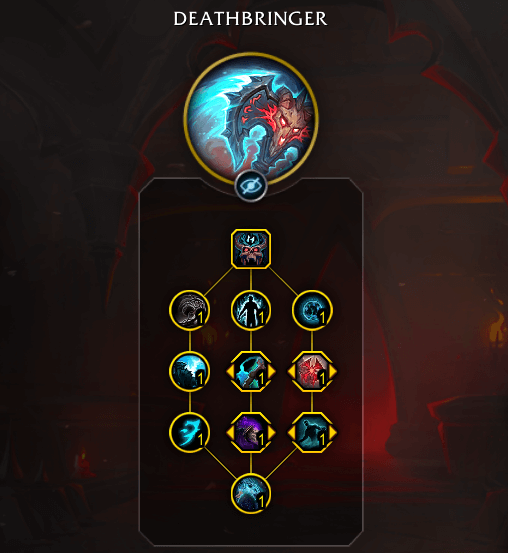
At the moment you are actually heavily locked into these choices without the real choice to change anything. In heavy caster M+ environments you could maybe build a niche case for expelling shield, but you’re giving up an extremely shortened Lichborne CD at a 15% DR on demand for that.
What About Exterminate Procs? (The Big Scythes From My Marrowrends)
Exterminate does A LOT of damage, on Single Target if you have a proc’d exterminate just send it, however if you have 2 proc’d (If playing Painful Death) don’t just drill them back to back, you still want to make some use of recovering Bone Shield charges with your reduced Marrowrend cost. Also avoid using Exterminate in Dancing Rune Weapon, if you can, if you were going to send a Marrowrend to recover stacks then go nuts, but if not, wait till DRW is finished as you’re better off using Heart Strike in your DRW window.
For AOE situations/M+ most of the same rules apply, it’s a huge damage gain to send your Exterminate. The important thing, as mentioned above, is to avoid sending these back to back (if you’re playing Painful Death) but don’t sit on your charges. You have 45 seconds to use your second charge if playing Painful Death, and the biggest decision you need to make is can you use your second exterminate to possibly mark another enemy or can you hold it in time to get into another pack/ find a new enemy to chance mark. Remember with Painful Death your Exterminates have a 30% chance to apply a new Reaper’s Mark but it can’t mark the same original target you sent your original Reaper’s Mark into.
San’layn
When Alpha first dropped for The War Within it was no secret this was the juicer of the 2 hero builds, it was the kid that had been coming to the gym for 6 months, only wearing a stringer singlet, and had somehow managed to gain 10kgs of muscle by “just eating clen and trening hard bro”.
We saw a number of changes through BETA cycles and now several changes since TWW launched, unfortunately San’layn has failed to hit the mark which each dartboard shot from a number perspective, always leaving it the weaker of the 2 hero systems at patch 11.0.5 is no different.
San’layn revolves all around the use of Dancing Rune Weapon, and wanting to press it off cooldown. Playing San’layn means you gimp your own performance essentially if you sit on your dancing rune weapon as it’s now a core part of your rotational gameplay within this hero system. This means you want to be leveraging your abilities like Bonestorm and Tombstone within your rotation optimally now as this is the fastest way to reduce the cooldown on your Dancing Rune Weapon. Luckily this is easy to to do your aim is to always cast bonestorm first at 5+ boneshield charges when standing in your own death and decay, then use Tombstone at 5+ boneshield charges against whilst in your death and decay, this nets you the fastest possible CDR to your Dancing Rune Weapon.
This change to San’layn also has a positive passive impact as San’layn will function well in M+ due to constant auto attacks helping to chip away at your Bone Shield (1 charge every 2.5 seconds at max in combat) so this is a welcome change.
The first talent on the talent tree is Vampiric Strike, this replaces your heart strike either when you get a proc of Essence of the Blood Queen via Death Strike or when Dancing Rune Weapon is active. You can proc a Vampiric Strike after a Death Strike but the chance is fairly low at 35% each cast but during Dancing Rune Weapon your heart strike will always be replaced for the duration with Vampiric Strike.
Vampiric Strike heals you for 1% of your max HP and grants you stacks of Essence of the Blood Queen, these stacks last for 25 seconds and refresh on application. Each stack grants you 1% haste, capping at 5 stacks or 5% haste. Thanks to the bottom capstone talent Gift of the San’layn your Essence of the Blood Queen effects are increased by 200% during Dancing Rune Weapon
From inception San’layn has been plagued with issues from a performance perspective when placed next to Deathbringer. The idea was to have this fast past ravager styled hero system, and when it was designed around Vampiric Blood (even with all its faults) you had that degen gameplay loop and you sort of got a sense of that frenzy styled play.
In the latest search for a fix it has been changed to active from Dancing Rune Weapon, which as mentioned is a better change. But honestly, it just feels really lackluster to play and boring (except for that one pack in the dungeon where you get Blood Beast RNG and do 4 million dps, that’s cool). There are positives for sure, we get Vampiric Blood back as a cooldown you can allocate to better use, but when you switch from DB to San’layn you really notice how empty it feels. The week after patch 11.0.5 dropped Blizzard hit another load of buffs to San’layn in the hopes it’ll push people towards it. I think this is a real shame on what this hero talent system could have been and what it’s ended up as sadly.
The San’layn Hero Talents
The hero talent tree for San’layn is built around building up stacks of Essence of the Blood Queen to increase your haste, leech and stack damage modifiers. Some of the key talents in the tree are
- Vampiric Strike Gives your death coil and death strike a 35% chance to make your next Heart Strike become a Vampiric Strike.
- Blood-Soaked Ground gives you a 5% Physical DR whilst standing in your Death and Decay and you also gain an extra 5% chance to proc a Vampiric Strike.
- Vampiric Aura gives you empowered leech when Lichborne is active and enables this to 4 allies within 12 yards.
- Frenzied Bloodthirst grants you 2 additional stacks of Essence of the Blood Queen (making this 7 stacks at 7% haste) and Increased the damage of your Death Strike by 6% per stack
- Infliction of Sorrow does bonkers damage this also feeds into Vampiric Strike, as when Vampiric Strike damages an enemy with Blood Plague it extends the duration of the disease by 3 seconds and deals 10% of the remaining damage to the enemy.
- Incite Terror causes Vampiric Strike and Heart Strike to cause targets to 1% increased Shadow Damage up to 5% for 15 seconds and Vampiric Strike benefits from Incite Terror at 400% effectiveness.
Your talent setup for San’layn will look like this
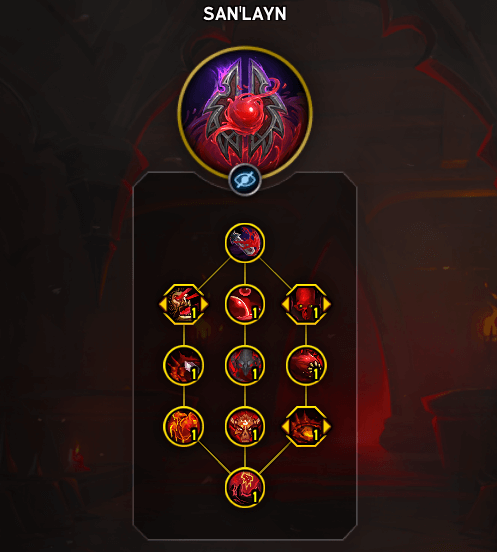
Changes you can make:
- You do have the option to change from Vampiric Aura to Bloody Fortitude if you require the reduced cooldown on Ice Bound Fortitude.
- You can also swap Sanguine Scent for Pact of the San’layn.
So How Do You play it?
As mentioned San’layn revolves around Dancing Rune Weapon and your ability to work with Bonestorm and Tombstone to set those windows up as quickly as possible for each rotation and then filling GCD’s with Vampiric Strike. It’s not all mindless spam though, you do need to set your Dancing Rune Weapon windows up to maximize throughput.
Before Dancing Rune Weapon
- Refresh your Bone Shield stacks/charges, the last thing you want to be doing is spending 2 runes on a marrowrend in your Dancing Rune Weapon window.
- Death Strike just prior to pressing Dancing Rune Weapon this will ensure you have the coagulopathy buff, as this feeds into Blood Plague damage.
- Blood Boil so all targets are affected by Blood Plague
- Drop Death and Decay for cleaving strikes and the extra haste, damage and healing.
- Then hit your Dancing Rune Weapon and start spending runes on Vampiric Strike.
During Dancing Rune Weapon
- Still press Death Strike to avoid lengthy times at Runic Cap or when you need healing, you also need to maintain the coagulopathy buff by pressing your Death Strike once every 8 seconds, so don’t avoid it.
- Press Vampiric Strike, you're going to be spending all your runes basically on this as it will also refresh your Blood Plague and build stacks of Essence of the Blood Queen.
- When your Dancing Rune Weapon hits 4 seconds remaining, use Consumption as this will cause your Blood Plague to tick faster feeding further into Infliction of Sorrow. This will also net you back 2 runes, and you want to ensure your last GCD in Vampiric Blood is a Vampiric Strike to refresh your buff and stacks.
Once your Dancing Rune Weapon window is done use Heart Strike to consume Blood Plague (function with Infliction of Sorrow) and then use Blood Boil to re apply Blood Plague.
So Which Hero Talent Do You Choose?
As I mentioned at the start of the Hero Talent system, if you fit into 99% of the WoW population that isn’t on the bleeding edge of content you can pick whatever takes your fancy and lines up with your own sense of fantasy, we are after all, playing a game here. If however, you do want the best choice via numbers then here it is.
Mythic+ (Deathbringer)
Even in Patch 11.1 I still feel that Deathbringer is the reliable winner when it comes to a clear line of performance output in keys. The hero talent tree was designed so well to reward good game play backed with hero talents that fed into and improved our existing toolkit, your rotation is backed with a near perm 10% DR via Rune Carded Plates, Wave of Souls adds a further 5% DR to that also and you get these huge scythes that smashing out of you and into enemy mobs. It’s safe, it’s reliable, it’s consistent.
San’layn is certainly viable, and it can pump huge numbers from a damage output perspective; however, it's a complete gamble if your rocket takes off to the moon or if you crash harder than the cast of Twilight. Defensively it also lacks in comparison to Deathbringer, but if you certainly do have what we always wanted: choice.
Raiding (Pick Your Hero)
Patch 11.0.5 changed the landscape in raid somewhat, and the same continues into Patch 11.1 I still think DB is the safe pick of the two regarding steady line performance. The hero spec is fairly easy to play around, it has a fantastic interactive toolkit that comes with both offensive and defensive value. San’layn on the other hand if played really well with a high haste build will likely win out in Single Target encounters for the majority of the raid encounters, but doesn’t feel as rewarding to play in my opinion and lacks any real defensive benefits which you gain via Deathbringer.
One thing is for certain though, you do have a choice now and San’layn can pump some damage, especially whilst the bug (which I assume will eventually be fixed) exists with Unholy Bond, at the moment the build along with Rune of Sanguination is propping San’layn up, due to it causing Death Strike to be bugged giving it an extra 20% value.