Blackfathom Deeps Dungeon Guide
Learn how to complete the Blackfathom Deeps mission in Warcraft Rumble. Follow our suggested build and strategy for Blackfathom Deeps.
In this guide to the Blackfathom Deeps dungeon in Warcraft Rumble, I showcase strong armies for completing the dungeon at red difficulty with various Leaders and go through each boss fight in detail.
The comps include quick instructions for the fights and you can refer to the boss descriptions for full details on all mechanics.
Best Builds
-
 Alliance
-
 Beast
Beast
-
 Blackrock
-
 Cenarion
-
 Horde
Horde
-
 Undead
Arthas with Chimaera


rumblo:CF4QABoECEQQAhoECF0QABoECEYQABoECFkQAhoECBkQABoECCQQAg==
Important talents
- Pyroblast on Pyromancer helps to clear Gargoyles on Baron Aquanis, but is not mandatory.
Grglmrgl
- Attack through the right Tower
- Use a Chimaera to kill the Murloc that shoots at your base from the ledge; prevent the respawns from reaching the ledge when you control the right Tower
Baron Aquanis
- Defend against Gargoyles with Pyromancer or Chimaera
- Take the two Towers closest to your base to secure your base
- Use Earth Elemental to tank the left Tower: damage can come from Chimaera that flies there or from Plague Farmer from the left edge of the middle lane
Aku’mai
- Take the Tower and defeat the head on the left at the start
- Defend your Tower and take down the remaining heads
Watch it in action
Malfurion with Whelp Eggs
rumblo:CDkQAhoECBUQAhoECDMQARoECCQQAhoECEQQAhoECFgQARoECEYQAA==
Important talents
- Pyroblast on Pyromancer helps to clear Gargoyles on Baron Aquanis, but is not mandatory
- Splashing Pumpkins on Plague Farmer helps the splash reach targets in the back
Grglmrgl
- Attack through the right Tower
- Use Whelp Eggs to kill the Murloc that shoots at your base from the ledge
Baron Aquanis
- Defend against Gargoyles with Pyromancer, Malfurion, and dropping Whelp Eggs into poison as Gargoyle flies above it
- Take the two Towers closest to your base to secure your base
- Use Earth Elemental to tank the left Tower, and drop Whelp Eggs into the poison pool to pop them and get the Whelps to attack the Tower
Aku’mai
- Take the Tower and defeat the head on the left at the start
- Defend your Tower and take down the remaining heads
Watch it in action
Tirion
rumblo:CFMQABoECC4QABoECFoQARoECCQQAhoECEwQARoECBkQABoECEYQAQ==
Important talents
- Obsidian Shard on Earth Elemental helps it tank Grglmrgl considerably longer.
- Pyroblast on Pyromancer helps to clear Gargoyles on Baron Aquanis, but is not mandatory.
- You cannot use the 5-Man talent on Skeleton Party because you do not want Skeleton Party to Taunt Grglmrgl. Using the Party without a talent is better than using 5-Man in this dungeon.
Grglmrgl
- Use Unbound minis to attack the boss
- You generally do not need to defend
- Any non-unbound minis you use can pick up chests near your base
Baron Aquanis
- Defend against Gargoyles with Pyromancer
- Take the two Towers closest to your base to secure your base
Aku’mai
- Take the Tower and defeat the head on the left at the start
- Defend your Tower and take down the remaining heads
Maiev
rumblo:CDgQAhoECC4QABoECDMQARoECEwQARoECCQQAhoECBkQABoECFgQAQ==
Important talents
- Obsidian Shard on Earth Elemental helps it tank Grglmrgl considerably longer.
- You cannot use the 5-Man talent on Skeleton Party because you do not want Skeleton Party to Taunt Grglmrgl. Using the Party without a talent is better than using 5-Man in this dungeon.
Grglmrgl
- Use Unbound minis to attack the boss
- You generally do not need to defend
- Any non-unbound minis you use can pick up chests near your base
Baron Aquanis
- Defend against Gargoyles with Chimaera and Skeleton Party
- Take the two Towers closest to your base to secure your base
Aku’mai
- Take the Tower and defeat the head on the left at the start
- Defend your Tower and take down the remaining heads
Anub'arak Blackfathom Deeps

Anub’arak is so strong that it requires very little specific adjustments to clear Blackfathom Deeps.
Important talents
- Explosive Shells on Anub’arak is vital to make the Leader work in general, and Blackfathom Deeps is no exception.
- Pyroblast on Pyromancer helps to clear Gargoyles on Baron Aquanis, but is not mandatory.
- Lock Pick on Defias Bandits can increase your income, especially on Grglmrgl, but it is not mandatory either.
- Ritual of Rime allows you to use Skeleton Party on the bridge on Aku’mai to guard your Tower. It is not mandatory either. However, you cannot use the 5-Man talent because you do not want Skeleton Party to Taunt Grglmrgl. Using the Party without a talent is better than using 5-Man in this dungeon.
Grglmrgl
- Use Unbound minis to attack the boss
- You generally do not need to defend
- Any non-unbound minis you use can pick up chests near your base
Baron Aquanis
- Defend against Gargoyles with Pyromancer and Beetles
- Take the two Towers closest to your base to secure your base
Aku’mai
- Take the Tower and defeat the head on the left at the start
- Defend your Tower and take down the remaining heads
Watch it in action
Charlga Blackfathom Deeps
Important talents
- Bloodthirsty on Execute is essential: you use Execute to provide Bloodlust. If you do not have the talent, you can use Defias Bandits instead.
- Obsidian Shard on Earth Elemental helps it tank Grglmrgl considerably longer.
- Pyroblast on Pyromancer helps to clear Gargoyles on Baron Aquanis, but is not mandatory.
- Ritual of Rime allows you to use Skeleton Party on the bridge on Aku’mai to guard your Tower. It is not mandatory either. However, you cannot use the 5-Man talent because you do not want Skeleton Party to Taunt Grglmrgl. Using the Party without a talent is better than using 5-Man in this dungeon.
Grglmrgl
- Use Unbound minis to attack the boss
- You generally do not need to defend
- Any non-unbound minis you use can pick up chests near your base
Baron Aquanis
- Defend against Gargoyles with Pyromancer
- Take the two Towers closest to your base to secure your base
Aku’mai
- Take the Tower and defeat the head on the left at the start
- Defend your Tower and take down the remaining heads
Watch it in action
Hogger Blackfathom Deeps
Important talents
- Bloodthirsty on Execute is essential: you use Execute to provide Bloodlust. If you do not have the talent, you can use Quilboar instead.
- Obsidian Shard on Earth Elemental helps it tank Grglmrgl considerably longer.
- Pyroblast on Pyromancer helps to clear Gargoyles on Baron Aquanis, but is not mandatory.
- Ritual of Rime allows you to use Skeleton Party on the bridge on Aku’mai to guard your Tower. It is not mandatory either. However, you cannot use the 5-Man talent because you do not want Skeleton Party to Taunt Grglmrgl. Using the Party without a talent is better than using 5-Man in this dungeon.
Grglmrgl
- Use Unbound minis to attack the boss
- You generally do not need to defend
- Any non-unbound minis you use can pick up chests near your base
Baron Aquanis
- Defend against Gargoyles with Pyromancer
- Take the two Towers closest to your base to secure your base
Aku’mai
- Take the Tower and defeat the head on the left at the start
- Defend your Tower and take down the remaining heads
Watch it in action
Old Murk-Eye Blackfathom Deeps
Important talents
- Bloodthirsty on Execute is essential: you use Execute to provide Bloodlust. If you do not have the talent, you can use Quilboar instead.
- Obsidian Shard on Earth Elemental helps it tank Grglmrgl considerably longer.
- Pyroblast on Pyromancer helps to clear Gargoyles on Baron Aquanis, but is not mandatory.
- Ritual of Rime allows you to use Skeleton Party on the bridge on Aku’mai to guard your Tower. It is not mandatory either. However, you cannot use the 5-Man talent because you do not want Skeleton Party to Taunt Grglmrgl. Using the Party without a talent is better than using 5-Man in this dungeon.
Grglmrgl
- Use Unbound minis to attack the boss
- You generally do not need to defend
- Any non-unbound minis you use can pick up chests near your base
Baron Aquanis
- Defend against Gargoyles with Pyromancer
- Take the two Towers closest to your base to secure your base
Aku’mai
- Take the Tower and defeat the head on the left at the start
- Defend your Tower and take down the remaining heads
Watch it in action
Doomhammer Blackfathom Deeps
rumblo:CB8QAhoECFkQAhoECCQQAhoECEwQAhoECAkQABoECEYQABoECFgQAQ==
Important talents
- Bloodthirsty on Execute is essential: you use Execute to provide Bloodlust. If you do not have the talent, you have a lot of options you can use instead, such as Defias Bandits, Darkspear Troll, or Quilboar.
- Obsidian Shard on Earth Elemental helps it tank Grglmrgl considerably longer.
- Pyroblast on Pyromancer helps to clear Gargoyles on Baron Aquanis, but is not mandatory.
- Ritual of Rime allows you to use Skeleton Party on the bridge on Aku’mai to guard your Tower. It is not mandatory either. However, you cannot use the 5-Man talent because you do not want Skeleton Party to Taunt Grglmrgl. Using the Party without a talent is better than using 5-Man in this dungeon.
Grglmrgl
- Use Unbound minis to attack the boss
- You generally do not need to defend
- Any non-unbound minis you use can pick up chests near your base
Baron Aquanis
- Defend against Gargoyles with Pyromancer
- Take the two Towers closest to your base to secure your base
Aku’mai
- Take the Tower and defeat the head on the left at the start
- Defend your Tower and take down the remaining heads
Watch it in action
Thaurissan with Unbounds
rumblo:CCUQARoECFgQARoECCQQAhoCCEwaBAgJEAAaBAhGEAAaBAgcEAI=
Important talents
- Bloodthirsty on Execute is essential: you use Execute to provide Bloodlust. If you do not have the talent, you can use Witch Doctor instead.
- Obsidian Shard on Earth Elemental helps it tank Grglmrgl considerably longer.
- Pyroblast on Pyromancer helps to clear Gargoyles on Baron Aquanis, but is not mandatory.
- You cannot use the 5-Man talent on Skeleton Party because you do not want Skeleton Party to Taunt Grglmrgl. Using the Party without a talent is better than using 5-Man in this dungeon.
Grglmrgl
- Use Unbound minis to attack the boss
- You generally do not need to defend
- Any non-unbound minis you use can pick up chests near your base
Baron Aquanis
- Defend against Gargoyles with Pyromancer
- Take the two Towers closest to your base to secure your base
Aku’mai
- Take the Tower and defeat the head on the left at the start
- Defend your Tower and take down the remaining heads
Watch it in action
Rend with Unbounds
rumblo:CEoQARoECEYQABoECCQQAhoECFgQARoECEwQAhoECBwQAhoECAkQAA==
Important talents
- Bloodthirsty on Execute is essential: you use Execute to provide Bloodlust. If you do not have the talent, you can use Witch Doctor instead.
- Obsidian Shard on Earth Elemental helps it tank Grglmrgl considerably longer.
- Pyroblast on Pyromancer helps to clear Gargoyles on Baron Aquanis, but is not mandatory.
- Ritual of Rime allows you to use Skeleton Party on the bridge on Aku’mai to guard your Tower. It is not mandatory either. However, you cannot use the 5-Man talent because you do not want Skeleton Party to Taunt Grglmrgl. Using the Party without a talent is better than using 5-Man in this dungeon.
Grglmrgl
- Use Unbound minis to attack the boss
- You generally do not need to defend
- Any non-unbound minis you use can pick up chests near your base
Baron Aquanis
- Defend against Gargoyles with Pyromancer
- Take the two Towers closest to your base to secure your base
Aku’mai
- Take the Tower and defeat the head on the left at the start
- Defend your Tower and take down the remaining heads
Watch it in action
Drakkisath with Unbounds
rumblo:CCEQABoECCQQAhoECFgQARoECEwQAhoECEYQABoECBwQAhoECAkQAA==
Important talents
- Bloodthirsty on Execute is essential: you use Execute to provide Bloodlust. If you do not have the talent, you can use Witch Doctor instead.
- Obsidian Shard on Earth Elemental helps it tank Grglmrgl considerably longer.
- Pyroblast on Pyromancer helps to clear Gargoyles on Baron Aquanis, but is not mandatory.
- Ritual of Rime allows you to use Skeleton Party on the bridge on Aku’mai to guard your Tower. It is not mandatory either. However, you cannot use the 5-Man talent because you do not want Skeleton Party to Taunt Grglmrgl. Using the Party without a talent is better than using 5-Man in this dungeon.
Grglmrgl
- Use Unbound minis to attack the boss
- You generally do not need to defend
- Any non-unbound minis you use can pick up chests near your base
Baron Aquanis
- Defend against Gargoyles with Pyromancer
- Take the two Towers closest to your base to secure your base
Aku’mai
- Take the Tower and defeat the head on the left at the start
- Defend your Tower and take down the remaining heads
Watch it in action
Cenarius Blackfathom Deeps Unbounds
Important talents
- Bloodthirsty on Execute is essential: you use Execute to provide Bloodlust. If you do not have the talent, you can use Eclipse instead.
- Obsidian Shard on Earth Elemental helps it tank Grglmrgl considerably longer.
- Pyroblast on Pyromancer helps to clear Gargoyles on Baron Aquanis, but is not mandatory.
- Ritual of Rime allows you to use Skeleton Party on the bridge on Aku’mai to guard your Tower. It is not mandatory either. However, you cannot use the 5-Man talent because you do not want Skeleton Party to Taunt Grglmrgl. Using the Party without a talent is better than using 5-Man in this dungeon.
Grglmrgl
- Use Unbound minis to attack the boss
- You generally do not need to defend, although the Spiderling buff means that sometimes the enemy will come at you fast
- Any non-unbound minis you use can pick up chests near your base
Baron Aquanis
- Defend against Gargoyles with Pyromancer
- Take the two Towers closest to your base to secure your base
- Note that Cenarius is bugged on this map (as of April 2025): he will be poisoned everywhere on the map, so you cannot play your Leader on this map at all
Aku’mai
- Take the Tower and defeat the head on the left at the start
- Defend your Tower and take down the remaining heads
Watch it in action
Ysera with Whelp Eggs

rumblo:CFsQABoECAgQABoECBUQAhoECFkQAhoECFgQARoECEYQABoECCQQAg==
Important talents
- Pyroblast on Pyromancer helps to clear Gargoyles on Baron Aquanis, but is not mandatory.
Grglmrgl
- Attack through the right Tower
- Use Whelp Eggs or Eclipse to kill the Murloc that shoots at your base from the ledge
Baron Aquanis
- Defend against Gargoyles with Pyromancer or Ysera minis
- Take the two Towers closest to your base to secure your base
- Use Earth Elemental to tank the left Tower, and drop Whelp Eggs into the poison pool to pop them and get the Whelps to attack the Tower
Aku’mai
- Take the Tower and defeat the head on the left at the start
- Defend your Tower and take down the remaining heads
Watch it in action
Malfurion with Whelp Eggs
rumblo:CDkQAhoECBUQAhoECDMQARoECCQQAhoECEQQAhoECFgQARoECEYQAA==
Important talents
- Pyroblast on Pyromancer helps to clear Gargoyles on Baron Aquanis, but is not mandatory
- Splashing Pumpkins on Plague Farmer helps the splash reach targets in the back
Grglmrgl
- Attack through the right Tower
- Use Whelp Eggs to kill the Murloc that shoots at your base from the ledge
Baron Aquanis
- Defend against Gargoyles with Pyromancer, Malfurion, and dropping Whelp Eggs into poison as Gargoyle flies above it
- Take the two Towers closest to your base to secure your base
- Use Earth Elemental to tank the left Tower, and drop Whelp Eggs into the poison pool to pop them and get the Whelps to attack the Tower
Aku’mai
- Take the Tower and defeat the head on the left at the start
- Defend your Tower and take down the remaining heads
Watch it in action
Doomhammer Blackfathom Deeps
rumblo:CB8QAhoECFkQAhoECCQQAhoECEwQAhoECAkQABoECEYQABoECFgQAQ==
Important talents
- Bloodthirsty on Execute is essential: you use Execute to provide Bloodlust. If you do not have the talent, you have a lot of options you can use instead, such as Defias Bandits, Darkspear Troll, or Quilboar.
- Obsidian Shard on Earth Elemental helps it tank Grglmrgl considerably longer.
- Pyroblast on Pyromancer helps to clear Gargoyles on Baron Aquanis, but is not mandatory.
- Ritual of Rime allows you to use Skeleton Party on the bridge on Aku’mai to guard your Tower. It is not mandatory either. However, you cannot use the 5-Man talent because you do not want Skeleton Party to Taunt Grglmrgl. Using the Party without a talent is better than using 5-Man in this dungeon.
Grglmrgl
- Use Unbound minis to attack the boss
- You generally do not need to defend
- Any non-unbound minis you use can pick up chests near your base
Baron Aquanis
- Defend against Gargoyles with Pyromancer
- Take the two Towers closest to your base to secure your base
Aku’mai
- Take the Tower and defeat the head on the left at the start
- Defend your Tower and take down the remaining heads
Watch it in action
Grom Blackfathom Deeps
rumblo:CDAQARoECBwQABoECAkQABoECEwQAhoECFgQARoECCQQAhoECEYQAA==
Important talents
- Bloodthirsty on Execute is essential: you use Execute to provide Bloodlust. If you do not have the talent, you can use Witch Doctor instead.
- Obsidian Shard on Earth Elemental helps it tank Grglmrgl considerably longer.
- Pyroblast on Pyromancer helps to clear Gargoyles on Baron Aquanis, but is not mandatory.
- Ritual of Rime allows you to use Skeleton Party on the bridge on Aku’mai to guard your Tower. It is not mandatory either. However, you cannot use the 5-Man talent because you do not want Skeleton Party to Taunt Grglmrgl. Using the Party without a talent is better than using 5-Man in this dungeon.
Grglmrgl
- Use Unbound minis to attack the boss
- You generally do not need to defend
- Any non-unbound minis you use can pick up chests near your base
Baron Aquanis
- Defend against Gargoyles with Pyromancer
- Take the two Towers closest to your base to secure your base
Aku’mai
- Take the Tower and defeat the head on the left at the start
- Defend your Tower and take down the remaining heads
Watch it in action
Cairne Blackfathom Deeps
rumblo:CBYQABoECAkQABoECBwQABoECEYQABoECCQQAhoECFgQARoECEwQAg==
Important talents
- Bloodthirsty on Execute is essential: you use Execute to provide Bloodlust. If you do not have the talent, you can use Witch Doctor instead.
- Obsidian Shard on Earth Elemental helps it tank Grglmrgl considerably longer.
- Pyroblast on Pyromancer helps to clear Gargoyles on Baron Aquanis, but is not mandatory.
- Ritual of Rime allows you to use Skeleton Party on the bridge on Aku’mai to guard your Tower. It is not mandatory either. However, you cannot use the 5-Man talent because you do not want Skeleton Party to Taunt Grglmrgl. Using the Party without a talent is better than using 5-Man in this dungeon.
Grglmrgl
- Use Unbound minis to attack the boss
- You generally do not need to defend
- Any non-unbound minis you use can pick up chests near your base
Baron Aquanis
- Defend against Gargoyles with Pyromancer
- Take the two Towers closest to your base to secure your base
Aku’mai
- Take the Tower and defeat the head on the left at the start
- Defend your Tower and take down the remaining heads
Watch it in action
Sneed Blackfathom Deeps
rumblo:CE4QARoECAkQABoECBwQABoECCQQAhoECFgQARoECEYQABoECEwQAg==
Important talents
- Bloodthirsty on Execute is essential: you use Execute to provide Bloodlust. If you do not have the talent, you can use Witch Doctor instead.
- Obsidian Shard on Earth Elemental helps it tank Grglmrgl considerably longer.
- Pyroblast on Pyromancer helps to clear Gargoyles on Baron Aquanis, but is not mandatory.
- Ritual of Rime allows you to use Skeleton Party on the bridge on Aku’mai to guard your Tower. It is not mandatory either. However, you cannot use the 5-Man talent because you do not want Skeleton Party to Taunt Grglmrgl. Using the Party without a talent is better than using 5-Man in this dungeon.
Grglmrgl
- Use Unbound minis to attack the boss
- You generally do not need to defend
- Any non-unbound minis you use can pick up chests near your base
Baron Aquanis
- Defend against Gargoyles with Pyromancer
- Take the two Towers closest to your base to secure your base
Aku’mai
- Take the Tower and defeat the head on the left at the start
- Defend your Tower and take down the remaining heads
Watch it in action
Anub'arak Blackfathom Deeps
Anub’arak is so strong that it requires very little specific adjustments to clear Blackfathom Deeps.
Important talents
- Explosive Shells on Anub’arak is vital to make the Leader work in general, and Blackfathom Deeps is no exception.
- Pyroblast on Pyromancer helps to clear Gargoyles on Baron Aquanis, but is not mandatory.
- Lock Pick on Defias Bandits can increase your income, especially on Grglmrgl, but it is not mandatory either.
- Ritual of Rime allows you to use Skeleton Party on the bridge on Aku’mai to guard your Tower. It is not mandatory either. However, you cannot use the 5-Man talent because you do not want Skeleton Party to Taunt Grglmrgl. Using the Party without a talent is better than using 5-Man in this dungeon.
Grglmrgl
- Use Unbound minis to attack the boss
- You generally do not need to defend
- Any non-unbound minis you use can pick up chests near your base
Baron Aquanis
- Defend against Gargoyles with Pyromancer and Beetles
- Take the two Towers closest to your base to secure your base
Aku’mai
- Take the Tower and defeat the head on the left at the start
- Defend your Tower and take down the remaining heads
Watch it in action
Arthas with Chimaera
rumblo:CF4QABoECEQQAhoECF0QABoECEYQABoECFkQAhoECBkQABoECCQQAg==
Important talents
- Pyroblast on Pyromancer helps to clear Gargoyles on Baron Aquanis, but is not mandatory.
Grglmrgl
- Attack through the right Tower
- Use a Chimaera to kill the Murloc that shoots at your base from the ledge; prevent the respawns from reaching the ledge when you control the right Tower
Baron Aquanis
- Defend against Gargoyles with Pyromancer or Chimaera
- Take the two Towers closest to your base to secure your base
- Use Earth Elemental to tank the left Tower: damage can come from Chimaera that flies there or from Plague Farmer from the left edge of the middle lane
Aku’mai
- Take the Tower and defeat the head on the left at the start
- Defend your Tower and take down the remaining heads
Watch it in action
Dungeon Strategy
Grglmrgl
Minis in army
- Earth Elemental
- Ogre Mage
- Prowler
- Spiderlings
- Stonehoof Tauren
Other minis and map mechanics
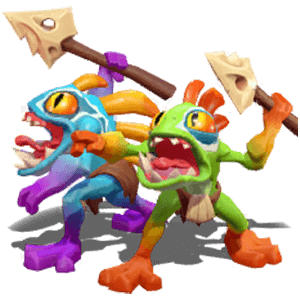
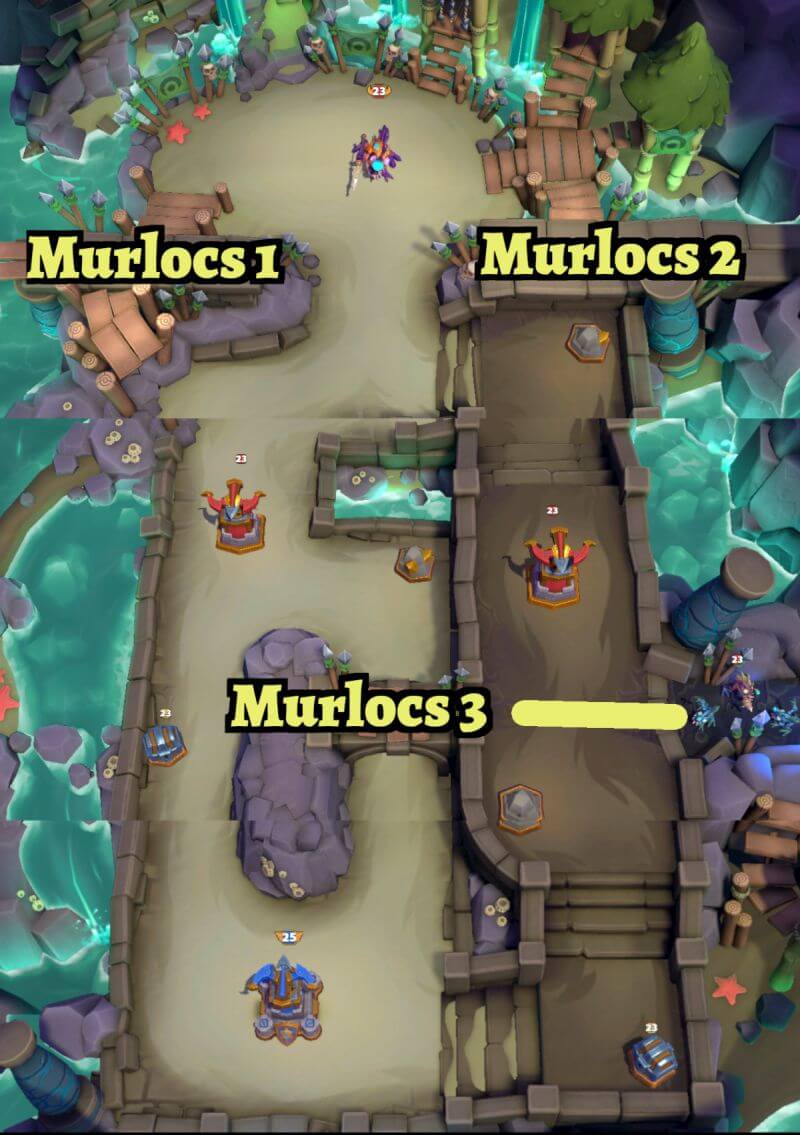
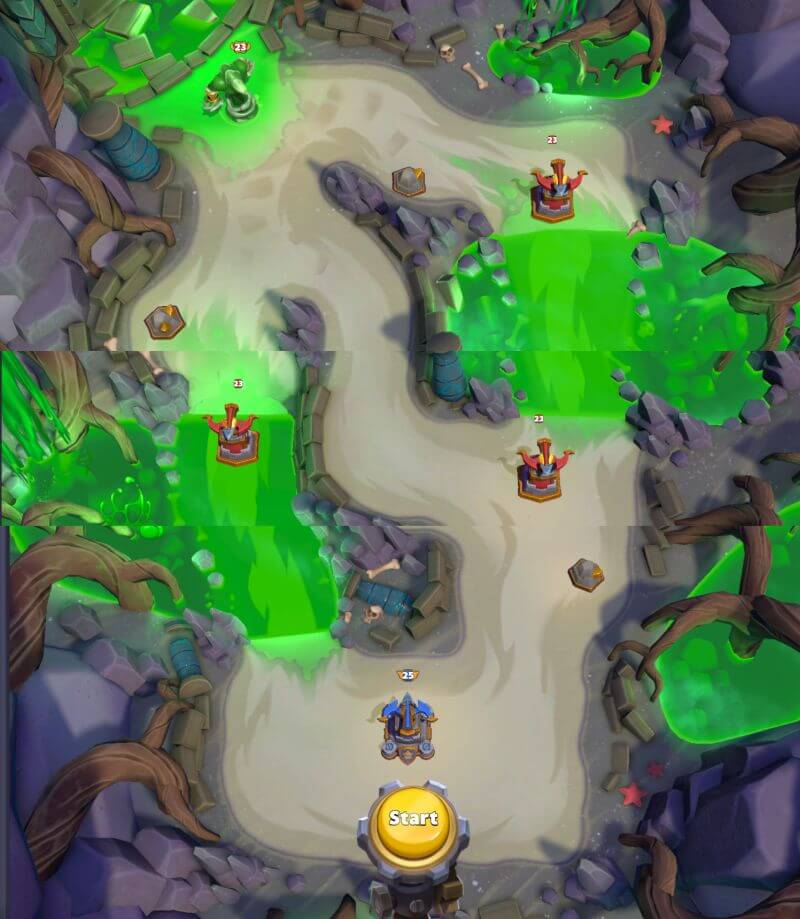
Grglmrgl has three groups of Murlocs that respawn with a delay after being killed. Groups 1 and 2 defend the approaches to the boss, while group 3 moves from the right side of the map to the middle, and one of the group members will shoot at your base when in position.
General strategy
There are two main approaches you can take to Grglmrgl: either you push through a tower and the chokepoint guarded by Murlocs, or you attack the boss with unbound minis.
If you choose to push, the preferable path is through the right tower. This gives you more control over Murloc group 3 that will start to chip on your base, and any minis you send to take out Murloc group 2 can join your attack on the boss more easily than anything sent against Murloc group 1.
You will need to maintain control over Murloc group 3. In practice, this means sending Unbound minis to clear them, or at least the one who can reach your base, if they manage to reach their main position. S.A.F.E. Pilot and Whelp Eggs can be useful here. Flying minis sent from your base can also attack them, but they are vulnerable to being shot down.
The downside of the push plan is that the chokepoint right before the boss can be difficult to push through and it is easy to get stalled there.
My preferred strategy is to defeat the boss with Unbound minis. With Unbound minis, you barely need to defend at all, and you avoid the chokepoint completely.
The basic strategy is to use Earth Elemental to tank the boss. The boss deals physical damage, which makes the Armored Earth Elemental a superior option. Then, you can send other Unbound minis to deal damage to the boss. Skeleton Party is an excellent option, as long as you do not use the 5-Man talent which would Taunt the boss away from your main tank.
The main risk with the Unbound strategy is that the boss can summon minis to take down your attackers while they are focused on the boss. Ogre Mage, in particular, can be a tough opponent. To mitigate this risk, spread your minis so that the Ogre Mage will only attack some of them. Sometimes, you can also have enough time to wait for the Ogre Mage to leave before playing more minis. If you see the boss spending gold elsewhere, you can also have a good window of opportunity to attack.
Baron Aquanis
Minis in army
- Bat Rider
- Dark Iron Miner
- Drake
- Gargoyle
- Gryphon Rider
- Vultures
Other minis and map mechanics
A Banshee will spawn at the boss at 45-second intervals (at 2:45, 2:00, 1:15, and so on).
Also note that the boss has an exceptionally high gold income, higher than the player, which allows it to gather large attack groups.
The green pools deal damage to any ground minis that enter them.
General strategy
The main threat in the map comes from Gargoyles. Especially when you are punching up, a single unattended Gargoyle can destroy your base. This is why capturing the Towers next to your base is so important: they will provide a first line of defense. Even if they sometimes fall, they can be recovered, and the base remains healthy. You can also use the left Tower to launch attacks on the boss. The third Tower further away from your base can be ignored.
Taking the right Tower is your main priority early on. If the boss pushes hard from the Tower at the start and you manage to defeat that push with low casualties, you can sometimes also continue the push from the Tower all the way to the boss. Unless you outlevel the dungeon, you are unlikely to have the resources to end the battle with a single push, and will need to focus on defense as well.
The left Tower is in a green pool that hurts your ground minis. You can deploy Unbound ground minis right on the north side of the Tower. If you use Whelp Eggs, you can deploy them in the pool, and the damage from the pool will pop the Eggs and get your Whelps into action immediately. If you use Execute in your army, it can help capture the Tower. You can also attack the Tower with ranged minis walking the left side of the path from the right Tower towards the boss. Note that the Tower will be able to attack them back.
After you have control of the two Towers, they will help you defend against Gargoyle attacks. You still need to deploy troops to beat Gargoyles, but your base is safe. From there, you can start attacking Baron Aquanis itself.
Aku'mai
Minis in army
- Defias Bandits
- Harpies
- Murloc Tidehunters
- Raptors
- Quilboar
Other minis and map mechanics
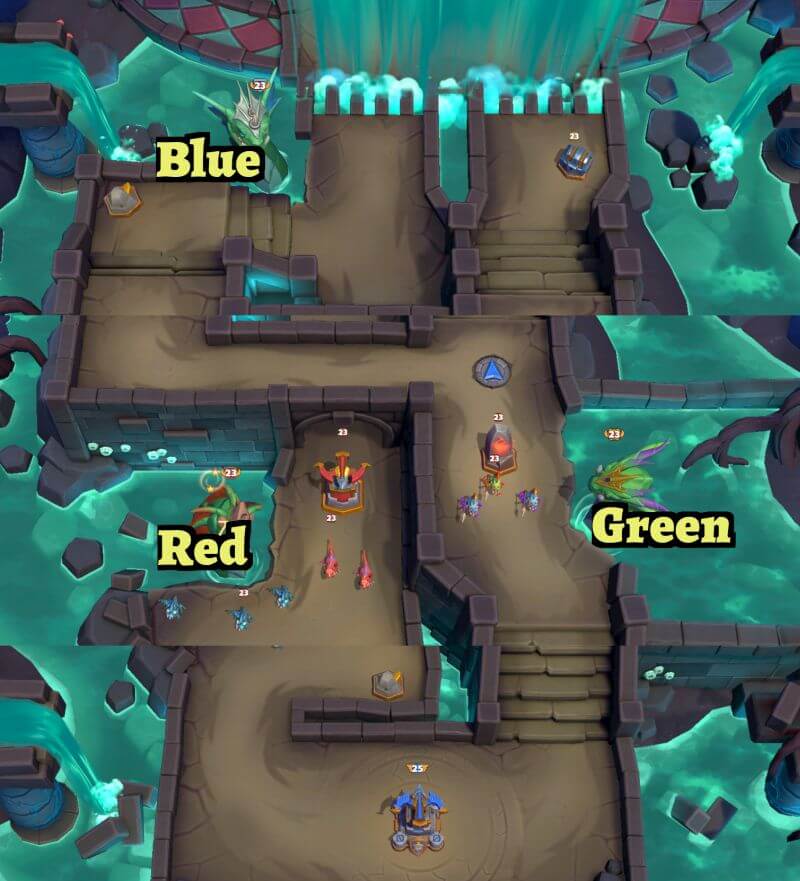
At the start of the fight, several minis attack your base. There are also three Murlocs that guard the Red head on the left.
Aku’mai is a hydra that consists of three heads: red, blue, and green. When first defeated, the waterfall at the top of the map disappears, and all three heads respawn behind it. Until all three initial heads are defeated, any minis that reach the waterfall are instantly destroyed.
Red head: Sleeps at the start. Roars when awoken, granting Bloodlust to nearby enemy minis. Tosses rocks.
Blue head: Breathes chain lightning. Long pause between attacks.
Green head: Spits Ooze minis and pools of acid.
General strategy
You want to attack the Red head on the left and the Tower it guards at the start. Winning this initial encounter is crucial to stabilize because the map has scarce resources and capturing the Tower is necessary to secure the gold mine.
Then you can take out the Blue head and the Green head in any order.
After all heads are defeated, the waterfall disappears, and all three heads respawn behind it.
The boss has a heavy emphasis on squad minis, which makes area-of-effect damage highly effective. The squads can overwhelm the Tower, so you need to use resources to defend it. You can use the Tower to tank and place ranged minis behind it, or if you have Skeleton Party with Ritual of Rime, you can deploy them on top of the bridge, from where they can shoot down on squads that assault the Tower.