Deadmines Dungeon Guide
Learn how to complete the Deadmines mission in Warcraft Rumble. Follow our suggested build and strategy for Deadmines.
In this guide to the Deadmines dungeon in Warcraft Rumble, I showcase strong armies for completing the dungeon at red difficulty with various Leaders and go through each boss fight in detail.
The comps include quick instructions for the fights and you can refer to the boss descriptions for full details on all mechanics.
This dungeon is not the current active dungeon.
Go to Active DungeonBest Builds
-
 Alliance
-
 Beast
Beast
-
 Blackrock
-
 Cenarion
-
 Horde
Horde
-
 Undead
Malfurion with Footmen


rumblo:CDkQAhoECAgQABoECB0QARoECCoQABoECAEQAhoECF0QABoECFkQAg==
Important talents
- Spirit Ward on Witch Doctor is very useful in negating Execute against Mr. Smite.
- Pick Lock on Defias Bandits adds more income from chests.
- Solar Flare on Eclipse gives it more damage against Cookie’s squads.
Mr. Smite
- Push up against Smite’s first attack.
- Use the arrow to send minis from left to middle across the bridge.
- Take the right stone and use it for reinforcements.
- Do not take the left stone.
Cookie
- Send a Kobold to the right and take the chests with a cheap mini, preferably Defias Bandits, at the start.
- Counter Cookie’s big groups with Eclipse and your Footmen army.
- Take the left and middle Towers and start attacking Cookie. Because you need your army to fight Cokie’s squads, you may sometimes take the left and right Towers while countering the incoming minis.
Sneed
- Take the chest and the left Tower.
- Send Kobolds to mine the middle.
- Keep an eye on the Goblin Analyzer (the copy platform).
- Take the right Tower and attack Sneed from there, try to build a push with multiple Priestesses healing.
Watch it in action
Tirion with Abomination


Important talents
- Earth Shield on Frostwolf Shaman is useful to make the Abomination Armored. Shaman is still useful for healing even without it.
- Pick Lock on Defias Bandits adds more income from chests.
Mr. Smite
- Push up against Smite’s first attack.
- Use the arrow to send minis from left to middle across the bridge.
- Take the right stone and use it for reinforcements.
- Do not take the left stone.
Cookie
- Send a Kobold to the right and take the chests with a cheap mini, preferably Defias Bandits, at the start.
- Counter Cookie’s big groups with Living Bomb.
- Take the left and middle Towers and start attacking Cookie.
Sneed
- Take the chest and the left Tower.
- Send Kobolds to mine the middle.
- Keep an eye on the Goblin Analyzer (the copy platform).
- Take the right Tower and attack Sneed from there, try to build a push with multiple Shamans healing.
Watch it in action
Charlga with Abomination
rumblo:CBgQARoECEUQABoECEcQAhoECAEQAhoECEsQAhoECA4QABoECAsQAQ==
Important talents
- Earth Shield on Frostwolf Shaman is useful to make the Abomination Armored. Shaman is still useful for healing even without it.
Mr. Smite
- Push up against Smite’s first attack.
- Use the arrow to send minis from left to middle across the bridge.
- Take the right stone and use it for reinforcements.
- Do not take the left stone.
Cookie
- Send a Kobold to the right and take the chests with a cheap mini at the start.
- Counter Cookie’s big groups with Living Bomb.
- Take the left and middle Towers and start attacking Cookie.
Sneed
- Take the chest and the left Tower.
- Send Kobolds to mine the middle.
- Keep an eye on the Goblin Analyzer (the copy platform), you can drop a Quilboar to be copied if necessary.
- Take the right Tower and attack Sneed from there, try to build a push with multiple Shamans healing.
Watch it in action
Anub'arak being Anub'arak
rumblo:CBAQARoECB4QABoECEcQAhoECE0QAhoECB0QARoECEwQAhoECFkQAg==
Important talents
- Explosive Shells on Anub’arak is vital to turn your Scarabs into a proper threat.
- Spirit Ward on Witch Doctor can protect your swarm.
Mr. Smite
- Push up against Smite’s first attack.
- Use the arrow to send minis from left to middle across the bridge.
- Take the right stone and use it for reinforcements.
- Do not take the left stone.
Cookie
- Send a Kobold to the right and take the chests with a cheap mini at the start.
- Counter Cookie’s big groups with Scarabs from your squad minis.
- Take the left and middle Towers and start attacking Cookie.
Sneed
- Take the chest and the left Tower.
- Send Kobolds to mine the middle.
- Keep an eye on the Goblin Analyzer (the copy platform), you can drop an Unbound like Skeletons to be copied if necessary.
- Take the right Tower and attack Sneed from there, just spam it down with your Scarabs.
Watch it in action
Doomhammer with Eggs
Important talents
- Flame Burst on Whelp Eggs is crucial with this build because you need to drop Whelp Eggs on Cookie’s mini groups.
- Spirit Ward on Witch Doctor is very useful in negating Execute against Mr. Smite.
Mr. Smite
- Push up against Smite’s first attack.
- Use the arrow to send minis from left to middle across the bridge.
- Take the right stone and use it for reinforcements.
- Do not take the left stone.
Cookie
- Send a Kobold to the right and take the chests with a cheap mini - ideally Defias Bandits - at the start.
- Counter Cookie’s big groups with Whelp Eggs and then Footmen and Witch Doctor.
- Take the left and middle Towers and start attacking Cookie.
Sneed
- Take the chest and the left Tower.
- Send Kobolds to mine the middle.
- Keep an eye on the Goblin Analyzer (the copy platform).
- Take the right Tower and attack Sneed from there, try to build a push with multiple Shamans healing.
Watch it in action
Drakkisath tanking
Important talents
- Earth Shield on Frostwolf Shaman is mandatory to make the Drakkisath Armored. Drakkisath does not have enough Health to tank the dungeon without it.
- Spirit Ward on Witch Doctor is very useful in negating Execute against Mr. Smite.
Mr. Smite
- Push up against Smite’s first attack.
- Use the arrow to send minis from left to middle across the bridge.
- Take the right stone and use it for reinforcements.
- Do not take the left stone.
Cookie
- Send a Kobold to the right and take the chests with a cheap mini - ideally Defias Bandits - at the start.
- Counter Cookie’s big groups with Living Bomb.
- Take the left and middle Towers and start attacking Cookie.
Sneed
- Take the chest and the left Tower.
- Send Kobolds to mine the middle.
- Keep an eye on the Goblin Analyzer (the copy platform).
- Take the right Tower and attack Sneed from there, try to build a push with multiple Shamans healing.
Watch it in action
Thaurissan with Abomination
Important talents
- Earth Shield on Frostwolf Shaman is useful to make the Abomination Armored. Shaman is still useful for healing even without it.
- Spirit Ward on Witch Doctor is very useful in negating Execute against Mr. Smite.
Mr. Smite
- Push up against Smite’s first attack.
- Use the arrow to send minis from left to middle across the bridge.
- Take the right stone and use it for reinforcements.
- Do not take the left stone.
Cookie
- Send a Kobold to the right and take the chests with a cheap mini at the start.
- Counter Cookie’s big groups with Living Bomb.
- Take the left and middle Towers and start attacking Cookie.
Sneed
- Take the chest and the left Tower.
- Send Kobolds to mine the middle.
- Keep an eye on the Goblin Analyzer (the copy platform).
- Take the right Tower and attack Sneed from there, try to build a push with multiple Shamans healing.
Watch it in action
Rend with Abomination
Important talents
- Earth Shield on Frostwolf Shaman is useful to make the Abomination Armored. Shaman is still useful for healing even without it.
- Spirit Ward on Witch Doctor is very useful in negating Execute against Mr. Smite.
Mr. Smite
- Push up against Smite’s first attack.
- Use the arrow to send minis from left to middle across the bridge.
- Take the right stone and use it for reinforcements.
- Do not take the left stone.
Cookie
- Send a Kobold to the right and take the chests with a cheap mini at the start.
- Counter Cookie’s big groups with Living Bomb.
- Take the left and middle Towers and start attacking Cookie.
Sneed
- Take the chest and the left Tower.
- Send Kobolds to mine the middle.
- Keep an eye on the Goblin Analyzer (the copy platform).
- Take the right Tower and attack Sneed from there, try to build a push with multiple Shamans healing.
Watch it in action
Ragnaros with Molten Giant
Important talents
- Spirit Ward on Witch Doctor is very useful in negating Execute against Mr. Smite.
Mr. Smite
- Push up against Smite’s first attack.
- Use the arrow to send minis from left to middle across the bridge.
- Take the right stone and use it for reinforcements.
- Do not take the left stone.
Cookie
- Send a Kobold to the right and take the chests with a cheap mini at the start.
- Counter Cookie’s big groups with Living Bomb.
- Take the left and middle Towers and start attacking Cookie.
Sneed
- Take the chest and the left Tower.
- Send Kobolds to mine the middle.
- Keep an eye on the Goblin Analyzer (the copy platform).
- Take the right Tower and attack Sneed from there, try to build a push with multiple Shamans healing.
Watch it in action
Malfurion with Footmen
rumblo:CDkQAhoECAgQABoECB0QARoECCoQABoECAEQAhoECF0QABoECFkQAg==
Important talents
- Spirit Ward on Witch Doctor is very useful in negating Execute against Mr. Smite.
- Pick Lock on Defias Bandits adds more income from chests.
- Solar Flare on Eclipse gives it more damage against Cookie’s squads.
Mr. Smite
- Push up against Smite’s first attack.
- Use the arrow to send minis from left to middle across the bridge.
- Take the right stone and use it for reinforcements.
- Do not take the left stone.
Cookie
- Send a Kobold to the right and take the chests with a cheap mini, preferably Defias Bandits, at the start.
- Counter Cookie’s big groups with Eclipse and your Footmen army.
- Take the left and middle Towers and start attacking Cookie. Because you need your army to fight Cokie’s squads, you may sometimes take the left and right Towers while countering the incoming minis.
Sneed
- Take the chest and the left Tower.
- Send Kobolds to mine the middle.
- Keep an eye on the Goblin Analyzer (the copy platform).
- Take the right Tower and attack Sneed from there, try to build a push with multiple Priestesses healing.
Watch it in action
Cenarius with Abomination
rumblo:CBcQARoECAgQABoECB0QARoECA4QABoECEsQAhoECAEQAhoECFkQAg==
Important talents
- Spirit Ward on Witch Doctor is very useful in negating Execute against Mr. Smite.
- Pick Lock on Defias Bandits adds more income from chests.
- Solar Flare on Eclipse gives it more damage against Cookie’s squads.
Mr. Smite
- Push up against Smite’s first attack.
- Use the arrow to send minis from left to middle across the bridge.
- Take the right stone and use it for reinforcements.
- Do not take the left stone.
Cookie
- Send a Kobold to the right and take the chests with a cheap mini, preferably Defias Bandits, at the start.
- Counter Cookie’s big groups with Eclipse and Abomination.
- Take the left and middle Towers and start attacking Cookie. Because you need your army to fight Cookie’s squads, you may sometimes take the left and right Towers while countering the incoming minis.
Sneed
- Take the chest and the left Tower.
- Send Kobolds to mine the middle.
- Keep an eye on the Goblin Analyzer (the copy platform).
- Take the right Tower and attack Sneed from there, try to build a push with multiple Shamans healing.
Watch it in action
Ysera with Abomination
rumblo:CFsQARoECAgQABoECB0QARoECFkQAhoECFgQARoECA4QABoECEsQAg==
Important talents
- Spirit Ward on Witch Doctor is very useful in negating Execute against Mr. Smite.
- Pick Lock on Defias Bandits adds more income from chests.
- Solar Flare on Eclipse gives it more damage against Cookie’s squads.
Mr. Smite
- Push up against Smite’s first attack.
- Use the arrow to send minis from left to middle across the bridge.
- Take the right stone and use it for reinforcements.
- Do not take the left stone.
Cookie
- Send a Kobold to the right and take the chests with a cheap mini, preferably Defias Bandits, at the start.
- Counter Cookie’s big groups with Eclipse, Ysera minis, and Abomination.
- Take the left and middle Towers and start attacking Cookie. Because you need your army to fight Cookie’s squads, you may sometimes take the left and right Towers while countering the incoming minis.
Sneed
- Take the chest and the left Tower.
- Send Kobolds to mine the middle.
- Keep an eye on the Goblin Analyzer (the copy platform).
- Take the right Tower and attack Sneed from there, try to build a push with multiple Shamans healing.
Watch it in action
Onu tanking
rumblo:CEMQAhoECAgQABoECB0QARoECFkQAhoECF0QARoECDIQABoECAEQAg==
Important talents
- Spirit Ward on Witch Doctor is very useful in negating Execute against Mr. Smite.
- Pick Lock on Defias Bandits adds more income from chests.
- Solar Flare on Eclipse gives it more damage against Cookie’s squads.
Mr. Smite
- Push up against Smite’s first attack.
- Use the arrow to send minis from left to middle across the bridge.
- Take the right stone and use it for reinforcements.
- Do not take the left stone.
- Try to play multiple Onus when you can to safeguard your army against Execute.
Cookie
- Send a Kobold to the right and take the chests with a cheap mini, preferably Defias Bandits, at the start.
- Counter Cookie’s big groups with Eclipse and Onu.
- Take the left and middle Towers and start attacking Cookie. Because you need your army to fight Cookie’s squads, you may sometimes take the left and right Towers while countering the incoming minis.
- Drop Harpies and Angry Chickens behind Cookie with Onu.
Sneed
- Take the chest and the left Tower.
- Send Kobolds to mine the middle.
- Keep an eye on the Goblin Analyzer (the copy platform).
- Take the right Tower and attack Sneed from there, try to build a push with multiple Priestesses healing.
- Drop Harpies and Angry Chickens behind Sneed with Onu.
Watch it in action
Doomhammer with Eggs
Important talents
- Flame Burst on Whelp Eggs is crucial with this build because you need to drop Whelp Eggs on Cookie’s mini groups.
- Spirit Ward on Witch Doctor is very useful in negating Execute against Mr. Smite.
Mr. Smite
- Push up against Smite’s first attack.
- Use the arrow to send minis from left to middle across the bridge.
- Take the right stone and use it for reinforcements.
- Do not take the left stone.
Cookie
- Send a Kobold to the right and take the chests with a cheap mini - ideally Defias Bandits - at the start.
- Counter Cookie’s big groups with Whelp Eggs and then Footmen and Witch Doctor.
- Take the left and middle Towers and start attacking Cookie.
Sneed
- Take the chest and the left Tower.
- Send Kobolds to mine the middle.
- Keep an eye on the Goblin Analyzer (the copy platform).
- Take the right Tower and attack Sneed from there, try to build a push with multiple Shamans healing.
Watch it in action
Sylvanas
rumblo:CFIQABoECA4QABoECE0QAhoECEsQAhoECAsQARoECFkQAhoECAEQAg==
Important talents
- Earth Shield on Frostwolf Shaman is useful to make the Abomination Armored. Shaman is still useful for healing even without it.
Mr. Smite
- Push up against Smite’s first attack.
- Use the arrow to send minis from left to middle across the bridge.
- Take the right stone and use it for reinforcements.
- Do not take the left stone.
Cookie
- Send a Kobold to the right and take the chests with a cheap mini at the start.
- Counter Cookie’s big groups with Living Bomb.
- Take the left and middle Towers and start attacking Cookie.
Sneed
- Take the chest and the left Tower.
- Send Kobolds to mine the middle.
- Keep an eye on the Goblin Analyzer (the copy platform).
- Take the right Tower and attack Sneed from there, try to build a push with multiple Shamans healing.
Watch it in action
Anub'arak being Anub'arak
rumblo:CBAQARoECB4QABoECEcQAhoECE0QAhoECB0QARoECEwQAhoECFkQAg==
Important talents
- Explosive Shells on Anub’arak is vital to turn your Scarabs into a proper threat.
- Spirit Ward on Witch Doctor can protect your swarm.
Mr. Smite
- Push up against Smite’s first attack.
- Use the arrow to send minis from left to middle across the bridge.
- Take the right stone and use it for reinforcements.
- Do not take the left stone.
Cookie
- Send a Kobold to the right and take the chests with a cheap mini at the start.
- Counter Cookie’s big groups with Scarabs from your squad minis.
- Take the left and middle Towers and start attacking Cookie.
Sneed
- Take the chest and the left Tower.
- Send Kobolds to mine the middle.
- Keep an eye on the Goblin Analyzer (the copy platform), you can drop an Unbound like Skeletons to be copied if necessary.
- Take the right Tower and attack Sneed from there, just spam it down with your Scarabs.
Watch it in action
Sylvanas
rumblo:CFIQABoECA4QABoECE0QAhoECEsQAhoECAsQARoECFkQAhoECAEQAg==
Important talents
- Earth Shield on Frostwolf Shaman is useful to make the Abomination Armored. Shaman is still useful for healing even without it.
Mr. Smite
- Push up against Smite’s first attack.
- Use the arrow to send minis from left to middle across the bridge.
- Take the right stone and use it for reinforcements.
- Do not take the left stone.
Cookie
- Send a Kobold to the right and take the chests with a cheap mini at the start.
- Counter Cookie’s big groups with Living Bomb.
- Take the left and middle Towers and start attacking Cookie.
Sneed
- Take the chest and the left Tower.
- Send Kobolds to mine the middle.
- Keep an eye on the Goblin Analyzer (the copy platform).
- Take the right Tower and attack Sneed from there, try to build a push with multiple Shamans healing.
Watch it in action
Baron Rivendare
rumblo:CBIQAhoECA4QABoECAsQARoECC4QABoECAEQAhoECFkQAhoECEsQAg==
Important talents
- Earth Shield on Frostwolf Shaman is useful to make the Abomination Armored. Shaman is still useful for healing even without it.
Mr. Smite
- Push up against Smite’s first attack.
- Use the arrow to send minis from left to middle across the bridge.
- Take the right stone and use it for reinforcements.
- Do not take the left stone.
Cookie
- Send a Kobold to the right and take the chests with a cheap mini at the start.
- Counter Cookie’s big groups with Living Bomb.
- Take the left and middle Towers and start attacking Cookie.
Sneed
- Take the chest and the left Tower.
- Send Kobolds to mine the middle.
- Keep an eye on the Goblin Analyzer (the copy platform).
- Take the right Tower and attack Sneed from there, try to build a push with multiple Shamans healing.
Watch it in action
Bloodmage Thalnos
rumblo:CBQQABoECA4QABoECE0QAhoECAsQARoECEsQAhoECFkQAhoECFgQAQ==
Important talents
- Earth Shield on Frostwolf Shaman is useful to make the Abomination Armored. Shaman is still useful for healing even without it.
Mr. Smite
- Push up against Smite’s first attack.
- Use the arrow to send minis from left to middle across the bridge.
- Take the right stone and use it for reinforcements.
- Do not take the left stone.
Cookie
- Send a Kobold to the right and take the chests with a cheap mini at the start.
- Counter Cookie’s big groups with Living Bomb.
- Take the left and middle Towers and start attacking Cookie.
Sneed
- Take the chest and the left Tower.
- Send Kobolds to mine the middle.
- Keep an eye on the Goblin Analyzer (the copy platform).
- Take the right Tower and attack Sneed from there, try to build a push with multiple Shamans healing.
Watch it in action
Dungeon Strategy
Mr. Smite
Minis in army
- Chain Lightning
- Darkspear Troll
- Execute
- Mountaineer
- Murloc Tidehunters
- Prowler
- Spiderlings
Other minis and map mechanics
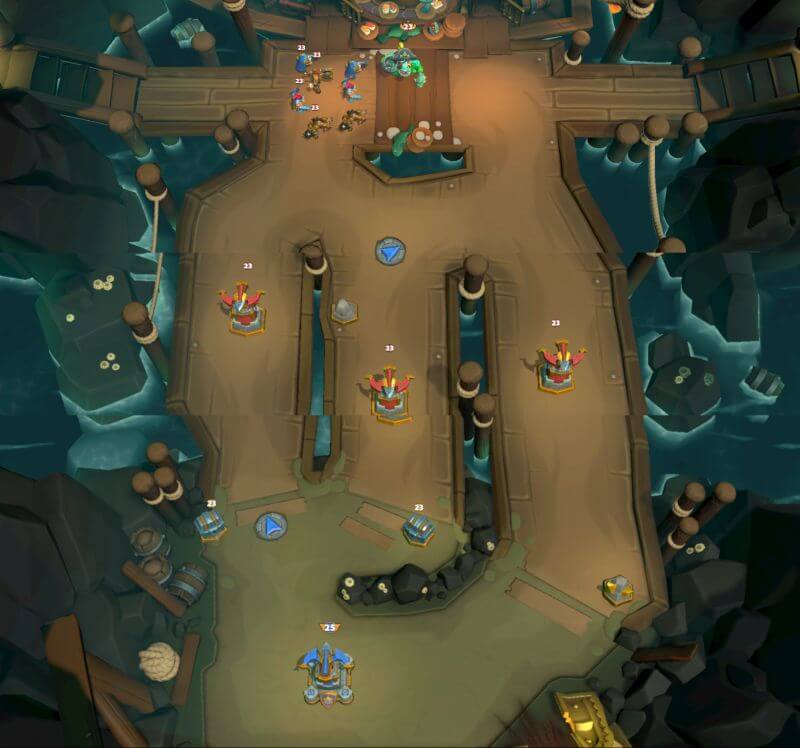
Mr. Smite has lots of minis on the board immediately at the start of the fight, and all of them respawn periodically if defeated:
- A Stonehoof Tauren and a Darkspear Troll guarding the left lane
- Two Defias Bandits on the bridge
- A Darkspear Troll and two Defias Bandits guarding the right lane
Furthermore, a Stonehoof Tauren will spawn at 3:20 and every 45 seconds thereafter (2:35, 1:50, 1:05, 0:20) . It walks down the pipe in the middle and will attack your base from the left.
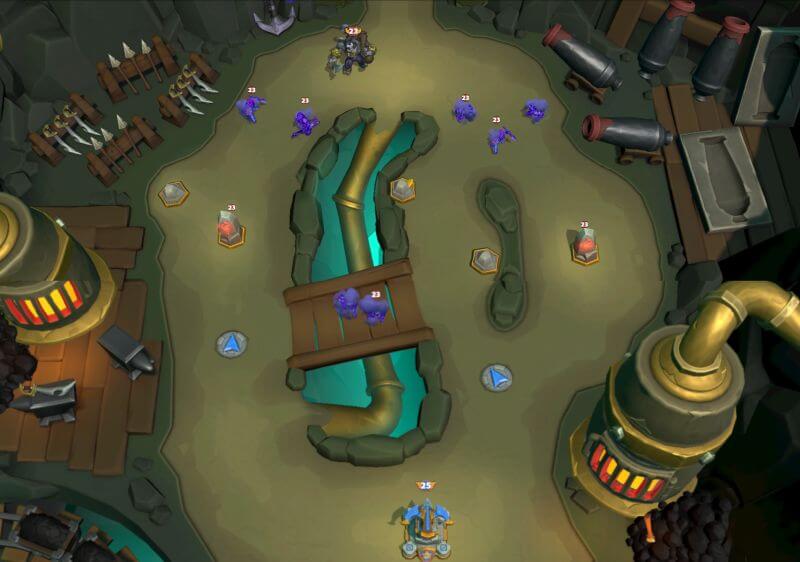
General strategy
Because Smite’s strongest defenses are on the left, you want to attack from the middle and right. There is also a direction switch on the left lane that you can use to send any minis you use in defense on the left side to walk over the bridge and join your attack in the middle. The middle lane also hosts two of the three gold veins on the map, making it an excellent target.
You want to take the right stone, and never send anyone to take the left stone. If you take both stones, all of Smite’s minis will start from the middle, but you’re happy to have some of them come from the left and take the long walk towards your base.
Send your first push head on against whichever direction Smite chooses to push from. If Smite attacks from the left, use the direction arrow to send your minis over the bridge after they have defeated the attackers.
Pick up the right stone with an unbound mini or some cheap mini, if your push does not head that way. When you engage Smite, deploy reinforcements from the right stone.
There are multiple ways to defend against the Stonehoof Tauren that walks down the pipe. You can drop Whelp Eggs on the pipe south of the bridge to engage it, or you can use cheap counter minis like Angry Chickens when the Tauren gets close to your base.
Cookie
Minis in army
- Chain Lightning
- Darkspear Troll
- Defias Bandits
- Gryphon Rider
- Huntress
- Murloc Tidehunters
- Prowler
Other minis and map mechanics
Cookie sends large waves of minis at you.
In the beginning of the fight, there is an army on the left side. After 10 seconds, Cookie will buff the army with an additional level, and then they will start walking towards your base.
At 2:48, an army will spawn on the right side. Again, Cookie will buff them after 10 seconds, and then they will start walking towards your base. From here, an army will spawn alternating between the left side and the right side every 50 seconds (1:58 left, 1:08 right, 0:18 left).
Either army is strong enough to take down your base unless taken out, so tools to defeat a large group of minis are essential against this boss.
Left army:
- 2 Gnoll Brutes
- Stonehoof Tauren
- 2 Darkspear Trolls
- 2 Mountaineer Dwarves (no Bears)
Right army:
- 2 Prowlers
- 2 Raptors
- 3 Murloc Tidehunters
General strategy
There are two chests ready and two nuggets of gold in the right-most gold vein at the start of the map. Your first priority is to secure those resources and counter the army coming in from the left lane.
Send a Kobold to the right as soon as you find one, and send cheap minis to pick up the chests on the left and in the middle (use the direction switch to send these minis to pick up the middle chest after they’re done with the left chest).
Then, you need to counter the incoming army. There are several ways to accomplish this:
- Living Bomb is an excellent mini against Cookie’s armies. It does not see a lot of play in general, but it can be several levels lower than your other army and still be effective here.
- Blizzard and Eclipse (Sunfire) are other spells that can help: if you can take out the ranged minis with spells, you can send flying units to finish the job.
- Whelp Eggs with Flame Burst talent can be dropped on the incoming army.
- Safe Pilot can be dropped on the incoming army.
Living Bomb is generally the strongest tool against Cookie. You can explode the army on top of a Tower, and if your Bomb is high enough, it can even take out the Tower together with the minis. You can also Living Bomb the army while it is waiting by Cookie’s side, and the splash damage will hit Cookie too. That said, it is not the only solution.
After you have secured the early resources and survived the first push from Cookie, it is time to secure some Towers and start pressing the attack. Remember to save resources to answer the next armies Cookie will send at you.
You need at least one Tower to make your way to Cookie, and I like to take the left and middle Towers. This will completely secure both chests and avoid any financial setbacks. Sending attacks from the middle Tower also has the upside that you can choose which side they will engage Cookie from with the direction switch.
Keep in mind where the next army will spawn when attacking Cookie: you do not want your push to meet Cookie’s army and be wasted fighting it and Cookie at the same time. Cookie has a large aoe splash attack, but if you engage Cookie with a tank from one side, you can safely send minis to hit Cookie in the back from the other side. This can be a great use of Chickens, if you have them in your army.
Sneed
Minis in army
- Bat Rider
- Darkspear Troll
- Defias Bandits
- Goblin Sappers
- Ogre Mage
- Safe Pilot
- Stonehoof Tauren
Other minis and map mechanics
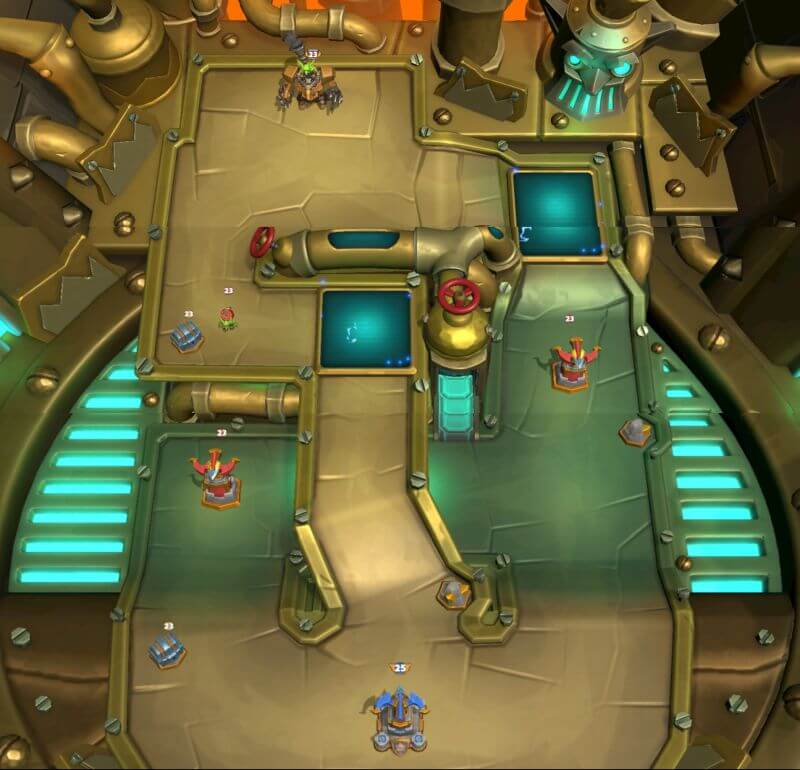
The most notable mechanic in the Sneed fight is the pair of copy platforms. The two platforms are connected and work as one. When a mini steps on a sparkling platform, the mini is destroyed and five new copies of it appear from the copy machine. The platforms copy one mini and then go on cooldown for 19 seconds, which is shown by the lack of sparks. After the sparks reignite, the platforms are ready to copy another mini.
Molten Giants spawn near Sneed and head down the left lane on a timer. The first one appears at 3:00, and then every 90 seconds after that (1:30, 0:00). The first Molten Giant arrives just in time to get copied by the platform, unless something else arrives there first.
General strategy
Paying attention to the copy platforms is important. You need to either send minis over the bridge at the right time to reach them, or you can drop unbound minis on the platform to be copied. Note that the platform does not copy Eggs, it can only copy the hatched Whelps from them. Especially the arrival of the first Molten Giant can be a difficult time, and it is much easier to survive if you can prevent the Giant from being copied. Sending Kobolds down the middle on regular basis can help you get your minis copied more often.
Control of the bridge to the left platform is useful. It gives you good access to the platform and ranged minis on the bridge can shoot down at the copy machine to immediately handle any copied minis.
I usually like to take both Towers: attack the left Tower immediately and try to secure the chest right at the start for additional resources. After taking the left Tower, head to the right Tower, take that, and attack Sneed from the right Tower.
If you use a deathball strategy with sturdy tanks and healers, you can often ignore the copy platforms by the time you take the right Tower because you will win a race against Molten Giants from there.
Alternatively, it is also possible to focus more on defense after taking the left Tower and beat Sneed with waves of Whelp Eggs and Quilboar.