Stormwind (Heroic) Siege Guide
Learn how to complete the Stormwind (Heroic) Siege in Warcraft Rumble. Follow our suggested build and strategy for General Marcus, Innkeeper Allison and Highlord Bolvar.
Welcome to our Heroic Siege guide for Stormwind. This guide will contain the information and strategy you need to defeat this Siege on Heroic Difficulty.
Co-op Build
Arthas


rumblo:CF4QABoECEQQAhoECF0QABoECFgQARoECBMQARoECFkQAhoECEYQAA==
Talents
Arthas - Death Grip. Grabbing ranged minis to be pummeled is moderately useful in this fight.
Plague Farmer - Splashing Pumpkins. The large splash area and longer range help to hit Arbalists better.
Priestess - Power Word: Shield. There are no big tanks in the comp, so Shield is the best talent.
Whelp Eggs - Flame Burst. More damage when popped helps in killing Arbalists.
Bat Rider - Enchanted Vials. Larger splash area helps against the large groups of minis.
Witch Doctor - Spirit Ward. The standard choice, helps to protect your minis.
Pyromancer - Pyroblast. More punch is nice.
Strategy
- Control the central Tower during phase one and phase two, be ready to retake at least one of the top Towers after the phase transition
- Marcus will take the central Tower in phase three and phase four, so be ready to take it back at the beginning of those phases
- Use Whelp Eggs to harass Arbalists
- Use Arthas and Priestess to build a sturdy push, add ranged dps to support it
Watch it in action
Boss Strategy
Heroic General Marcus is the fourth boss in Siege of Stormwind. He guards the gates with his Arbalists. The first-time reward for defeating Heroic General Marcus is a Golden Footman skin. A repeatable reward of 100 Valor is available on the following cycles, one reward per cycle. Valor can be used to upgrade an army slot to Diamond (+4 levels).
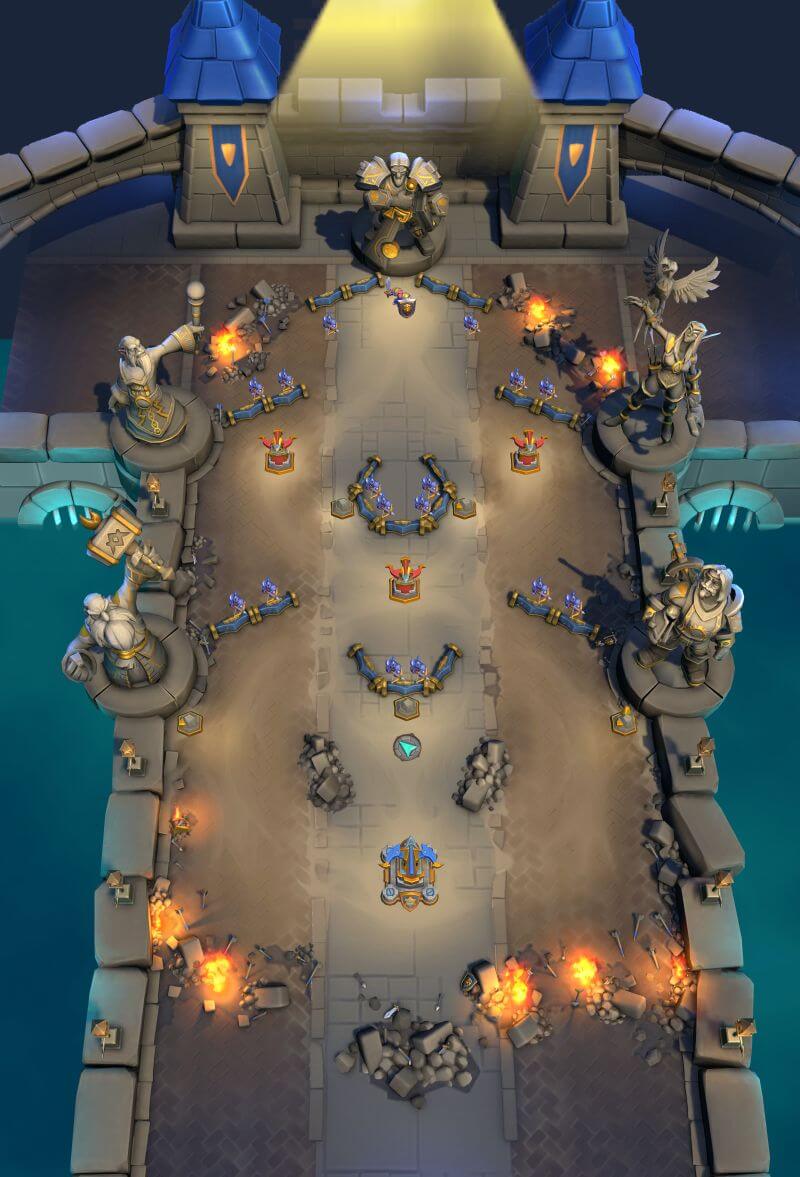
General Marcus map (illustration from the normal version):
Minis in Heroic General Marcus’s army
- Gnoll Brute - Thick Hide
- Gryphon Rider - Mighty Throw
- Harpies - Trinket Collectors
- Huntress - Elven Might
- Jaina - Flurry
- Mountaineer - Mend Pets
- Murloc Tidehunters - Careful Aim
For Heroic, General Marcus is joined by Jaina with the Flurry talent.
Other minis and map mechanics
The gates of Stormwind are guarded by a large number of Arbalists. These Armored crossbowmen are located behind barricades all over the map, and they stay in their positions. In the Heroic version, there are more Arbalists in each position and a Royal Guard behind the central barricade.
While the normal version consists of three phases, the Heroic version has four phases. General Marcus will cleanse himself of poison and burn at the start of each phase.
At the start of phase 2, General Marcus charges to the central barricade and takes control of the two top-most Towers. He destroys all minis in a reverse T-shape where the ends of the T hit the top Towers. He also summons two groups of 2 Footmen and an Arbalist, who enter the map from top-left and top-right.
Starting from phase 2, General Marcus will periodically inspire his Arbalists, giving them additional damage and increased range. You can see this by the glow in their crossbows. The increased range is 12, enough to let them hit the Towers from behind the barricades.
At the start of phase 3, General Marcus charges to the central barricade and takes control of all three Towers (including the central Tower that is not affected by phase transitions in the normal version of the fight). He destroys all minis in a reverse T-shape where the ends of the T hit the top Towers. He also summons two groups of 2 Footmen and an Arbalist, who enter the map from top-left and top-right.
At the start of phase 4, General Marcus charges to the central barricade, removes the top two Towers from the map altogether, and takes control of the central Tower. He destroys all minis in a reverse T-shape where the ends of the T hit the top Towers. He also summons two groups of 2 Footmen and an Arbalist, who enter the map from top-left and top-right.
As a phase 4 special, he also buffs his Arbalists and allows them to move, so any Arbalists on the map at the start of phase 4 will start attacking towards your base.
During phase 4, General Marcus will periodically summon two groups of 2 Footmen and an Arbalist, who enter the map from top-left and top-right.
All minis in Marcus’ army except for Jaina and General Marcus himself deal physical damage. Jaina and General Marcus deal Elemental damage.
General strategy
Because Marcus retakes Towers at phase transitions, launching timed attacks to retake them is crucial. Ideally, your push is already moving towards either of the top Towers at the start of phase 2, and towards the central Tower at the start of phase 3 and phase 4.
Unbound minis can be useful against Arbalists and also to chip in some damage to General Marcus to get a phase change at an appropriate time.
Saving gold for phase changes is important, and you can also clear out some of the Arbalists before pushing into phase 4 to prevent them all from attacking at the same time.
Co-op Build
Cenarius with Swole Troll

rumblo:CBcQARoECBMQARoECAsQARoECFEQAhoECFkQAhoECEQQARoECF0QAA==
Talents
Cenarius - Force of Nature. Very important! Turns small enemy minis into Treants for you, which can be used to tank Barrels to keep Towers alive.
Bat Rider - Enchanted Vials. Larger splash area helps against the large groups of minis.
Living Bomb - Chain Reaction. Chain Reaction and Blast Radius are both acceptable. There are usually minis in such a large area that Chain Reaction is slightly better.
Swole Troll - Meatier Elbow. You want the Troll to fight, and Meatier Elbow is the only talent that allows it to fight against minis.
Witch Doctor - Spirit Ward. The standard choice, helps to protect your minis.
Plague Farmer - Virulence. Virulence and Splashing Pumpkins are both viable for this fight.
Priestess - Power Word: Shield. Shield and Empowered Renew are both good here.
Strategy
- Do not push too fast, stabilize after each phase transition
- Tank the Barrels headed for the right Tower with Swole Troll when possible
- You can let the left Tower fall, take it back with Living Bomb or with Cenarius + damage dealer - Cenarius + Treants can also tank some Barrels
- Do not tank the Barrels headed for your base in the last phase unless absolutely mandatory, they are much sturdier than the regular Barrels
- In the last phase, all you need is one good push at Allison: securing one Tower and defending the other side is enough - use whichever Tower looks easier to get or hold
Watch it in action
Boss Strategy
Heroic Innkeeper Allison is the fifth boss in Siege of Stormwind. She guards the Inn. The first-time reward for defeating Heroic Innkeeper Allison is a Golden Gryphon Rider skin. A repeatable reward of 150 Valor is available on the following cycles, one reward per cycle. Valor can be used to upgrade an army slot to Diamond (+4 levels).
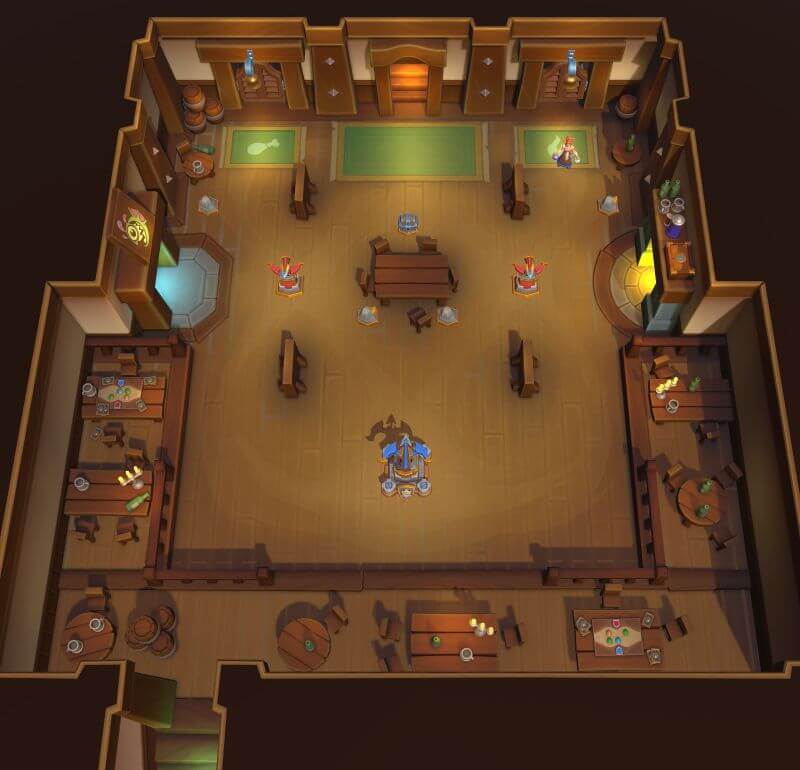
Innkeeper Allison map (illustration is from the normal version):
Minis in Innkeeper Allison’s army
- Defias Bandits - Last Resort
- Footmen - Shield Bash
- Harvest Golem - Trojan Chickens
- Huntress - Darnassian Steel
- Mountaineer - Frenzied Spirit
For Heroic, Huntress has replaced Firehammer in Allison’s army.
Other minis and map mechanics
In Heroic, Allison starts the fight with additional troops: she has a Footman, a Mountaineer Dwarf, and a Priestess on the left side and a Royal Guard, an Arbalist, and a S.A.F.E. Pilot on the right side. These groups of minis respawn 20 seconds after the entire group has been killed.
Allison patrols the top edge of the map. Barrels will periodically roll down from the side she is on towards the Towers: if a Barrel scores a direct hit on a Tower, the Tower is destroyed and more enemies arrive. If Allison already controls the Tower, the Tower itself is unaffected, but the same minis will spawn regardless.
Barrels can be blocked by minis: if a Barrel hits minis with a total of at least 2400 Health, the Barrel is destroyed while destroying the minis. The Barrels that roll towards your base in the final phase have 4000 Health.
The Barrels on the right side summon two Fire Elementals and a Son of Flame from the fireplace if they connect with a Tower.
The Barrels on the left side summon Murloc Tidehunters and Angry Chickens alongside King Mukla style bananas that increase the level of the minis that touch them if they connect with a Tower. In Heroic, they can also summon Hogger with two Gnoll Brutes alongside the Chickens or Murk-Eye with even more Murlocs.
In Heroic, there are additional Barrels on a timer. They arrive every 40 seconds, alternating between left and right:
- 5:20 left
- 4:40 right
- 4:00 left
- 3:20 right
- 2:40 left
- 2:00 right
- And so on
When there are several minis close to Allison, she periodically summons one of the following minis to fight by her side: Gryphon Rider, Huntress, Safe Pilot, Pyromancer, or Worgen.
In the Heroic Allison encounter, there are four phases, instead of the three in the normal version.
At the start of each phase, Allison destroys all minis in a 20-range radius around her. This can be overcome with Cheat Death, if necessary. Allison also cleanses herself of any poison or burn effects.
At the start of phase 2, Allison will summon the Alliance Leaders to help her: Malfurion, Tirion, Jaina, Maiev, and a Royal Guard will spawn near Allison.
At the start of phase 3, Allison will summon two additional Barrels, one from each side.
At the start of phase 4, Allison will summon two additional Barrels, one from each side. Allison also becomes enraged and gains +75% movement speed and +20% damage. All further Barrels in phase 4 are duplicated: one goes for the Tower and another one goes for your base. The Barrel that goes for your base has 4000 Health instead of the usual 2400.
General strategy
Heroic Allison is a much slower fight than normal Allison. If you try to rush it, you will be overwhelmed by an army of Barrels that summons a huge army for Allison.
Carefully manage each phase transition. First, get rid of the Alliance Leaders before moving on to the next phase. Then, stabilize from the barrels before moving on to the next one. In the final phase, you only need to get one good push at Allison, so there is no need to hold on to both Towers.
Tanking the Barrels to prevent new spawns is useful. It is especially difficult to deal with the Fire Elementals and Sons of Flame from the right side, if you get multiple spawns of them at once. You need to put 2400 Health on a Barrel’s way to destroy it, which you can achieve with a Swole Troll, an army of Treants from Cenarius, or various other big tanks.
The spawns from the left side are easier because the minis are small and can be dealt with using area-of-effect damage: a Living Bomb kills them all and can even retake the Tower too. You can often let the left Tower fall and just retake it after, especially if the boss has other minis there that can also be killed with the same Living Bomb.
In the last phase, the Barrels that go towards your base have 4000 Health. They deal a bunch of damage to the base, but if your base is in a good shape, just let them through to save your troops.
Co-op Build
Sneed with Molten Giant


rumblo:CE4QAhoECFkQAhoECBMQARoECDsQAhoECAkQABoECEYQABoECF0QAA==
Talents
Sneed - Land Grab. Land Grab is wonderful for the extra levels, but the other talents are also fine.
Witch Doctor - Spirit Ward. Spirit Ward is the default choice for Witch Doctor to protect your troops, but does nothing special in this fight.
Bat Rider - Enchanted Vials. Larger splash pool is useful against the large groups of minis Bolvar has.
Molten Giant - Bolster. Bolster is phenomenal at both healing your Giant and providing the team with lots of additional gold.
Execute - Bloodthirsty. A bit of extra damage for your minis.
Priestess - Power Word: Shield. Shield and Empowered Renew are both fine for this battle.
Pyromancer - Pyroblast. Hitting harder is good when you need to fight against Footmen and Royal Guards.
Strategy
- Use Sneed or Molten Giant to take Chests
- Push with Sneed or Molten Giant, take the Towers
- Send Molten Giant from one side and dps minis from the other side to attack Bolvar
- Save gold for phase changes, retake the Towers. Use Execute as needed to help.
- You can use Execute to help against Bolvar too
Watch it in action
Boss Strategy
Heroic Highlord Bolvar is the sixth and final boss in Siege of Stormwind. He guards the throne room. The first-time reward for defeating Heroic Highlord Bolvar is a Golden Tirion Fordring skin. The repeatable reward is a Split Leader Star Tome that is available on the following cycles, one reward per cycle. Split Leader Star Tome includes 3 stars for owned and unowned Split Leaders.
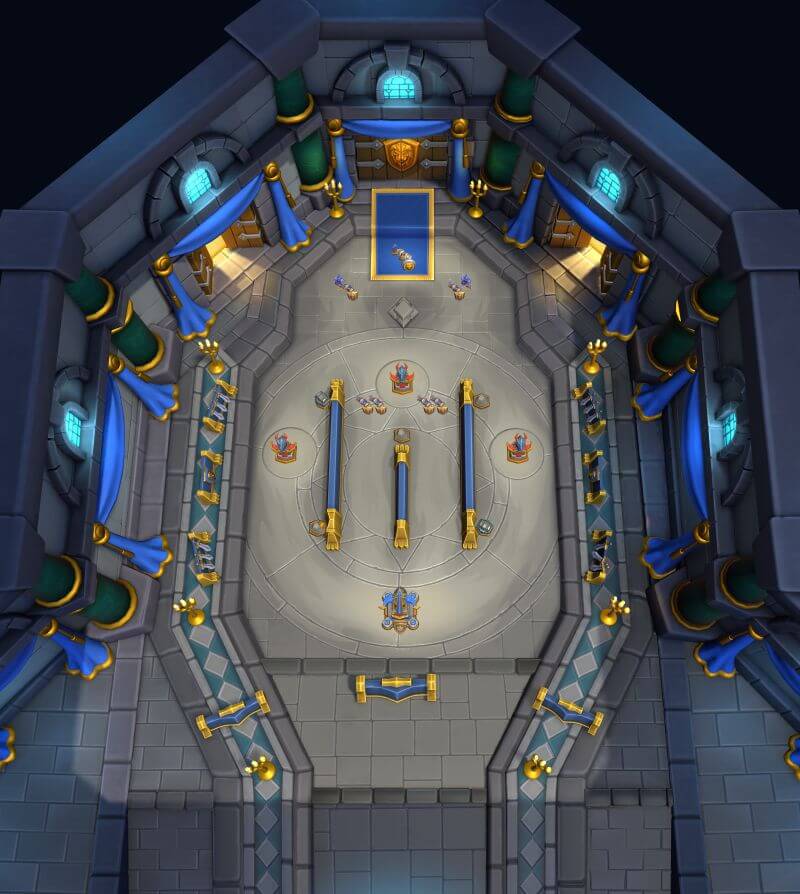
Highlord Bolvar map (illustration is from the normal version):
Minis in Highlord Bolvar’s army
- Footmen - Shield Bash
- Gryphon Rider - Mighty Throw
- Holy Nova - Renew
- Worgen - Premeditation
Heroic Bolvar does not use Harpies and Prowler, unlike the normal one. There are only four minis in his deck, so he can rapidly play anything he wants.
Other minis and map mechanics
Bolvar summons a group of three Royal Guards, an Arbalist, and a Priestess (in Heroic) every 40 seconds (at 5:20, 4:40, 4:00, and so on). The first group spawns on the left, then the next one on the right, and so on. A Royal Guard is basically a beefier Footman with 1250 Health instead of 800.
Bolvar has two main attacks: a cleave melee sword swing and a ranged Avenger’s Shield that bounces to five additional targets (in Heroic, to three in normal).
When there are 7 or more enemies around Bolvar (within a radius of 6, so closer than most ranged minis), he casts Highlord’s Justice that stuns enemies in a radius of 10 for 5 seconds, deals 200 damage to them, and knocks them back.
At phase transitions, Bolvar casts Consecration around himself and around all Towers. Consecration lasts for 8 seconds and destroys any mini or Tower in a 12-range radius in one second. Bolvar also casts Divine Shield on himself, negating all damage for 5 seconds. Finally, Bolvar summons two Royal Guards and two Arbalists close to him at every phase change.
Because Consecration does not cover the entire map, it is possible for minis on the way from Towers towards Bolvar to survive it and attack him again even before the Towers are back up.
In Heroic, Bolvar has a rotating banner that buffs his troops right from the start. Only one banner is active at a time. The different banners are:
Banner of War (red):
- Bolvar’s minis gain Unstoppable and Bloodlust
Banner of Unity (blue):
- Bolvar’s Tank minis gain Taunt
- When a nearby friendly mini dies, others gain a level
Banner of Light (yellow):
- Bolvar’s minis gain Lifesteal and Resist
The banner changes every 45 seconds in this order, starting from War and then into Unity and Light.
Starting from phase 2, Bolvar summons reinforcements whenever the banner changes:
Banner of War (red):
- 6 Harpies and Malfurion
Banner of Unity (blue):
- 8 Footmen and Jaina
Banner of Light (yellow):
- 4 Royal Guards, 2 Arbalists, and Tirion
In phase 3, Bolvar gains Retribution aura and begins to reflect 80 damage on his attackers each time he is hit.
General strategy
You want to control the gold, which means controlling the Towers. Because Bolvar has an area-of-effect damage attack, it is most effective to tank him from one side and deal damage from the other. Controlling the Towers also helps with sending troops from two directions.
At phase change, you want to attack the Towers before they are fully rebuilt. Because Consecration destroys minis very quickly, this requires some careful timing or a Meat Wagon with the Range talent to outrange Consecration.
Banner of Light, the yellow one, is generally the most dangerous of Bolvar’s banners. With Lifesteal and Resist, it can become difficult to take out his troops. Depending on your levels, you may want to focus on defense for the duration of the Banner of Light, and push again when the banner changes.