


Raid Setup
Introduction
Welcome to our Heroic Imperator Averzian guide for the first boss in The Voidspire Raid. This guide covers the fight mechanics and the strategy we recommend to defeat this boss on Heroic difficulty.
This boss is basically tic tac toe, which is perfect, because I used to play this all the time with my grandma while we were waiting for dinner to be done. This is my moment. Years of training for the most important raid mechanic of all time: not letting my opponent get three in a row.
Fight Style: Heavy Cleave fight
Recommended Setup: 2x Tank / 4x Healer / 14x DPS
Required utilities: None
Hero/Lust usage: On Pull
Method Boss Review
This boss is a really nice take on what a first boss should be. It has a unique mechanic that we haven’t really seen before, without turning it into something annoying or overcomplicated.
Most first bosses are usually a bit of a letdown because they’re light on mechanics and don’t feel very special, so this is a welcome change.
The only real downside is that once you understand the tic tac toe game, there isn’t a whole lot else going on.
Method Boss Rating: (3/5)
Easy Mode
This boss is tic tac toe. Do not let the boss claim three tiles in a line.
Shadow’s Advance Board Phase:
- Boss starts with Shadow's Advance and spawns 3 Abyssal Voidshapers.
- Each Voidshaper casts Gathering Darkness. If it completes, that tile is claimed.
Umbral Collapse saves 2 tiles:
- You get two Umbral Collapse soaks back-to-back.
- Raid leader calls which two tiles to save.
- Umbral Collapse target runs to the called marker, everyone stacks to soak.
- As soon as the first soak explodes, sprint to the second tile and soak again.
- If done right, only 1 tile gets claimed each wave.
Add Priority:
- Kill Abyssal Voidshaper first. If it hits 100 energy it becomes an Obsidian Endwalker.
- Cleave Voidmaws and the Shadowguard Stalwart / Annihilators.
- Kill Voidmaws before they reach a portal at sub 35% HP.
- Interrupt Pitch Bulwark from the Stalwart/Annihilator or everything gets a massive absorb shield.
Dodging:
- Void Fall is a knockback and lots of swirlies. Dodge.
- Oblivion's Wrath is spikes that fire in a direction. Dodge.
Tanks:
- Swap on Blackening Wounds around 8-10 stacks depending on comfort.
- Keep in mind adds move towards the tank with the highest stacks
Mechanics
If the boss is standing within 10 yards of a claimed spot (a spot that was not destroyed with Umbral Collapse), he gains:
- 75% increased damage done
- 90% reduced damage taken
Don’t let him hang out next to claimed tiles unless you want the world’s slowest pull.
The same buff is applied to the adds if the are also within 10 yards of the boss.
The boss spawns minions and targets three spaces, each one spawning an Abyssal Voidshaper.
Voidshapers cast Void Rupture. If the cast completes, they claim the spot. Using Umbral Collapse, you can destroy two out of the three Voidshapers and only have to fully fight one.
Voidshapers also have an energy bar. At 100 energy, they turn into an Obsidian Endwalker.
Shadowguard Stalwart / Annihilator
An add that casts Pitch Bulwark, placing a large absorb barrier on its allies. This should be interrupted.
Voidmaws
Small adds that give a stacking shadow DoT with each melee hit, and once they reach 35% HP, they start moving towards the nearest portal to heal up to full. During that, their movement speed is reduced by 75%.
A random player gets a soak circle that explodes after a few seconds. Damage is reduced based on how many players are soaking.
If the circle is placed on top of an Abyssal Voidshaper, it kills the add and prevents that spot from being claimed.
Each hit reduces the Tank’s max HP by 4% for 20 seconds. Swap once the stacks make the tank too squishy to comfortably survive (at around 8-10 stacks).
This also makes every add that spawns rush towards the tank with the highest stacks of this debuff.
The boss spawns spikes around him that, after a short delay, fire in the direction they’re facing, dealing damage to anyone hit.
Strategy
The Imperator Averzian Heroic fight is basically playing tic tac toe, and your goal is to stop the boss from winning. That’s the whole fight. Everything revolves around that board.
The Tic Tac Toe Mini Game
The boss opens with Shadow's Advance, spawning three Abyssal Voidshapers. They start casting Gathering Darkness. If that cast completes, the space is claimed, think of it like the boss placing an X.
Here’s the map layout:
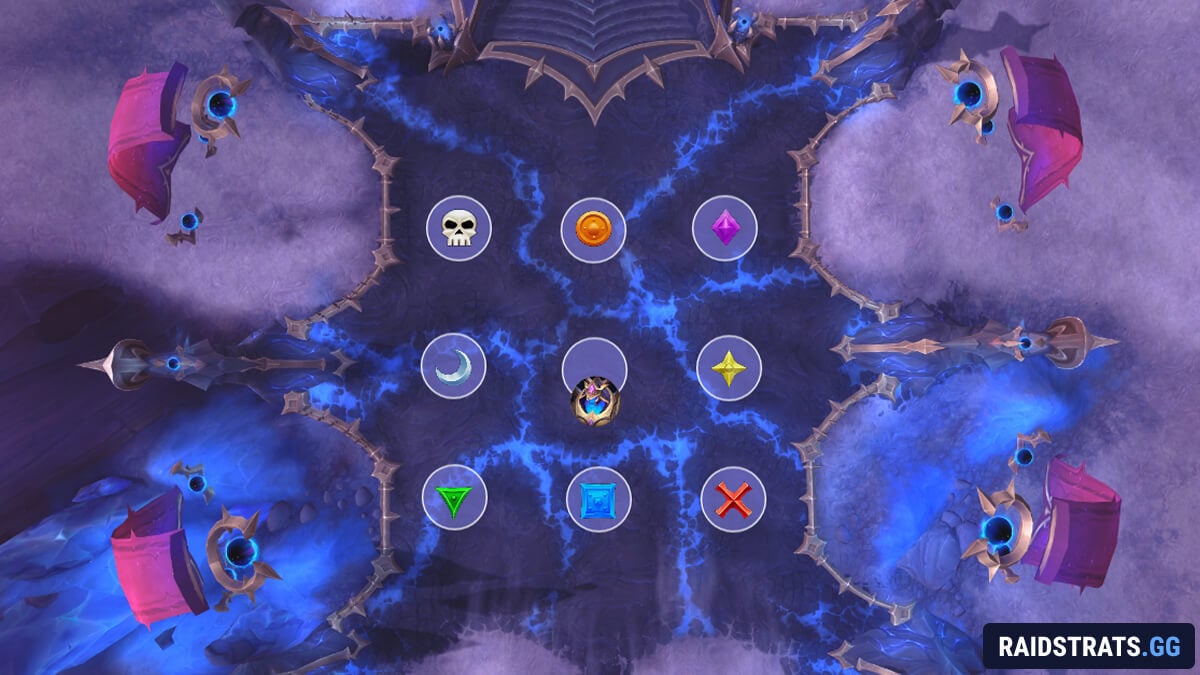
If the boss ever manages to claim three spaces in a line, it triggers an enrage mechanic that quickly wipes the raid. So your entire goal is to make sure the board never reaches that point.
Umbral Collapse Assignments
The good news is you can destroy two out of the three Voidshapers each wave using Umbral Collapse.
When you get targeted by Umbral Collapse, move to the marker your raid leader calls, and everyone else soaks with you to split the damage.
This happens back-to-back:
- So you soak the first one
- Then you immediately run to the second one and soak again
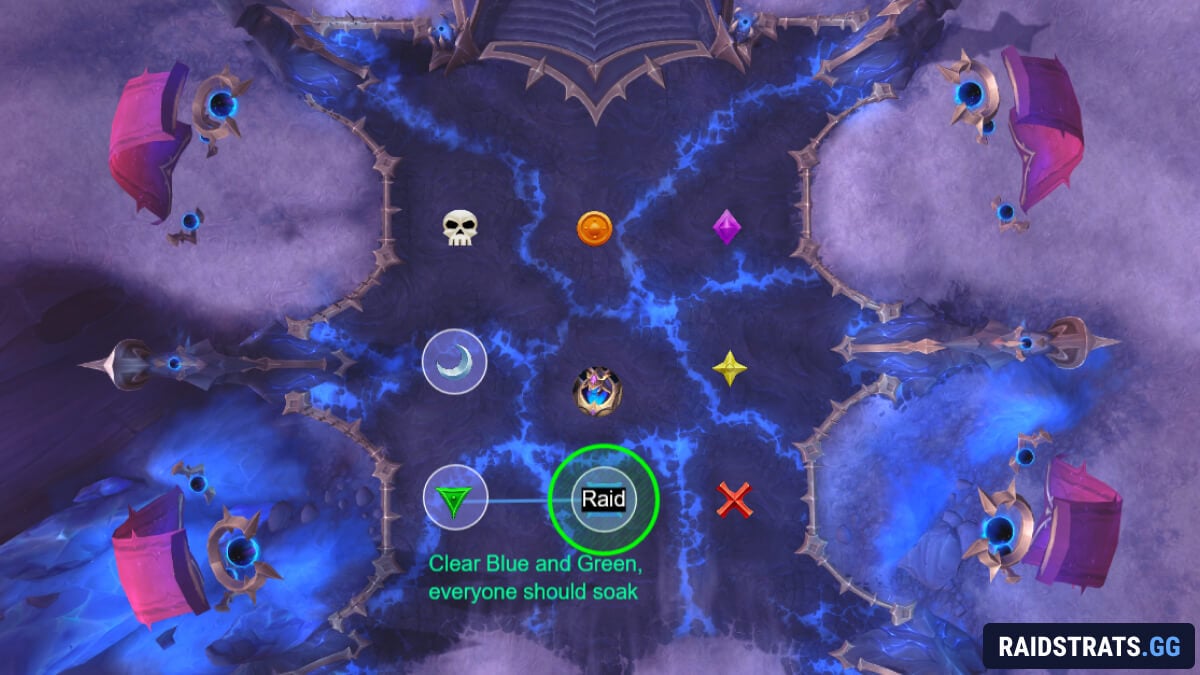
If you do it correctly, only one of the three spots will be claimed each set.
Next time Shadow's Advance happens, your raid leader needs to call on the fly which two spots to soak based on what’s already claimed. Thinking ahead matters a lot here, because one bad choice can set up a “free line” later.
Always make sure to keep the boss away from the claimed spots (portals), and never keep the boss next to the adds as they also get affected by Imperator's Glory when within 10 yards of the boss
Add Priority
After the board part, you’re fighting:
- Abyssal Voidshaper (priority kill)
- Shadowguard Stalwart
- Voidbound Annihilator
- A bunch of Voidmaw adds
Abyssal Voidshaper is always the kill priority. You want it dead before it reaches 100 energy, otherwise it becomes an Obsidian Endwalker, and that’s basically the “why did we let this happen” moment.
Stalwart / Anihilators and the Voidmaws can be cleaved down, but you must interrupt Pitch Bulwark from the Stalwart and the Annihilator, because if it goes through it puts a huge absorb shield on everything and makes the wave drag out for no reason.
Voidmaws will start to move towards a portal once below 35% and if they reach it, they heal up to full, but this should rarely be an issue as they die fairly quickly.
Dodge Mechanics
Void Fall and Oblivion's Wrath happen regularly. They’re just spikes and swirlies that you dodge. Nothing fancy, just don’t get clipped.
Tank Notes
Tanks need to watch Blackening Wounds. Once stacks get high and the max HP reduction ramps up, random mechanics can suddenly become lethal.
Swap at around 8-10 stacks, depending on comfort and healing.
The adds will automatically move towards the tank with the highest stacks of this debuff so make sure you are not standing next to the boss, otherwise everyone gets buffed.
As long as you handle the tic tac toe calls cleanly and kill the adds quickly, you shouldn’t have any problem defeating this boss.
