
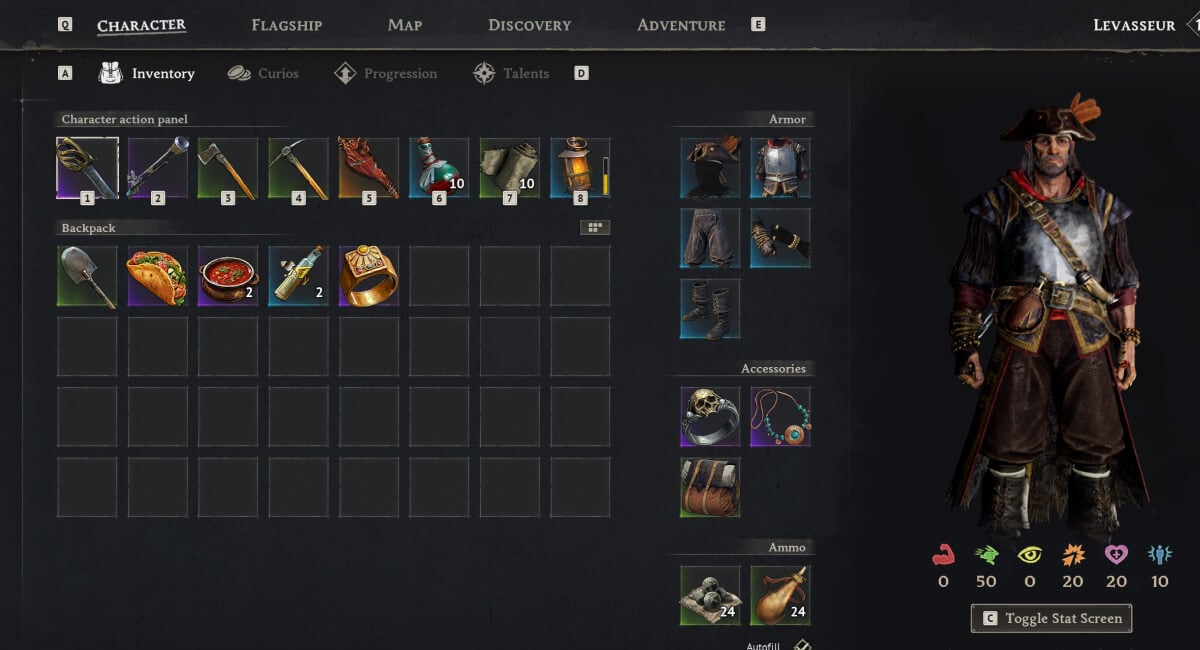
Even though there's still a tonne of content to come in the Early Access version of Windrose, the game is already pretty fleshed out when it comes to builds and there's enough flexibility in the game through Stats, Talents, Rings, Necklaces and Food etc to create some pretty awesome and unique builds.
Whether you are just preparing for the Ashlands, or trying to optimise your build for efficient farming, in this guide we'll break down some of the most effective and powerful builds in the game.
Quick Links
- Rapier Precision Build (S+ Tier)
- Plague Halberd AoE/Cleave Build (S Tier)
- Best Ranged Build: Reliable Musketeer (A Tier)
- Saber Dragon Crit Build (A Tier)
- Smasher Fish Ro Dah Build (C Tier... but fun?)
1. Rapier Precision Build (S+ Tier)
Overview
Strengths
- Incredible damage & speed
- Excellent survivability (Perfect Blocks & healing)
- Double dips on Stats for Ranged Damage
Weaknesses
- Optimal build & damage output requires mastering Perfect Block
The reason this build is called the Precision build is simple: both Rapiers and Pistols (and Muskets) scale with Precision. This allows us to dump all of our 'damage' stats into Precision instead of splitting it between Strength or Agility and Precision.
There are two different variants of this build, using two different Rapiers: The Rapier Of A Thousand Cuts and the Rapier Of Devastation. As soon as you find the Rapier Of A Thousand Cuts you can get this build off the ground in the early-mid game and then as soon as you get the Rapier Of Devastation you should swap to it.
This build is capable of taking you all the way through the game, and is even viable (albeit not optimal) for end-game farming.
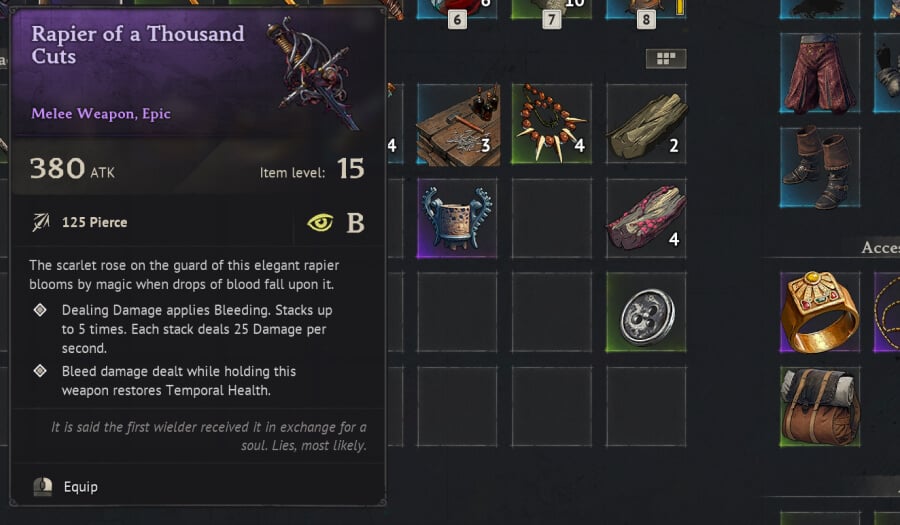
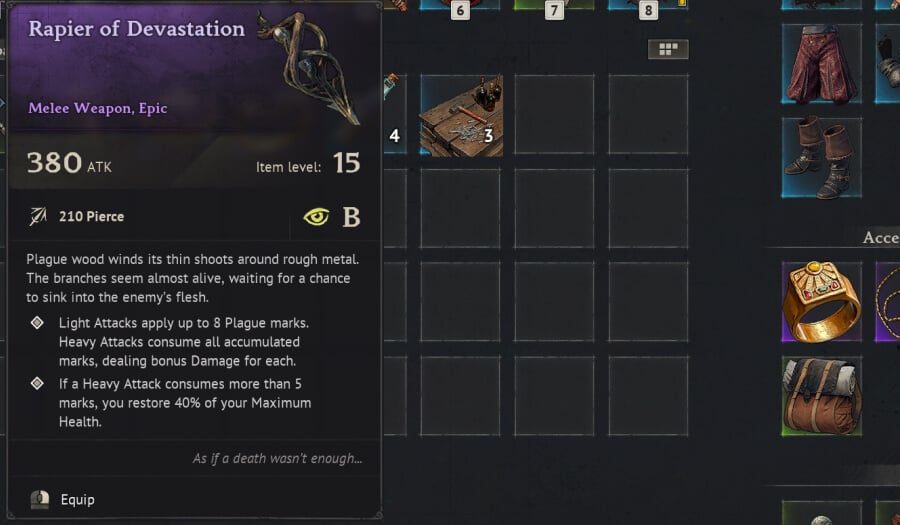
Both weapons are great, but swap to the Rapier Of Devastation as soon as you can for its superior damage and insane healing capabilities.
Gear & Consumables
Let's run through all of the suggested gear first before we discuss the build.
This build depends on having the following weapons:
- Weapon (Early-mid Game): Rapier Of A Thousand Cuts
- Weapon (Late Game): Rapier Of Devastation
- Ranged Weapon: Drake's Double-Barreled Pistol OR Reliable Pistol
For armor, we're going to take two set bonuses if playing with Rapier Of A Thousand Cuts and running full Flibustier's set if using Rapier Of Devastation.
- Armor Set (Thousand Cuts): Conquistador's (2x) + Pikeman's (2x)
- Armor Set (Devastation): Flibustier's (4x)
For jewellery, we'll switch up the ring depending on which Rapier we are using but for both we want the Major Necklace Of Precision.
- Ring (Thousand Cuts): Major Spear-Thrower's Ring (+Pierce Damage)
- Ring (Devastation): Major Warrior Ring (+Special Weapon Damage)
- Necklace: Major Necklace Of Precision (+Precision)
The best consumables options for us are Precision Food (Swamp Pie is best) and Endurance Food (Coffee), with the +Damage Elixir.
- Food: Precision Food and Endurance Food
- Potion: Elixir Of Cruelty (+8% Damage)
Important: The Rapier Of A Thousand Cuts is a 'random' drop from various POI chests throughout the game, so some players won't end up obtaining it until towards the end of the game.
Playstyle: Rapier Of A Thousand Cuts
The Rapier Of A Thousand Cuts is an insanely powerful weapon thanks to it's Bleed effect which places a DoT on the enemy that stacks up to 5x and deals huge damage. The way you play this build is simple:
- Ensure that you have the maximum number of stacks on all enemies at all times. If the DoT is about to drop off, one hit will refresh all stacks.
- Play safe if necessary, allowing the Bleed DoT to do a lot of the work.
- Fire your Pistol whenever it is off cooldown (when the passive reload is up) but don't actively reload.
Playstyle: Rapier Of Devastation
The playstyle is a bit different once you obtain the Rapier Of Devastation. The key is to build up Plague Marks on the enemy before using your heavy attack for insane damage. You will barely ever need to heal with this build thanks to the healing you receive when you consume 5+ stacks of Plague Marks.
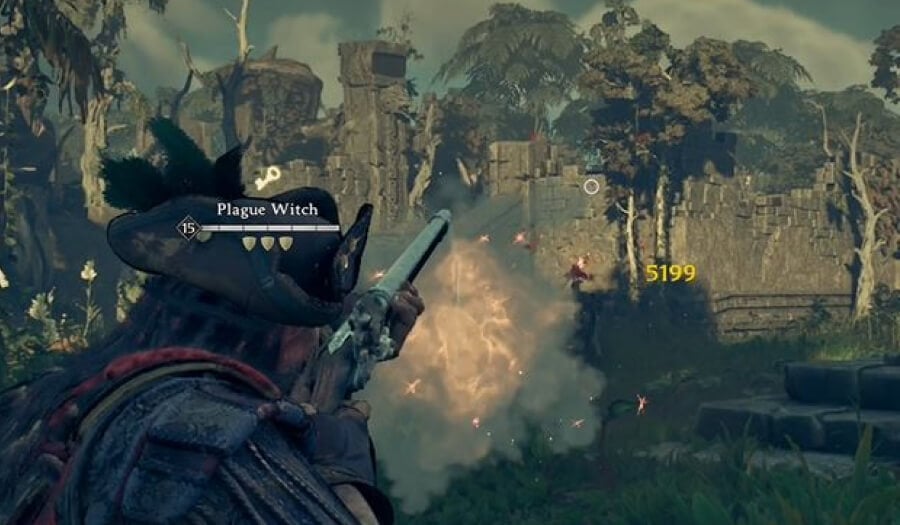
Note: Once you have Rapier Of Devastation, Drake's Double-Barreled Pistol is the best Pistol option thanks to the Vulnerability debuff you apply (Epic effect).
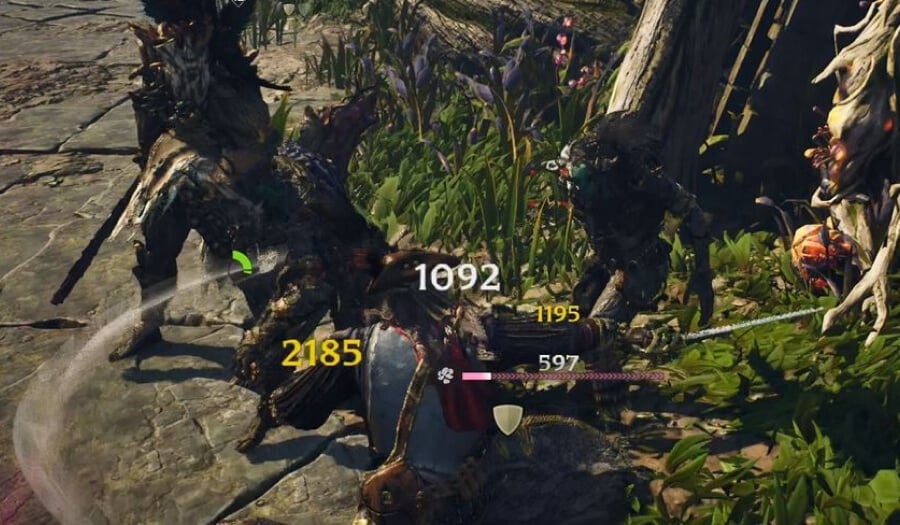
Against tough enemies (Plague Crocodiles, Plague Crushers, bosses etc) you will want to build up the full 8 stacks of Plague Marks, then apply Vulnerability with Drake's Pistol (epic effect) before using Heavy Attack.
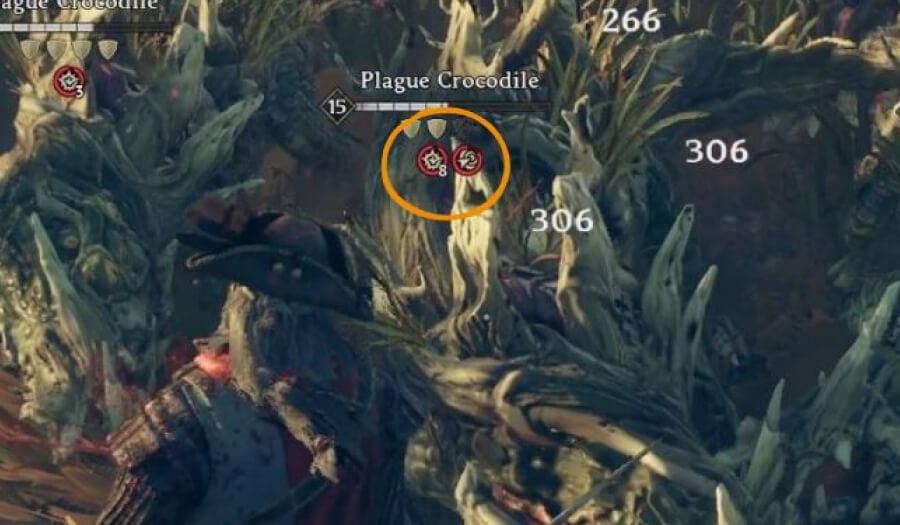
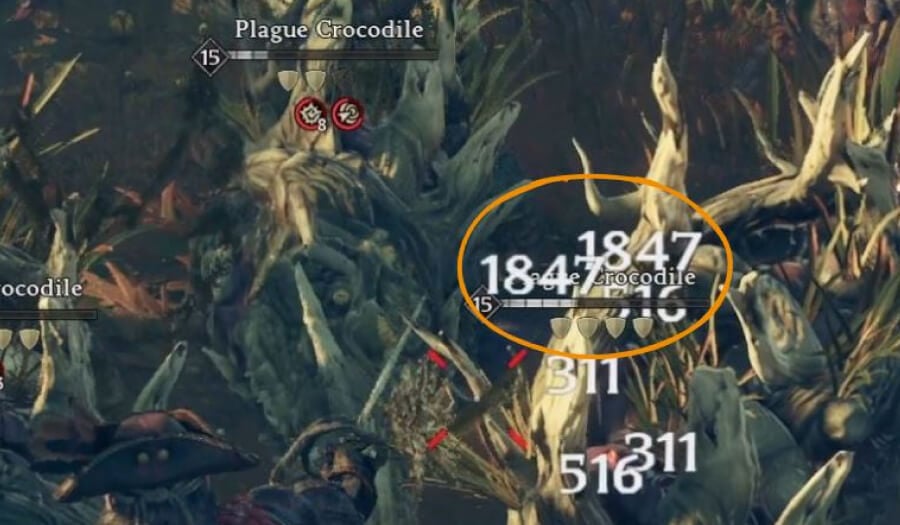
In the above image you can see we have 8 Plague Marks and Vulnerability on the target, resulting in almost 4k damage on heavy attack.
Efficiency with this build will come down to your ability to manage Perfect Blocks, so you can get many attacks in quickly without being interrupted.
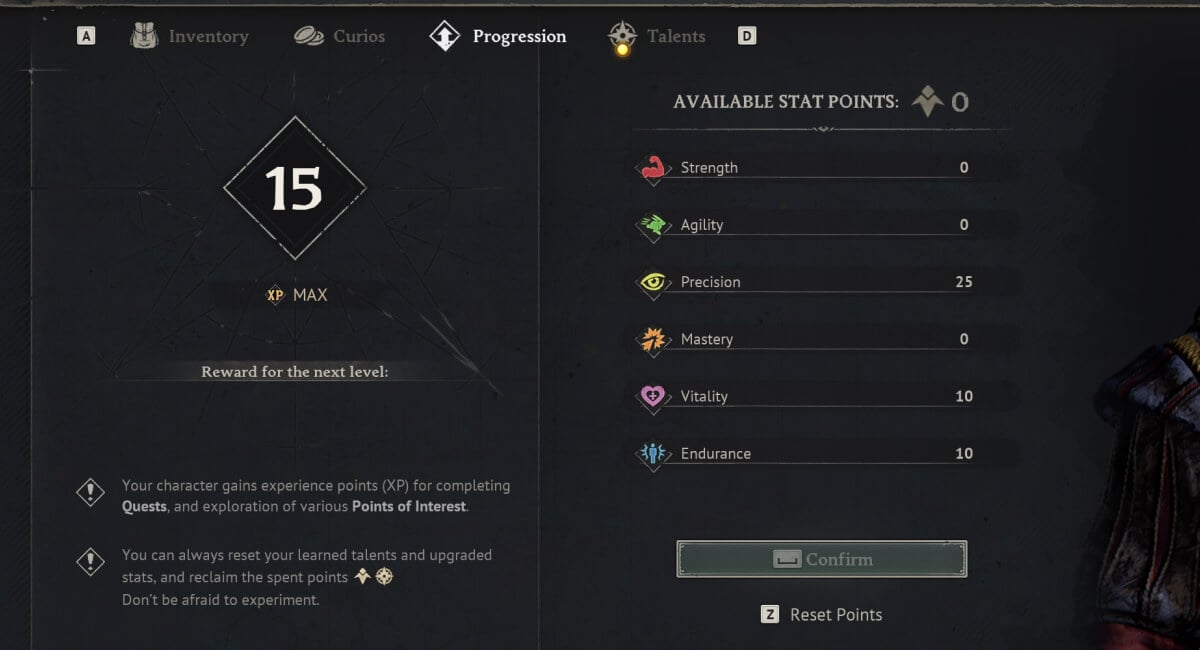
Stat Points
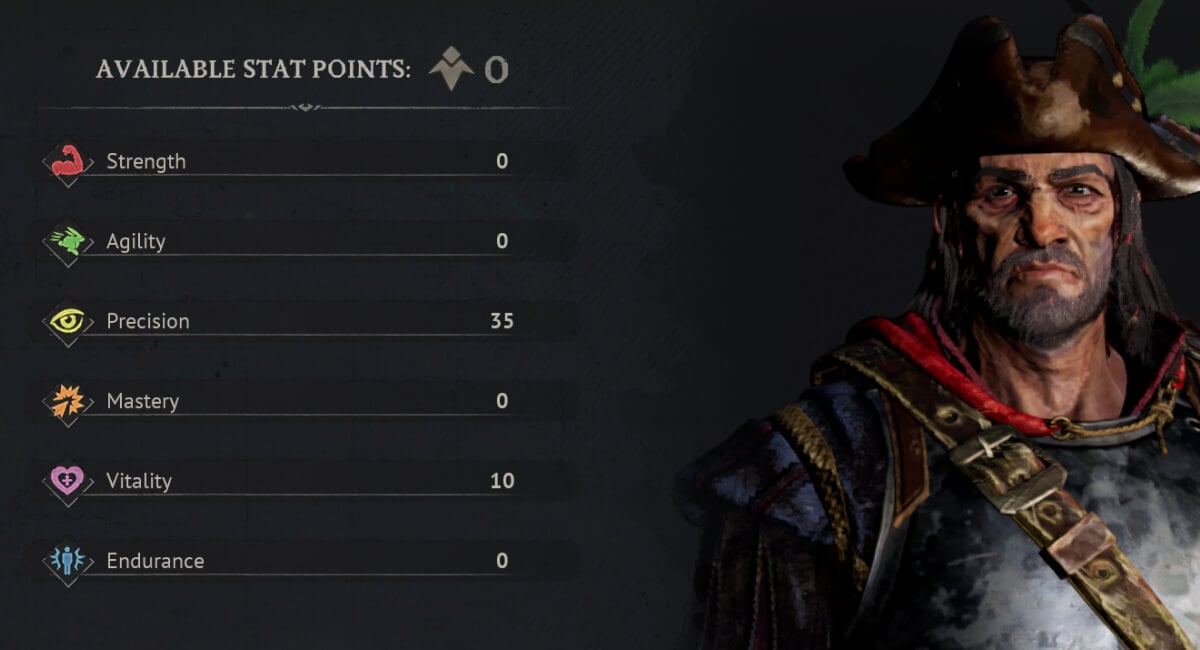
Your final Stat Point allocation will be:
- Precision: 35
- Vitality: 10
- Endurance: 0 (+20 from Coffee)
This is a pretty aggressive set-up that maximises damage and assumes you are very comfortable with Perfect Blocking as you will constantly refill your HP with the Epic effect, but feel free to shift some of the points away from Precision if needed. In the early-mid game, I would suggest more of a 1:1:1 ratio between Precision, Vitality and Endurance.
Also, when you switch from the Pikeman's 2P to go all in on Flibustier's for the Rapier Of Devastation, consider moving some points into Vitality to make up for the lost health.
A Note On DR: There does appear to be diminishing returns once you surpass certain breakpoints with different Stats. It looks like, for Precision, the damage you get per point drops by ~50% once you get past 20 points. Despite this however, the damage gain is still preferred over additional points in Vitality or Endurance (if you are using Coffee as a food item) and likely more effective than putting points into Mastery. Shout out to Slenderous for their work on this.
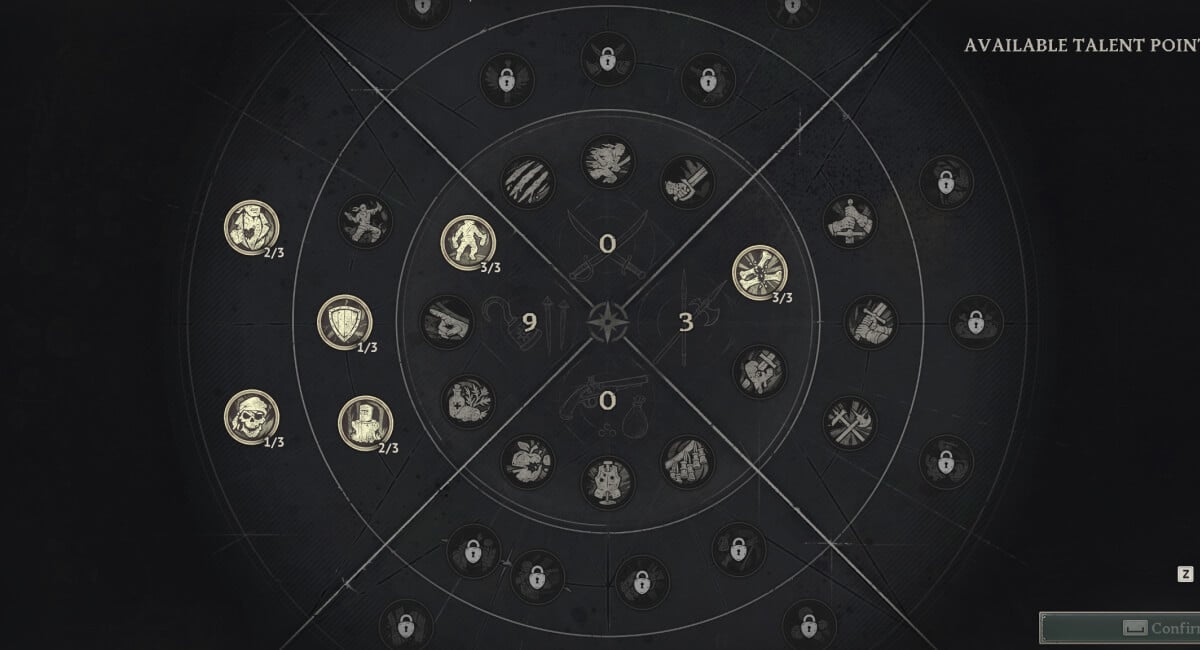
Talents
For the early-mid game build with the Rapier Of A Thousand Cuts, you will want to take the following:
- Marathon Runner (3/3)
- Just A Flesh Wound (3/3)
- Stout Frame (3/3)
- Too Angry To Die (1/3)
- You Will Answer For This (2/3)
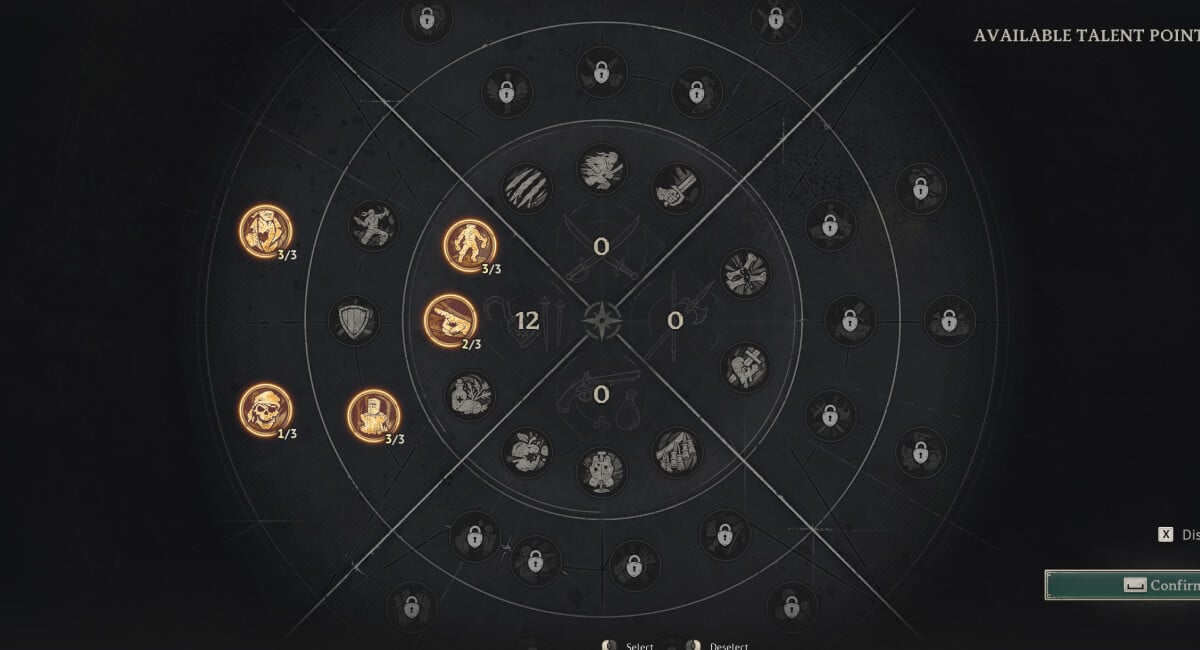
If you have less than 12 Points, just apply them in that order. This is the best build to progress through the game as it provides a good balance of increased Stamina, survivability and cheat death. You Will Answer For This synergises really well with the Rapier Of A Thousand Cuts's Epic passive.
Once you have the Rapier Of Devastation I would instead build as follows:
- Marathon Runner (3/3)
- Just A Flesh Wound (2/3)
- Outnumbered (1/3)
- Stout Frame (2/3)
- Too Angry To Die (1/3)
- Deep Impact (3/3)
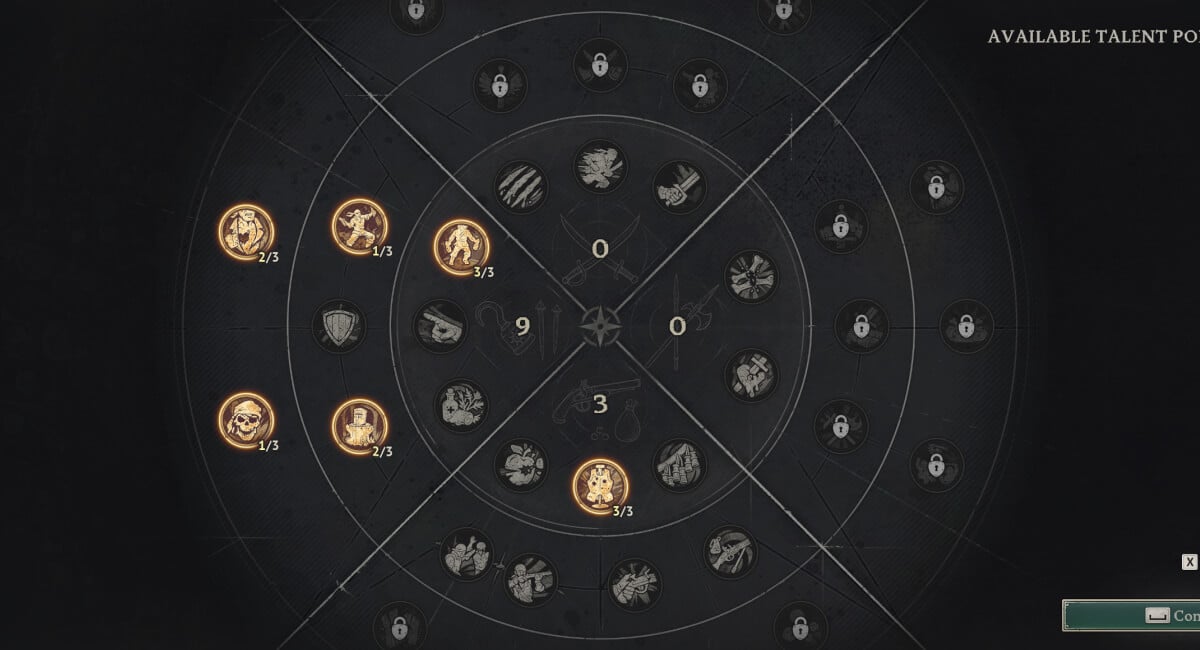
This build gives us some great survivability and cheat death while also providing an additional boost to Pierce Damage.
2. Plague Halberd AoE/Cleave Build (S Tier)
Overview
Strengths
- Very high damage cleave attack that melts enemy Posture
- Incredibly powerful AoE ability
- Strong self-healing
Weaknesses
- Halberds cannot Perfect Block
- Attack animation is slow and clunky
- Lacks any synergy with ranged weapons
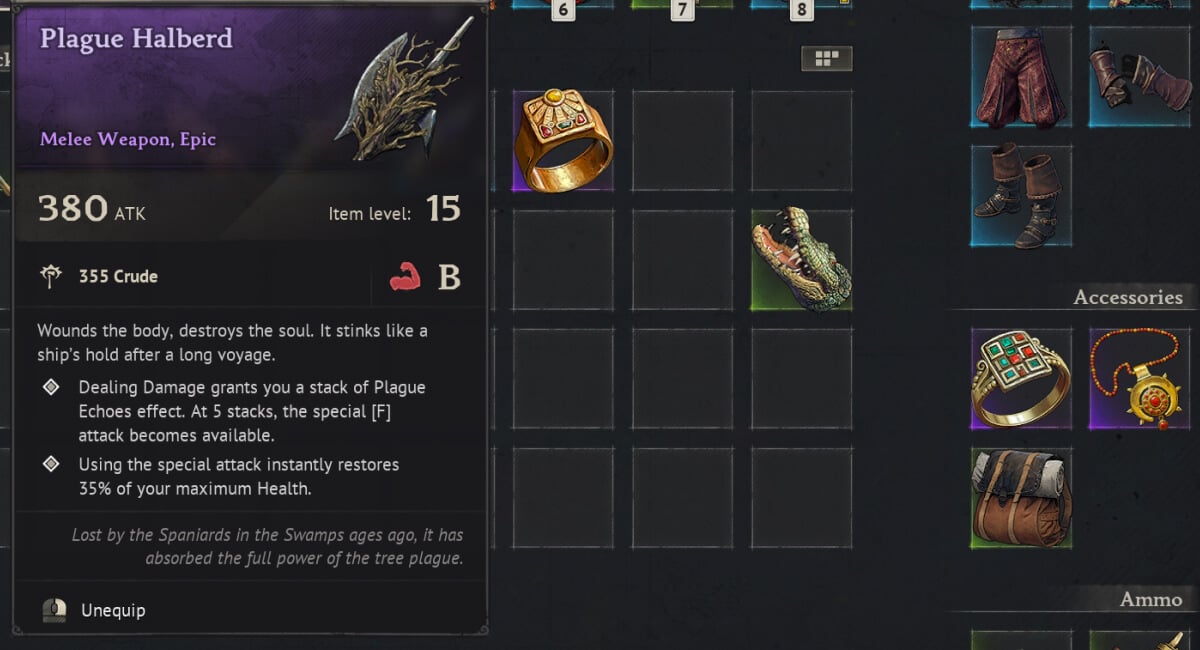
There are currently three Rare or better halberds in the game, the Sturdy Halberd, the Executioner and the Plague Halberd. I don't think that the halberd as a weapon type is currently strong enough to consider running either of the other options, but the Plague Halberd's special ability transforms the weapon.
Given that the Plague Halberd can only be obtained from Crypts or Ruins in the Cursed Swamps, this is going to be a late game build used for either finishing the game, farming or preparing for the Ashlands (upcoming zone).
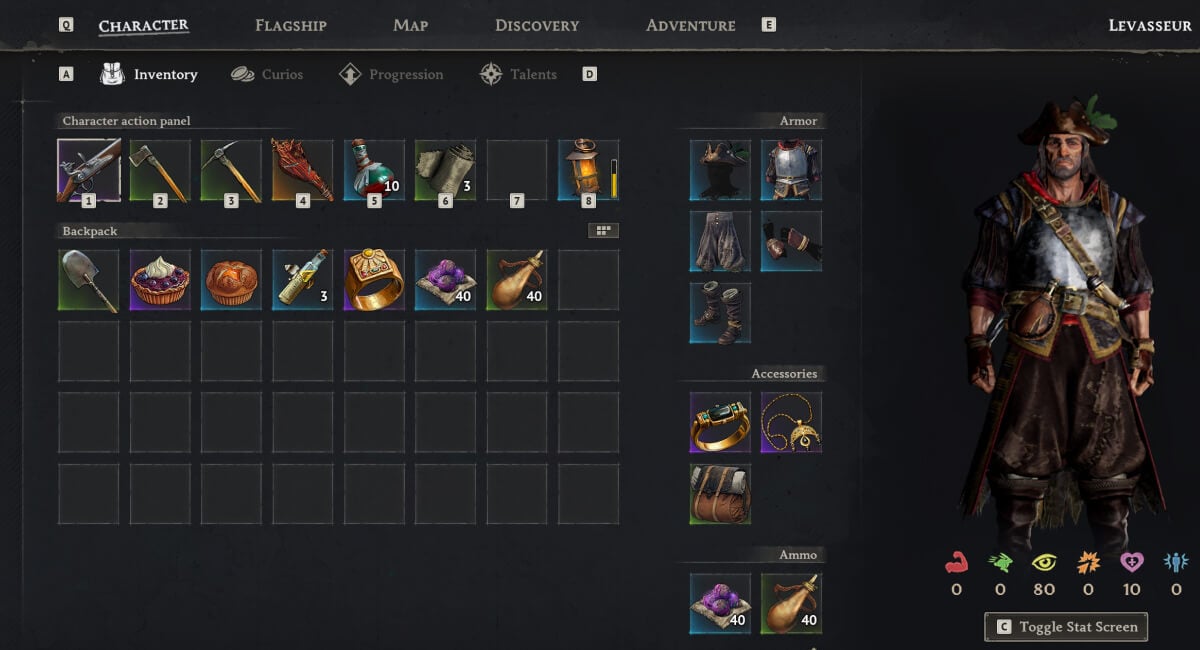
Gear & Consumables
We will of course be using the Plague Halberd, which is key for this build. For our ranged weapon, the Plague Pistol provides some nice extra sustain:
- Melee Weapon: Plague Halberd
- Ranged Weapon: Plague Pistol or Drake's Double-Barreled Pistol
For armor, there are two viable sets here. We prefer and recommend Pikeman's (4x) as the health synergises well with our Special Attack and the +15% damage is great obviously. However the Bulwark effect from Conquistador's lets us tank a couple of hits without interruption and charge up our Special Attack faster so it's also a solid option.
- Armor Set: Pikeman's (4x) > Conquistador's (4x)
For jewellery, we'll be using the Major Necklace Of Strength and there are two very good options for the Ring which will depend on what content you are tackling. The extra Crude Damage has a higher overall throughput and makes our Heavy Attacks incredible but the Warrior Ring allows for more powerful set plays.
- Ring: Major Warrior Ring (+30% Special Attack Damage) or Major Capricorn Ring (+12% Crude Damage)
- Necklace: Major Necklace Of Strength (+15 Strength)
The best consumables options for us are Strength food (Meaty Croc Kebab) and Endurance food (Coffee), with the +Melee Damage Elixir.
- Food: Strength food (Meaty Croc Kebab) and Endurance food (Coffee)
- Potion: Elixir Of Firm Hand (+13% Melee Damage)
Playstyle
The Halberd has a very different playstyle compared to the Rapier, or any other 1H build. It's slow, can't be used to Perfect Block and consumes a lot of Stamina per attack. However it also has a wide sweeping attack, deals huge damage and has a killer Special Attack. If you are coming from a 1H build, expect it to take some time to adjust.
Instead of a long rambling section here, I'll keep it short and easy to follow. These are the key playstyle notes:
- Do NOT sleep on the Heavy Attack. The animation is only slightly slower than the base attack animation and it can deal +70% damage or so.
- You will have to weave between blocking and dodging. If you are only blocking, enemies will shatter your Posture quickly.
- Keep a close eye on enemy Posture. When you break their Posture (which is easy with this weapon), use that time wisely with follow-up attacks.
- The Special Attack 'buff' does not expire once you hit 5 stacks so you can save it to hit multiple enemies at once.
- The Special Attack can be interrupted with other actions/attacks so be careful when you activate it.
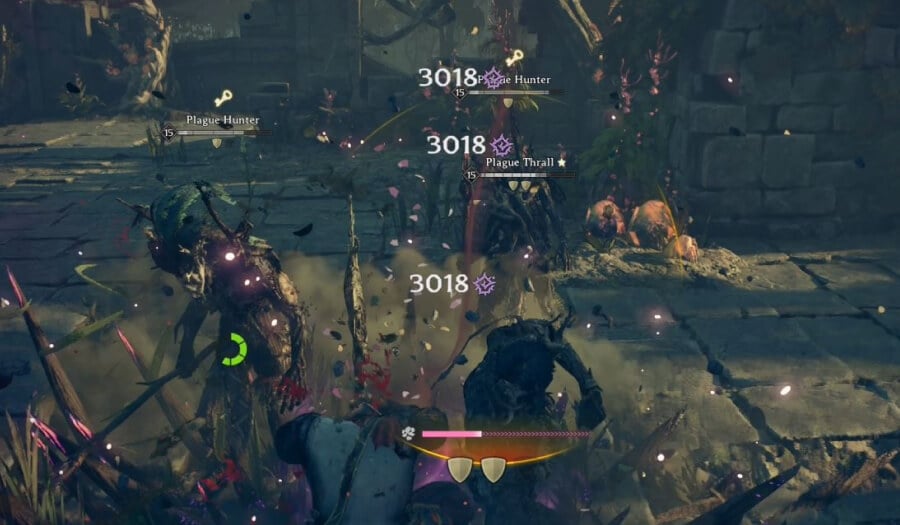
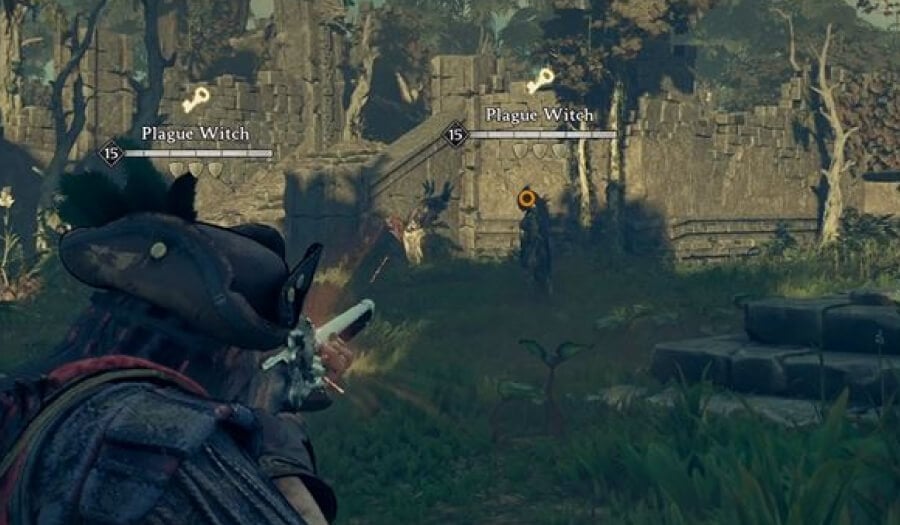
On the left we can see how powerful the standard Heavy Attack is and on the right, we almost one-shot a Level 15 Plague Hunter with our Special Attack.
The Halberd has a 3-swing combo (with light attacks) and both the light and heavy attacks have a fairly long range. Once you find your rhythm, you'll be mixing light and heavy attacks, blocking & dodging as needed and taking advantage of enemies being staggered or interrupted.
Use your Special Attack wisely as it has a pretty decent AoE and will heal you for 35% of your health. Don't feel bad about holding it for a short while if you need to.
Stat Points
Your final Stat Point allocation will be:
- Strength: 20
- Vitality: 15
- Endurance: 10
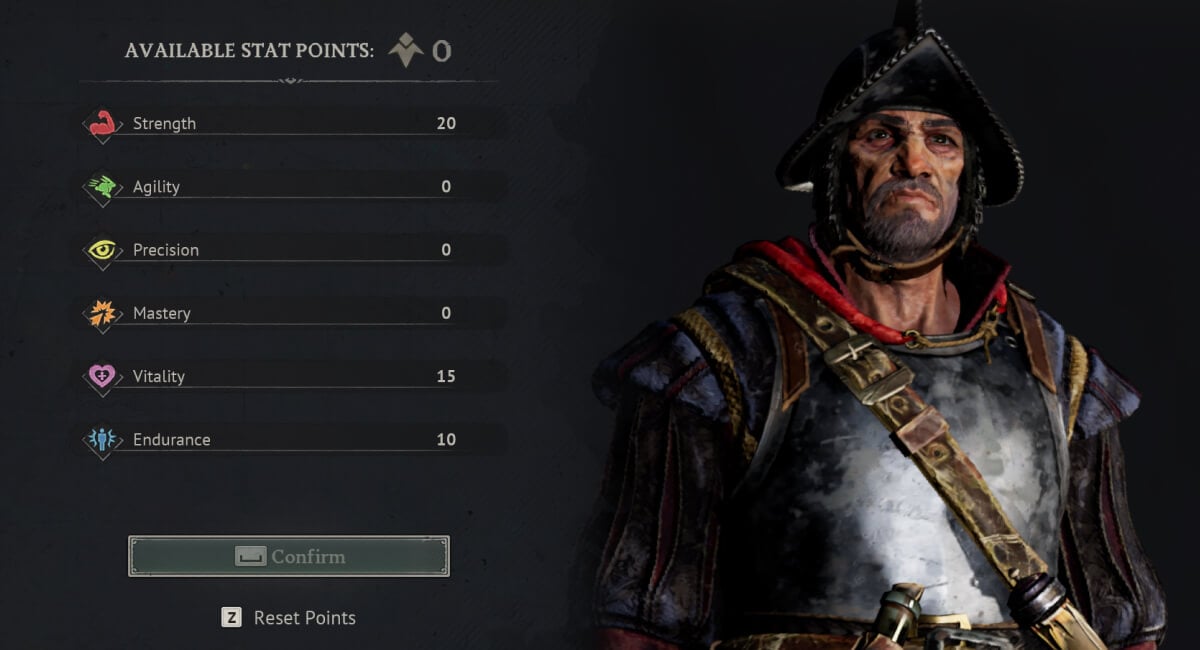
We don't have the luxury of Perfect Block with the Halberd so we opt for a few more points into Vitality with this build. You can also play around with this if needed but we wouldn't recommend putting any points into Mastery or Precision.
Talents
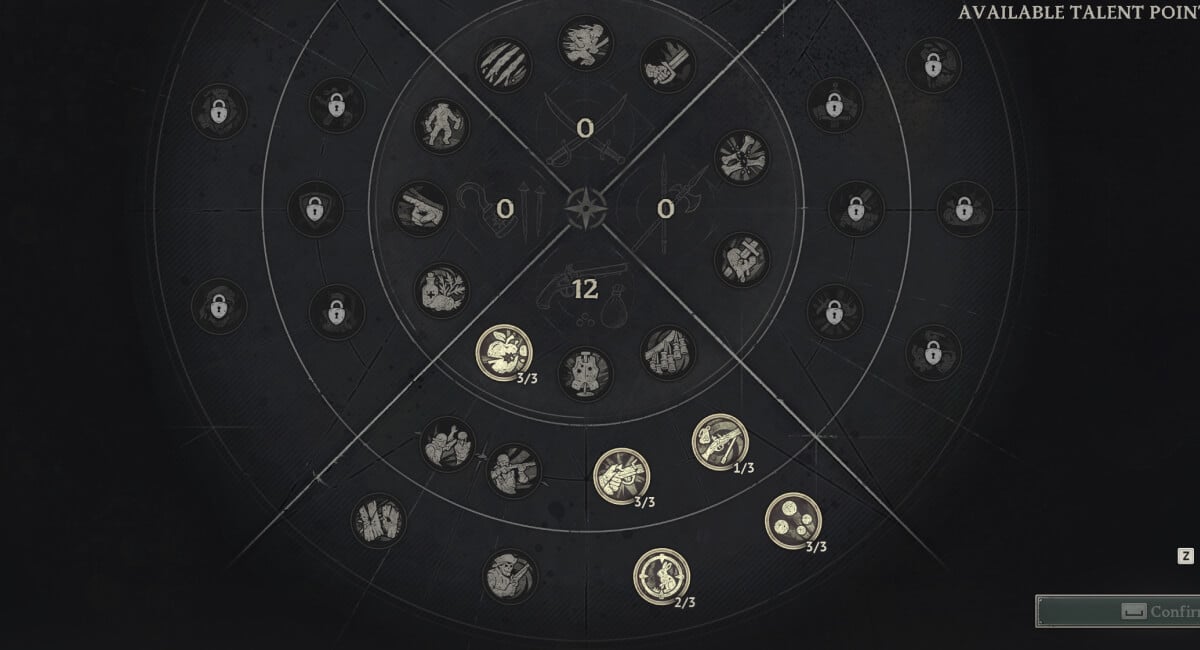
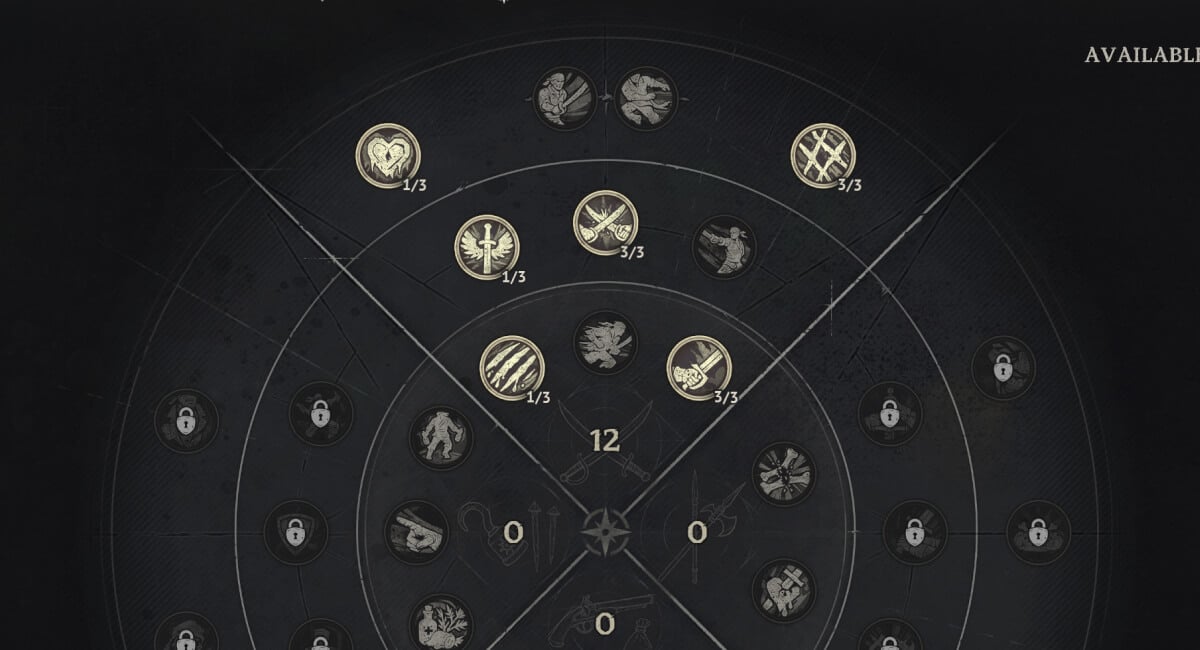
For our Talents, we recommend the following Talent build (in order):
- Marathon Runner (2/3)
- Stitches and Rum (1/3)
- Just a Flesh Wound (1/3)
- Outnumbered (2/3)
- Too Angry to Die (1/3)
- Stout Frame (1/3)
- Bonecrusher (3/3)
- Massive (1/3)
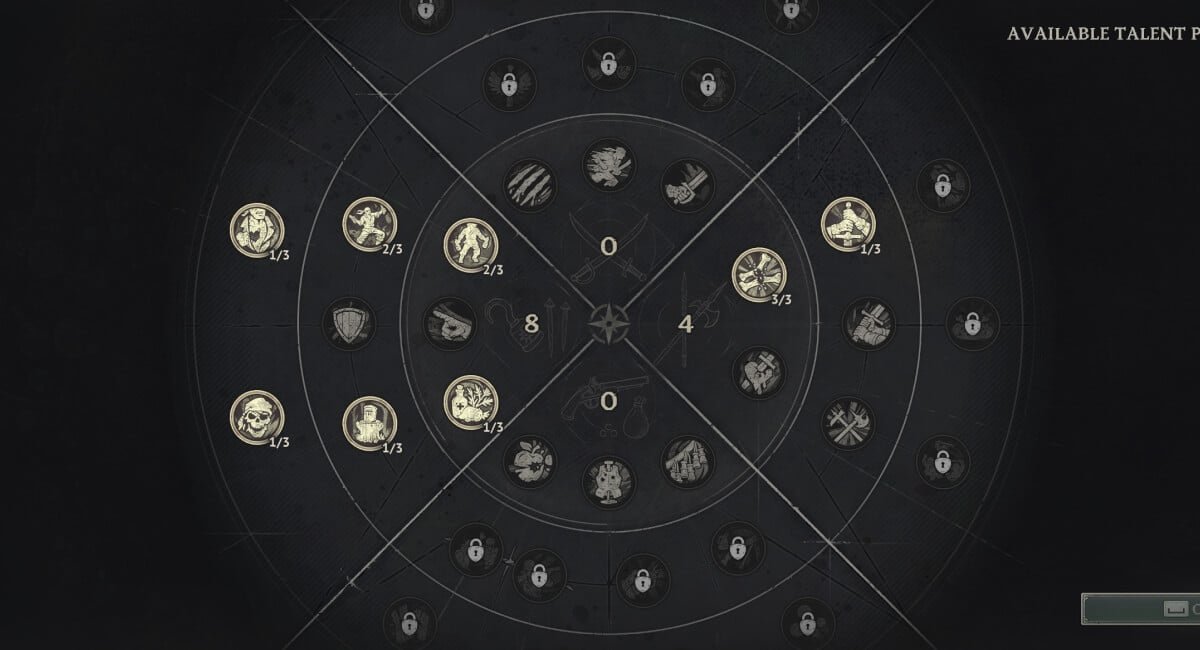
This build provides a nice balance of survivability, cheat death and a significant damage boost.
3. Best Ranged Build: Reliable Musketeer (A Tier)
Overview
Strengths
- Higher sustained DPS than any other build we've seen
- Extremely fun to play if you enjoy clicking heads
Weaknesses
- Requires consistent headshots, if you don't enjoy that playstyle then this won't be for you
- Very expensive to run as your primary build, requires a lot of bullets and gunpowder
- You will be very fragile and have no self-sustain and awful in boss fights
If you thought ranged-only builds were just for fun in Windrose, you were wrong. Turns out that this build is absolutely one of the strongest builds in the game and was actually the fastest build to complete our test run (clearing out Tainted Ruins Of An Ancient Temple).
However... the build does have a couple of downsides which prevent it from being in quite the same league as the Rapier and Plague Halberd builds. As mentioned above, you don't have any self-sustain through your weapons/abilities and you have to maintain a steady economy to keep your gunpowder and bullets stocked up.

Where To Find It: The Reliable Musket is a 'random' drop chance from the POIs in Coastal Jungle and Foothills, so with a bit of luck you should obtain it pretty early. I'm not sure I'd really recommend this build until much later though as it is gear-dependent and you require a lot of Gunpowder and Bullets!
Gear & Consumables
The Reliable Musket, what a beauty of a weapon. Both the Rare and Epic effect are critical for this build, so no alternative will suffice. We do not want to be fighting in melee but the musket has a melee attack if really needed that does pretty high damage.
- Melee Weapon: None
- Ranged Weapon: Reliable Musket
- Bullets: Bullet Arborum > Iron Bullet
For our armor, we are definitely going to be taking the Marksman set, with a minimum of 4 pieces for the extra +15% Ranged Damage bonus.
- Armor Set: Marksman's (4x)
When it comes to jewellery, we're definitely going to be running the Necklace Of Precision. We considered the Spear-throwers Ring but the Major Cutthroat Ring is actually much better.
- Ring: Major Cutthroat Ring (+30% Critical Damage)
- Necklace: Major Necklace Of Precision (+15 Precision)
For Food, we're going to double-stack Precision Food, the highest you have available. Our best Elixir is the +Crit Damage Elixir.
- Food: Swamp Pie (+20 Precision) and Banana Muffin (+10 Precision)
- Potion: Elixir Of Concentration (+30% Critical Damage)
Playstyle
Ultimately this is a glass cannon build. You want the enemy to be dead long before they reach you and if you land a headshot, they should be. The only reason this is a genuinely viable build rather than just being a fun/meme build is because of the Reliable Musket's reload speed (thanks to its Rare effect), combined with the Quick Hand Talent which improves it further.
This combination brings the reload speed to under two seconds which means that even when fighting against groups of 3-4, as long as you start from a distance, you should be able to deal with them all.
Headshots are absolutely critical for this build and you need to land almost all of your shots as headshots for it to be viable. In Windrose that is relatively easy to do with a little bit of practise but it's not for everyone so be aware of that.
Now you see me, now you don't.
Some tips:
- When dealing with groups, make sure you start from a distance
- Take out ranged enemies first as they are the biggest threat to you
- Use Bullet Arborum sparingly and only against highest level/challenging enemies, Iron Bullet work fine
If you miss a shot or you are fighting a group of enemies and one or two of them reach you, just dodge and take a close range shot if you can. Worst case just kite them until your passive reload is back up and then turn around and fire. For dealing with enemies that only have a tiny bit of health left, just left click them to melee them with your musket.
Stat Points
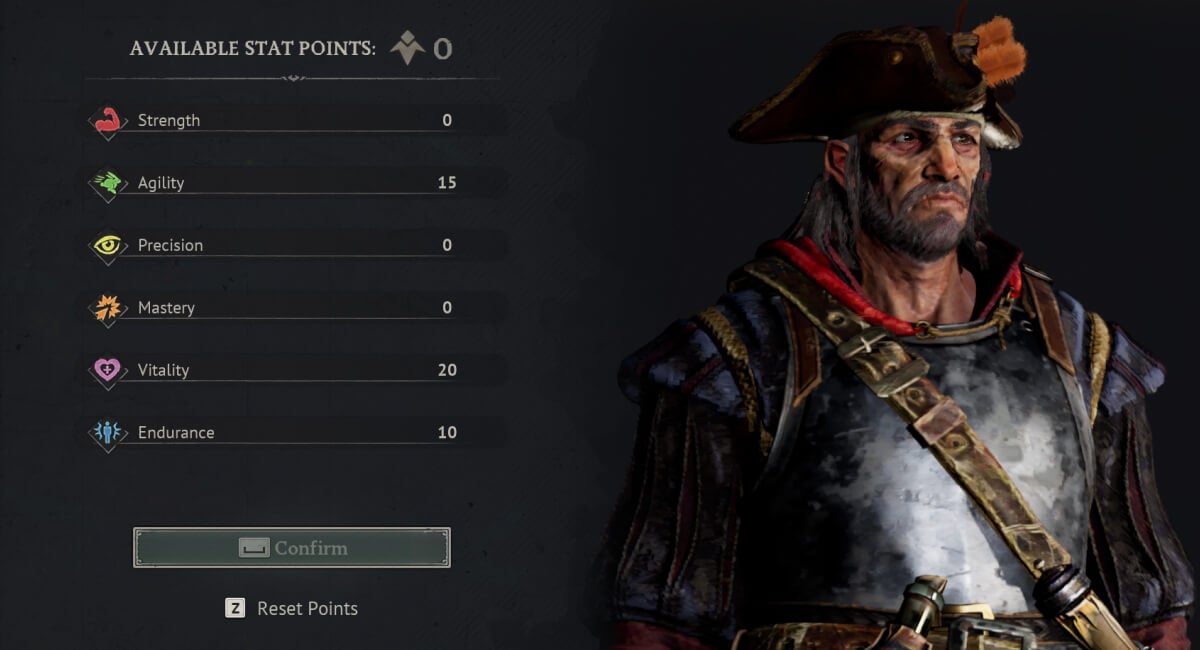
One of the things that allows this build to really shine is that it requires almost no Stamina whatsoever. For some reason, ranged combat in this game uses 0 Stamina, allowing us to skip Endurance completely. Suggested final Stat allocation below:
- Precision: 35
- Vitality: 10
- Endurance: 0
You shouldn't really be taking any damage with this build if you are dodging ranged attacks so feel free to get even more aggressive in reducing Vitality, however realistically you will probably be caught out by a Plague Crocodile lunge or a Plague Witch totem attack so I prefer to have a bit of wiggle room.
Talents
For the Talents, we recommend the following Talent build (in order):
- Bull's Eye (3/3)
- Quick Hand (3/3)
- Bulletstorm (3/3) - possibly the best talent in the game
- Sniper's Focus (2/3)
- Firearm Training (1/3)
With this Talent build we are focusing on optimising for damage.
Hope you enjoyed these builds and that this was helpful! We're planning to add more builds soon but let us know if there's any build in particular you want us to cover.
4. Saber Dragon Crit Build (A Tier)
Overview
Strengths
- Highest auto-attack DPS in the game with full set-up
- Can start the build early-mid game with 2x Privateer Set
- Super fun to play and great single target damage
Weaknesses
- Mostly reliant on auto attacks after the Blunderbuss opener
- No self-healing outside of Executioner's Grace and consumables
- Fragile build with fairly low health and no defensive buffs/passives
As soon as I saw the Privateer 2-piece set bonus early in the game, I knew I wanted to create a crit build at some point. It's not quite as powerful as the Rapier Of Devastation or Plague Halberd builds but it's still surprisingly solid thanks to a few Talents that synergise incredibly well.
The build is centred around either Razor or Dueling Saber, both of which are nifty little one-handed swords that can be found as a random drops within the Coastal Jungle & Foothills POIs, and Dragon's Breath, a late-game Blunderbuss found within Crypts and Ruins in the Cursed Swamps.
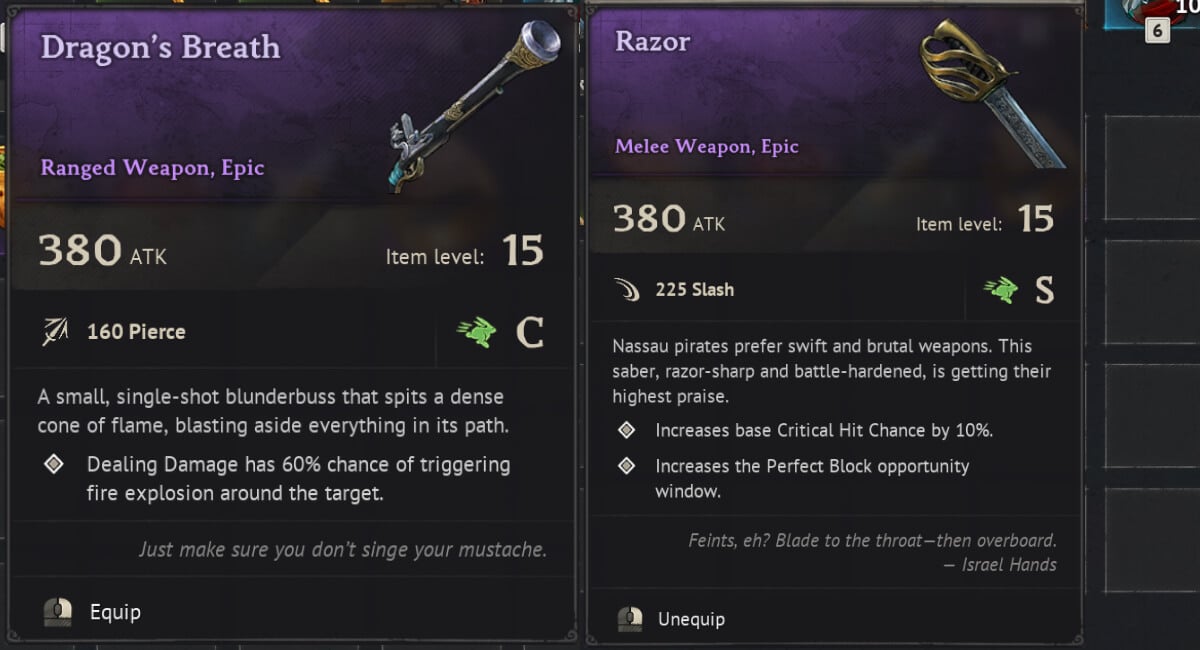
Both of the Sabers and Dragon's Breath scale with Agility and the extra crit damage also works for headshots to create a powerful melee/ranged combo. If you don't have Dragon's Breath yet, you can use the Reliable Blunderbuss as a replacement, it will still work reasonably well since it's mostly a melee build anyway.
Gear & Consumables
Razor and Dueling Saber are both viable with Razor being the option that is easier to play (and can also be used in this build before its ascended to Epic) whereas the Dueling Saber is higher risk, higher reward with greater damage potential but more asked of the player.
- Melee Weapon: Razor OR Dueling Saber
- Ranged Weapon: Dragon's Breath > Reliable Blunderbuss
- Bullets: Iron Bullets are fine
We will be running the full Privateer set with this build as both the 2P and 4P bonuses are essential.
- Armor Set: Privateer (4x)
When it comes to jewellery, we're definitely going to be running the Major Necklace Of Agility which scales with both of our weapons. Naturally, we'll also be taking the crit ring: Major Cutthroat Ring.
- Ring: Major Cutthroat Ring (+30% Critical Damage)
- Necklace: Major Necklace Of Agility (+15 Agility)
When it comes to consumables, we'll be taking Agility and Mastery food, and the +crit damage Elixir of course:
- Food: Gazpacho (+20 Agility) and Taco (+20 Mastery)
- Potion: Elixir Of Concentration (+30% Critical Damage)
Playstyle
This build actually has a really fun playstyle. First of all we're always going to open with a massive Blunderbuss shot to the face, so we can get the passive reload working for us immediately. After that, it's all about trying to maintain high uptime on all of our buffs, namely:
- Deadly Finale (Up to +25% damage on consecutive hits)
- Perfect Counter (+12% Crit Chance on Perfect Block, lost on damage taken)
- Retaliation (Up to +24% damage on consecutive Perfect Blocks, lost on damage taken)
- Executioner's Grace (Healing over 20 seconds on kill, lost on damage taken)
Basically you want to Perfect Block every melee attack and try to avoid taking any damage from unblockable attacks or ranged attacks. Once you start to ramp, you'll see that this build can deliver huge damage. Rotate in shots from your Dragon's Breath when it's finished passive reload.

On the left, Dragon's Breath opens with a lethal blast and on the right, a sweeping heavy attack crits.
Our total Crit Chance when we have all of our buffs active is:
- Privateer Set (2P): 10%
- Dueling Saber or Razor: 10%
- 20 Mastery: 9.2%
- Surgical Cuts Talent: 9%
- Perfect Counter Talent: 12%
Total Crit Chance = 50.2%
We also have up to +90% Crit Damage (from our Elixir, Ring and Privateer 4P) so it's a pretty lethal combo.
Stat Points
Given the lack of any self-healing, we opt for a bit more of a balanced build here when it comes to allocating our Stat Points:
- Agility: 15 (+20 from Food)
- Vitality: 20
- Mastery: 0 (+20 From Food)
- Endurance: 10
Both Sabers have 5-attack combos so 10 points in Endurance should be sufficient Stamina but if you feel like you need more, pull a couple more points away from Agility. Diminishing Returns hits Mastery hard after 20 points so we cap it out there with Tacos.
Talents
Even moreso than with other builds, Talents are critical for this build to be effective. We suggest the following (in order):
- Surgical Cuts (3/3) - Must have
- Perfect Counter (3/3) - Must have
- Deadly Finale (3/3)
- Quick Strikes (1/3)
- Deep Cuts (1/3)
- Executioner's Grace (1/3)
These Talents collectively add over 20% crit to your build, a shedload of additional damage and also adds a form of self-healing/sustain through Executioner's Grace.
5. Smasher Fish Ro Dah Build (C Tier... but fun?)
Overview
Strengths
- Can send your enemies into outer space
- Friendly handheld aquatic companion
- You'll never run out of Fish Fillets again after farming Smasher
Weaknesses
- Awful damage
- No Perfect Block
- May lose your mind fishing for it
Ok so we figured we should probably add at least one fun build, and this one is definitely up there. Smasher is a 'secret weapon' in Windrose which can only be obtained by fishing. We have a dedicated Smasher guide which gives you all the information you need to obtain it so check that out first if you don't already have it.
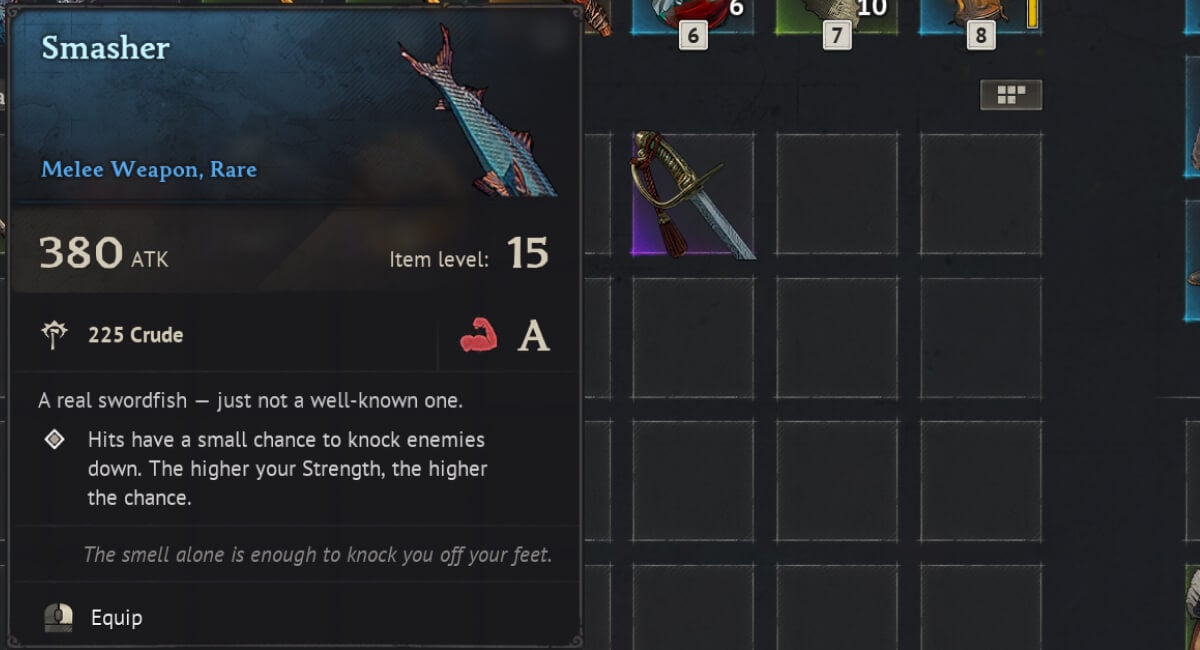
This slightly unserious build revolves around stacking huge amounts of Strength in order to increase our chance of proccing Smasher's passive ability which has a small chance to knock enemies down that scales with Strength.
The ability doesn't really knock enemies down but rather knocks them back, sometimes very far.
Gear & Consumables
As Smasher is effectively a one-handed mace, we can run a pistol in our offhand, either Plague Pistol for sustain or Drake's Double-Barreled Pistol for damage.
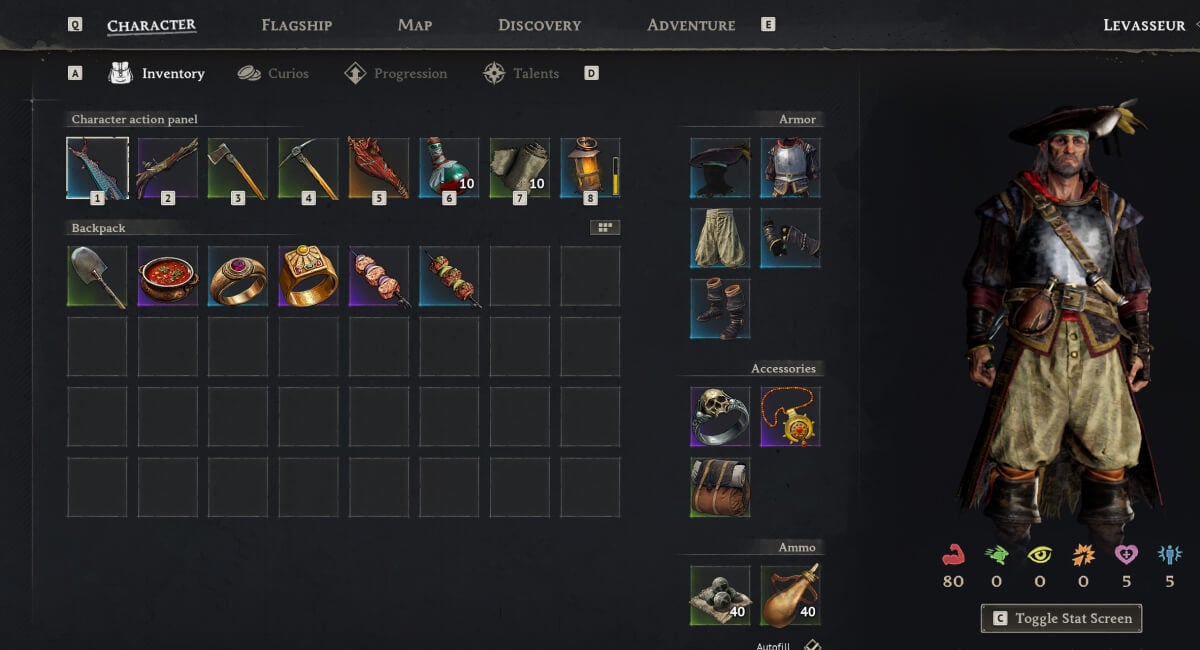
- Melee Weapon: Smasher
- Ranged Weapon: Plague Pistol or Drake's Double-Barreled Pistol
For our armor set, we're going to run the Flibustier set, with at least four pieces so we get both bonuses. The reduced Stamina cost on hit allows us to run very few points in Endurance (more Strength) and the extra damage is welcome.
- Armor Set: Flibustier (4x)
For jewellery, we'll be using the Major Necklace Of Strength and the Major Capricorn Ring for the extra Crude Damage.
- Ring: Major Capricorn Ring (+12% Crude Damage)
- Necklace: Major Necklace Of Strength (+15 Strength)
The best consumables options for us are Strength food (Meaty Croc Kebab) and, you guessed it... more Strength food!
- Food: Strength food +20 (Meaty Croc Kebab) and Strength Food +10 (Spicy Breaded Kebab)
- Potion: Elixir Of Firm Hand (+13% Melee Damage)
Playstyle
I'm not going to really beat around the bush here, the playstyle is that you are going to left click until your giant fish strikes your unsuspecting opponent with such force that they are sent back to the shadow realm. On repeat. I suppose you should also probably block as well.
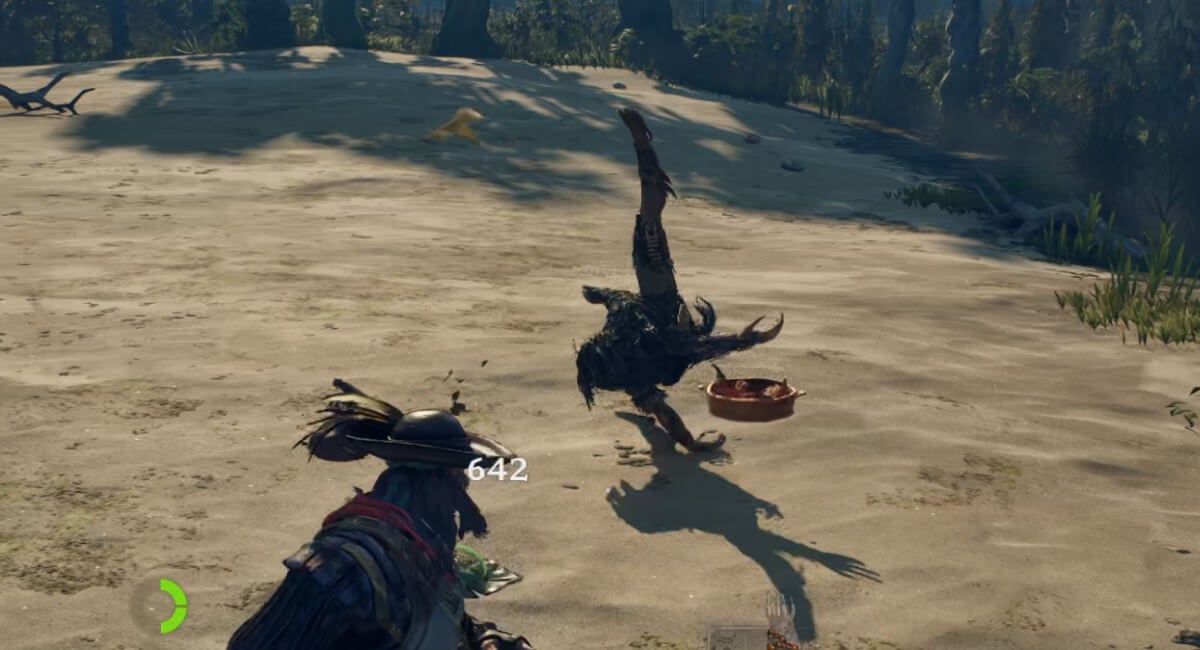
Even with the amount of Strength we are running in this build, the passive ability still only procs on about 1 in 6 hits so it remains a fairly low chance but maybe in the future we'll see an Epic upgrade to Smasher that allows it to ascend to its true power.
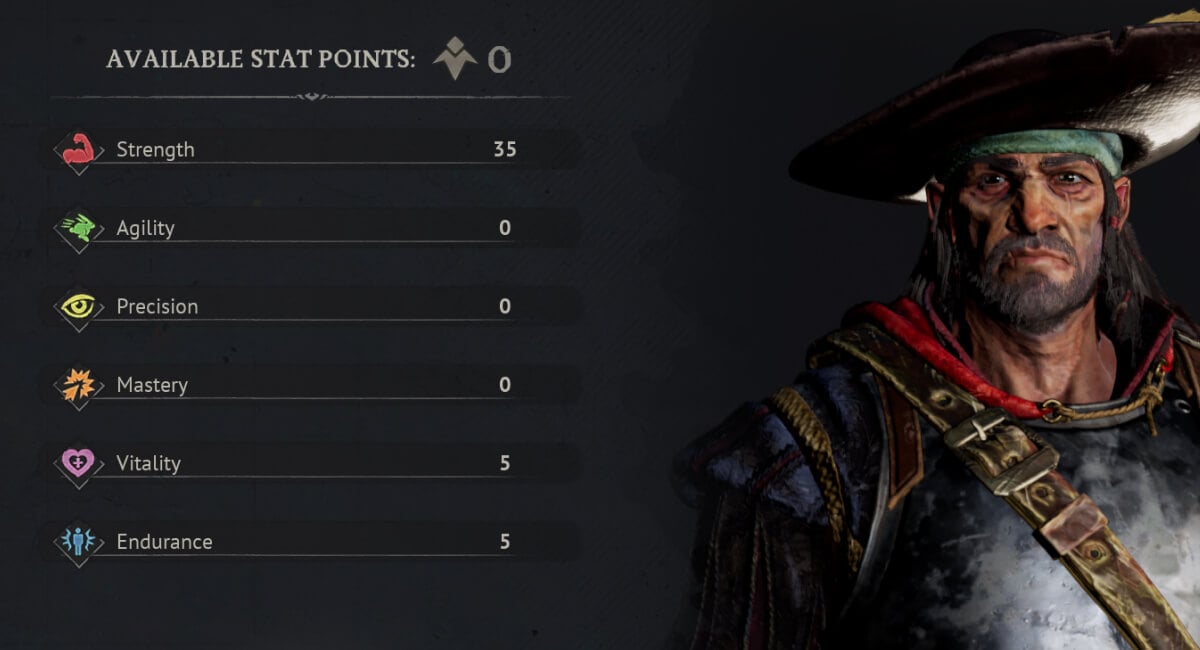
Stat Points
We throw caution to the wind and go pretty much all in on Strength here but fear not, we'll have plenty HP and Stamina from our weapon effects and Talents:
- Strength: 35 (+30 from Food)
- Vitality: 5
- Endurance: 5
Talents
The following Talent build has a nice blend of Stamina, HP, survivability and damage:
- Marathon Runner (3/3)
- Just a Flesh Wound (2/3)
- Flawless Defence (1/3)
- Stout Frame (2/3)
- Too Angry To Die (1/3)
- Bonecrusher (3/3)
Have fun with this one!