Raid Setup
Introduction
Welcome to our Mythic Cauldron of Carnage boss guide, for the Liberation of Undermine raid. Learn about the Mythic specific Cauldron of Carnage mechanics and the strategy we recommend to deal with this boss on Mythic difficulty!
Fight Style: Pure Single-Target encounter
Recommended Composition: 2 Tanks / 4 Healers / 14 DPS
Enrage Mechanic: Soft Enrage triggered when one boss falls
Heroism / Bloodlust: Pop on Pull
Mechanics
Each side receives 3 toys that players can walk into, causing them to get knocked in the direction they are facing.
When within 15 yards of another toy from the opposite side, they will perform a mini Colossal Clash and apply a DoT to the entire raid that lasts 3 seconds, and it stacks if several toys collide at the same time.
At the start of the intermission, all remaining toys will collide, regardless of the distance.
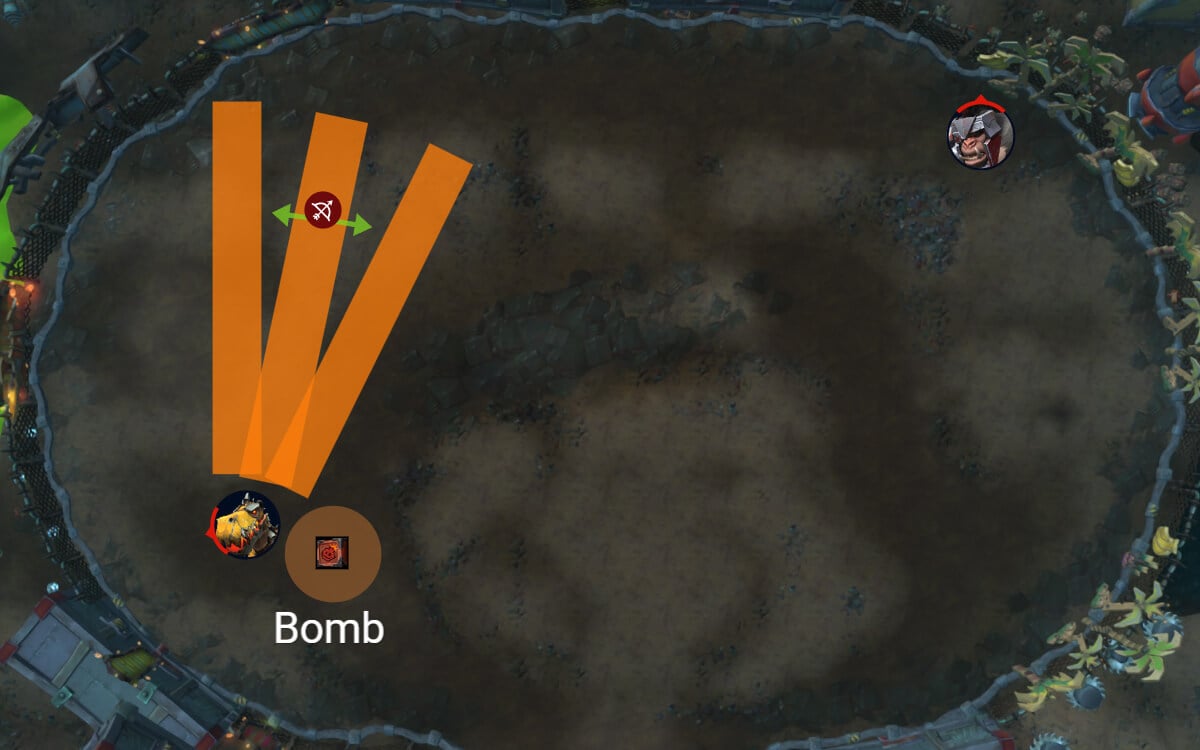
Works the same as on Heroic, except that now there are 3 beams, and the player who is turning the beam will have to use the gaps in between to dodge the beam, unless very mobile.
Strategy
We recommend that both groups swap the bosses after the intermission ends to reset the stacks.
This encounter barely feels different compared to the Heroic version, which means if you are familiar with it, you should have no problem defeating the boss.
The first thing we should talk about is the Mythic mechanic, Tiny Tussle.
Each side receives 3 of the toys, basically mini versions of the bosses. Once toys from the opposite sides are within 15 yards of each other, they will clash and put a dot on the entire raid for 3 seconds. Your goal here is to remove all toys from the arena before the intermission starts, because the intermission will force crash all remaining toys regardless of their distance from each other.
Given that the intermission alone already inflicts heavy damage, having a toy go off additionally will just make things much harder.
So here is how to deal with this mechanic.
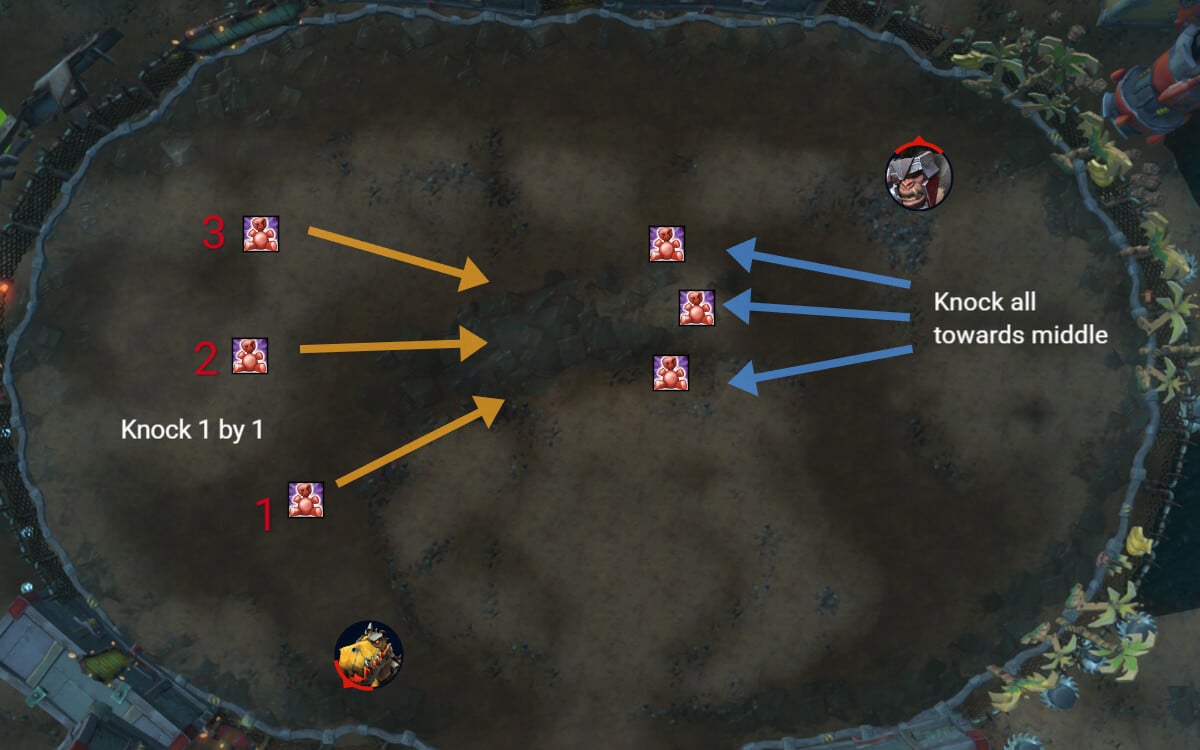
The Torq side should assign 1-2 players to instantly knock all 3 toys towards the middle of the room as they spawn. The reason you want to do all of them right away, is because Torq’s side cannot freely move due to the debuff, so by doing it at the start, you are pretty much done with the mechanic until the next set of spawns, which is after the intermission.
The Flamendo side on the other hand, has the freedom of movement. So they are the ones in charge of deciding when they want to force a toy crash. And this is fairly straightforward because it is very scripted.
It should go as follows:
- Bait the bomb and soak
- As you are spreading with the circle, the designated player should pick the closest toy and knock it towards the middle
- Go back to baiting and repeat the process
Note that after the 3rd bomb, the intermission starts right away, which in this scenario would mean that the last toy gets auto popped by it. If the damage is too much, you can play around this by simply pushing 2 toys on the first set, and commit some healer cooldowns for this. That way you only have one more toy left after the 2nd bomb.
The other notable change is to the Frontal ability, which is now 3 beams instead of 1. This makes it harder for the targeted player to dodge, unless it's a very mobile class. You still play it exactly the same as heroic, but it is much more important to turn it away from the opposite side team, because otherwise they have to dodge 3 beams instead of one, and at that distance, those 3 beams will cover half of their room (they won’t be happy).
Other than this, there is not much to worry about.
The Torq side team now has to kill the images if they want to prevent the puddle from spawning, because on heroic, kitting and having them expire would be enough, but on mythic the puddle will appear even when they expire.
You will also have additional puddles to dodge, but that's nothing to worry about.
It’s worth mentioning, if your team struggles with the damage taken from the Bomb, it is a viable strategy to send more players to the Flamendo side, but not too many more, otherwise you will have problems with the boss' health being too uneven. 1 or 2 extra players will reduce the raid wide damage from a bomb by a lot, and the health difference on the bosses can be fixed during the intermission by having everyone focus on the boss with higher HP.
WeakAuras
Northern Sky: Liberation of Undermine WeakAura Pack
This WeakAura also requires the Northern Sky Database and Functions WeakAura.
https://wago.io/NSUndermine