Raid Setup
Introduction
Welcome to our Mythic One-Armed Bandit boss guide, for the Liberation of Undermine raid. Learn about the Mythic specific One-Armed Bandit mechanics and the strategy we recommend to deal with this boss on Mythic difficulty!
Fight Style: Multi-Target fight (the majority of the time)
Recommended Setup: 2x Tank / 4x Healer / 14x DPS
Enrage: Hard - If you fail to insert coins on time, or insert the same combination again, and at the end of the fight when the Explosive Jackpot cast goes through.
Hero/Lust usage: Phase 2
Easy Mode
Phase 1:
- Tanks and players should drop blue puddles at the edges of the room
- Move out with Withering Flames and call for a dispel
- Hit the Reel Assistants with a coin to remove damage immunity at 25% from them
- Kill the main Reel Assistants
- Dodge flames
- Kick Overload
- Kite and kill all bomb adds
Phase 2:
- Bait the Coils in corners
- Watch out for the knockback
- Slow the Bomb adds and passively kill them
- Move out if targeted by fire beam
- Kill boss before Enrage
Mechanics
Reel Assistants now come with a buff that prevents them from being damaged below 25% HP unless hit by a Coin. You will need to assign a player to deal with this ability for the entire P1.
On Heroic, this ability will give the tank a large blue circle that needs to be placed to the side of the room and leaves a permanent puddle on the ground, until removed with Magnetic Coil.
On Mythic difficulty, one additional random player gets this at the same time as the tank, so careful placement of the puddles is recommended in order to keep the fight area clean.
Strategy
While on Heroic, the popular strategy was to skip the hard coin combos and push the boss into P2 before you have to deal with this, on Mythic difficulty, you will be forced to play all available coin combos.
The order of the combos is the following:
- Coin & Shock
- Coin & Bomb
- Flame & Bomb
- Flame & Coin
- Shock & Bomb
- Flame & Shock
You will also need to assign one player to deal with Dark Lined Cuirass that prevents Reels assistants from going below 25% HP unless hit by a coin. We recommend a hunter for this task, but other mobile ranged players will work also.
There are a few key factors that will make progressing this boss easy if everyone understands the importance of them.
Killing Reel Assistants
The absolute main prio on this fight is killing reel assistants as the priority. This changes the fight in many ways that most players underestimate early into progression.
Having reel assistants up deals additional raid damage, and adds more Withering Flames casts. Additionally, you have limited time to insert the coins before Fraud Detection.
Ideally, the entire raid should be mainly targeting Reel Assistants every single set.
Once you start playing the fight clean, you will end up stopping DPS on the boss just before you push P2, so trying to min-max boss damage in P1 is very bad because it will reduce damage done on the Reel Assistant.
Withering Flames
This ability is very lethal on Mythic difficulty. The dispellable DoT already deals massive amounts of damage to the player and players need to react to it fast. Moving out ASAP, getting dispelled and overall using personals to reduce damage is a must.
Additionally, the roaming flames that come after the dispel deal massive damage, close to 7 million if hit. Dodging those is super important and players cannot underestimate this ability.
The Big Hit Circles
Since you are getting double the amount of those circles (Players + Tank), placing them far to the side is a must because you won't be able to remove all of those with the Magnetic Coil.
Having those circles placed badly will add issues to the player handling the coins, because they will have to stand in the puddle to shoot the coin, and the puddle does very high damage.
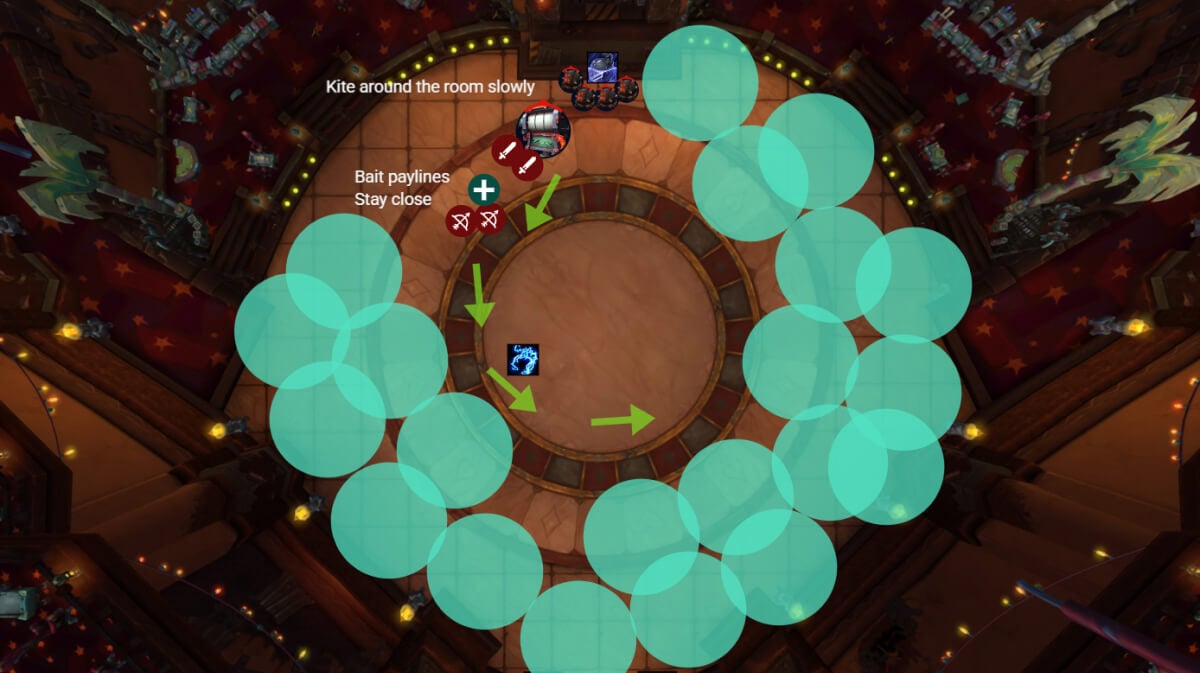
Baiting the Pay Lines
Each payline cast will target one melee and one ranged player. You ideally want all paylines to be baited in the same direction. This will make the coins drop next to each other and will help the player doing coins a lot. Very bad baits, that usually happen if a melee is standing to the side, will force the coin player to run to the opposite side of the room, most likely running through the puddles just to shoot the coin.
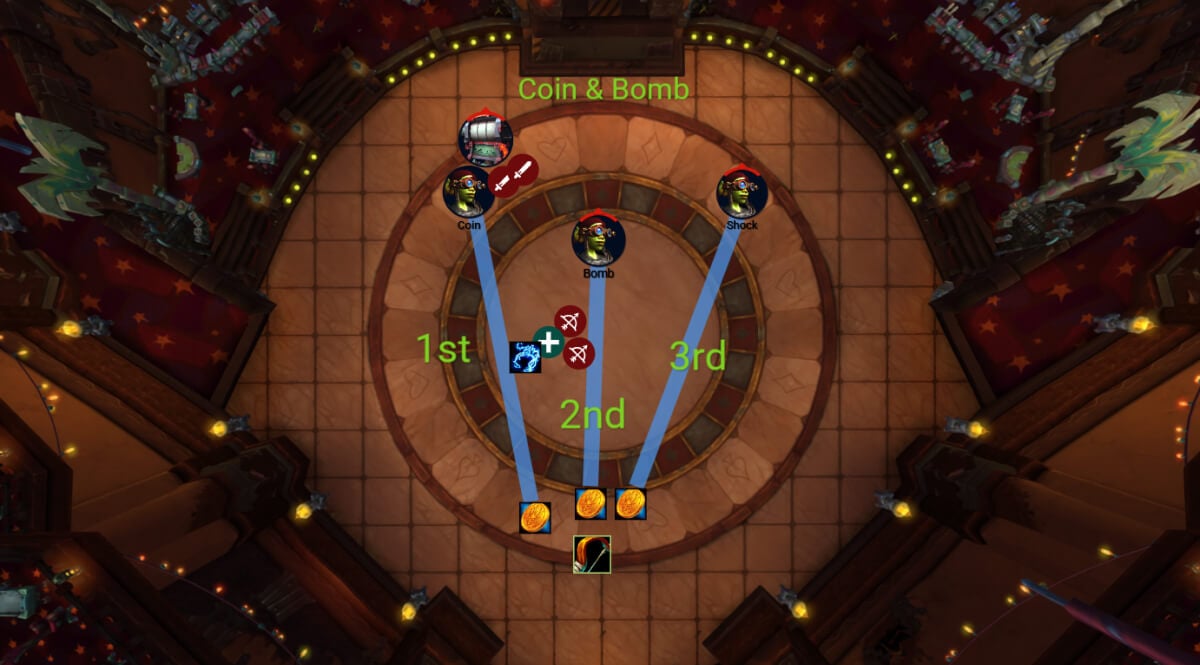
On pull you should bait the coins like this:
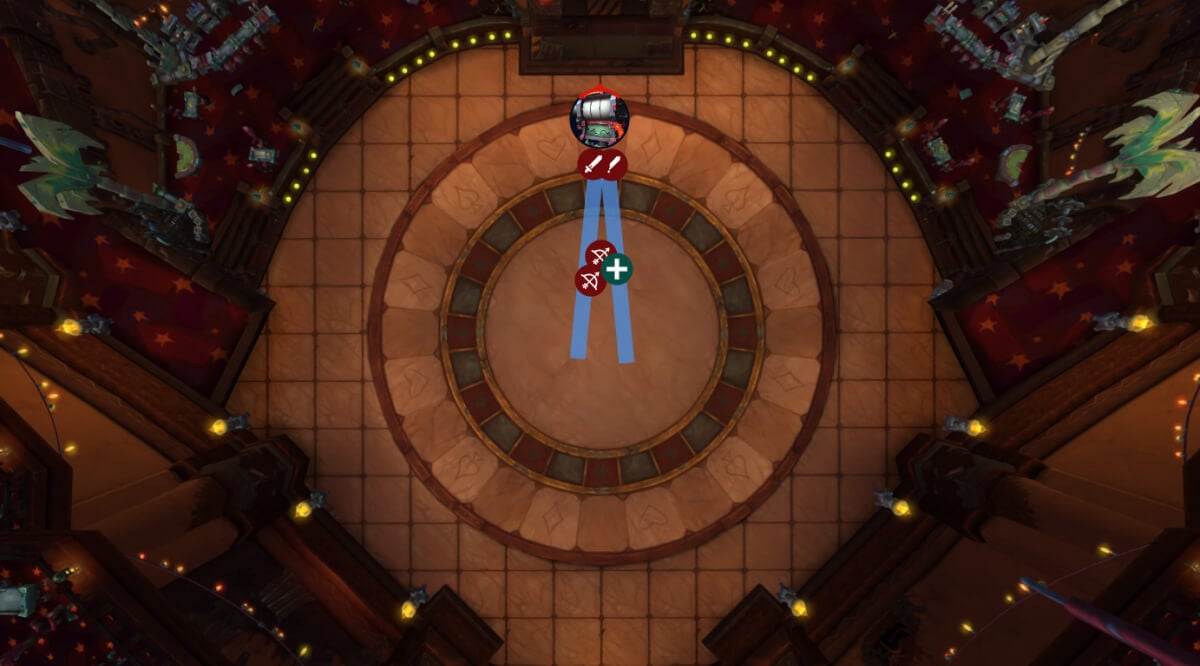
While every other bait should look like this:
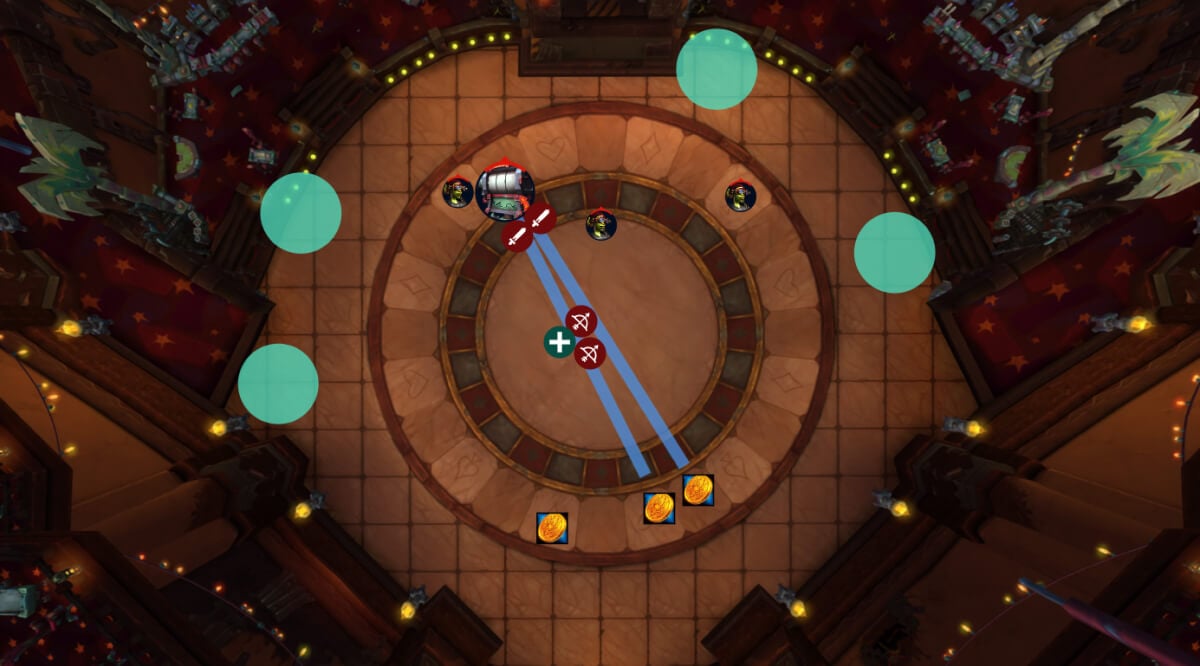
The reason why it will always look like this, is because you will always start attacking one of the priority Reel Assistants on the side, so either Left or Right.
Meaning that the boss will always stand at one of the sides during Pay Line cast, so the simple rule is that you always bait the lines towards the middle of the room.
The Coin Player
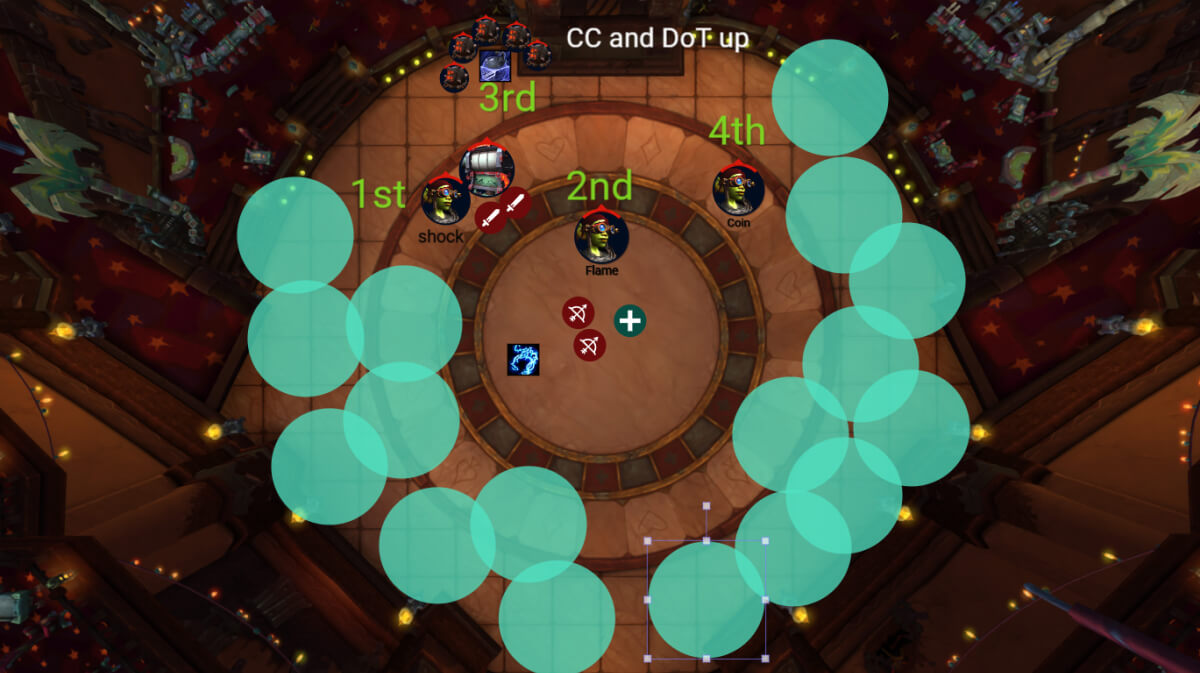
Doing the coins is fairly simple if they are placed properly. The general rule is that you 1st shoot the Reel Assistant that Tank and melees are going to attack first, because this one will reach 25% fastest. Afterwards you hit the 2nd prio add that ranged players are attacking, because this will be the second kill. Lastly, you shoot the 3rd Reel Assistant.
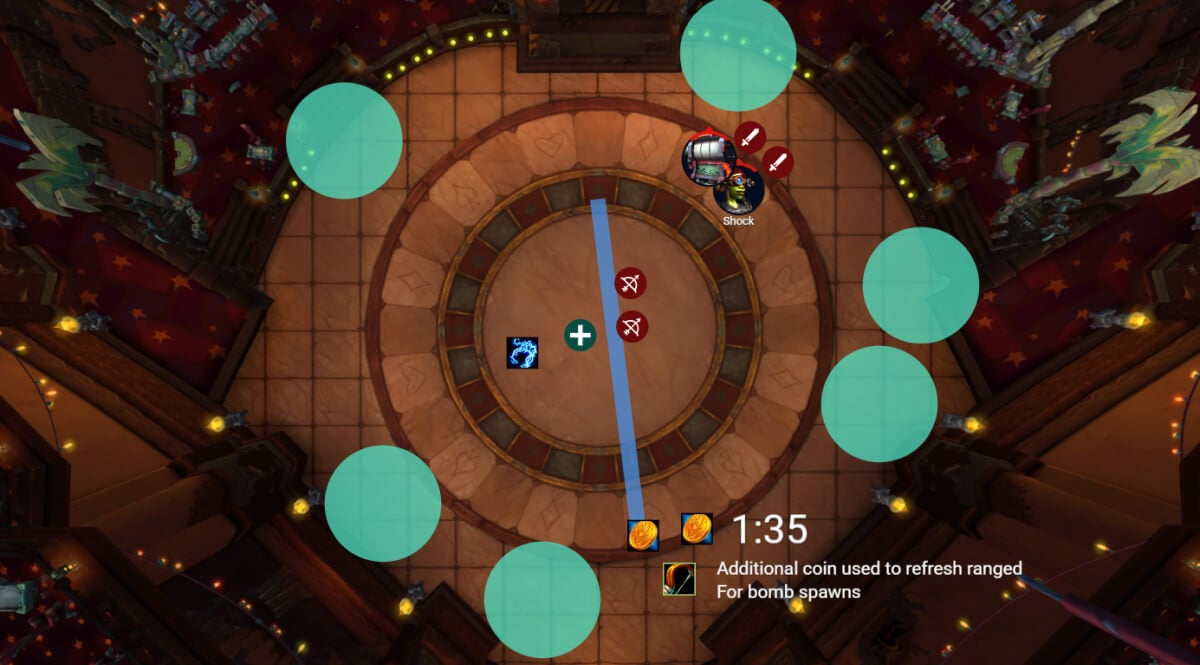
Additionally, there will be several moments where the coin player wants to shoot an extra coin to buff the ranged players before bombs spawn.
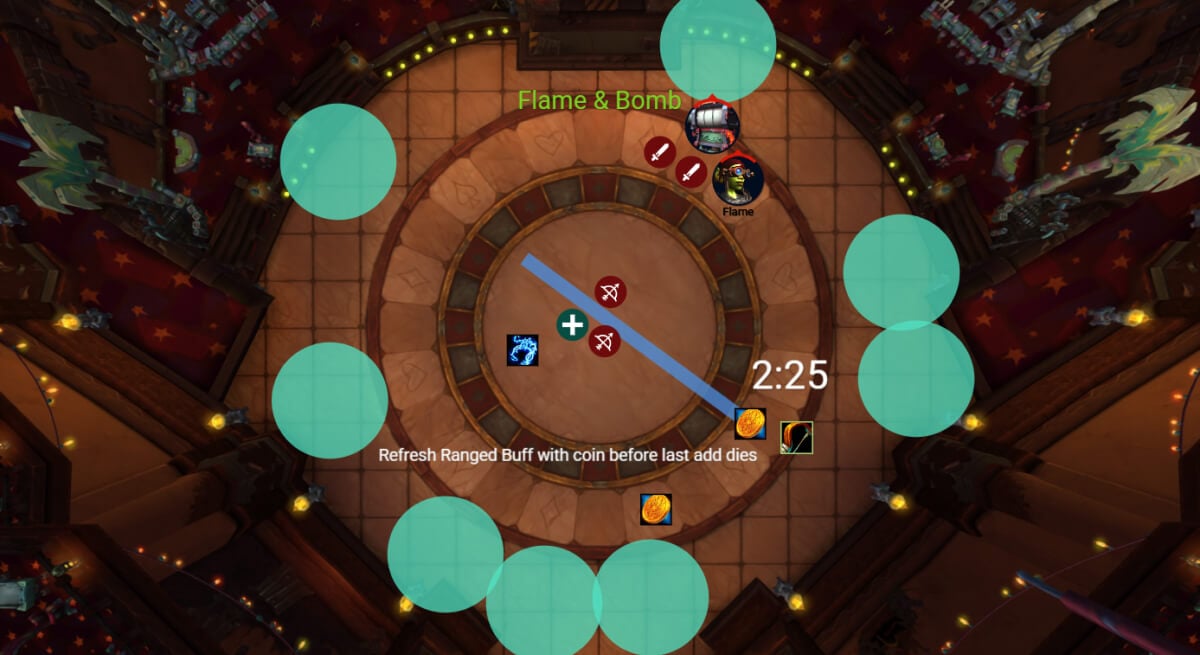
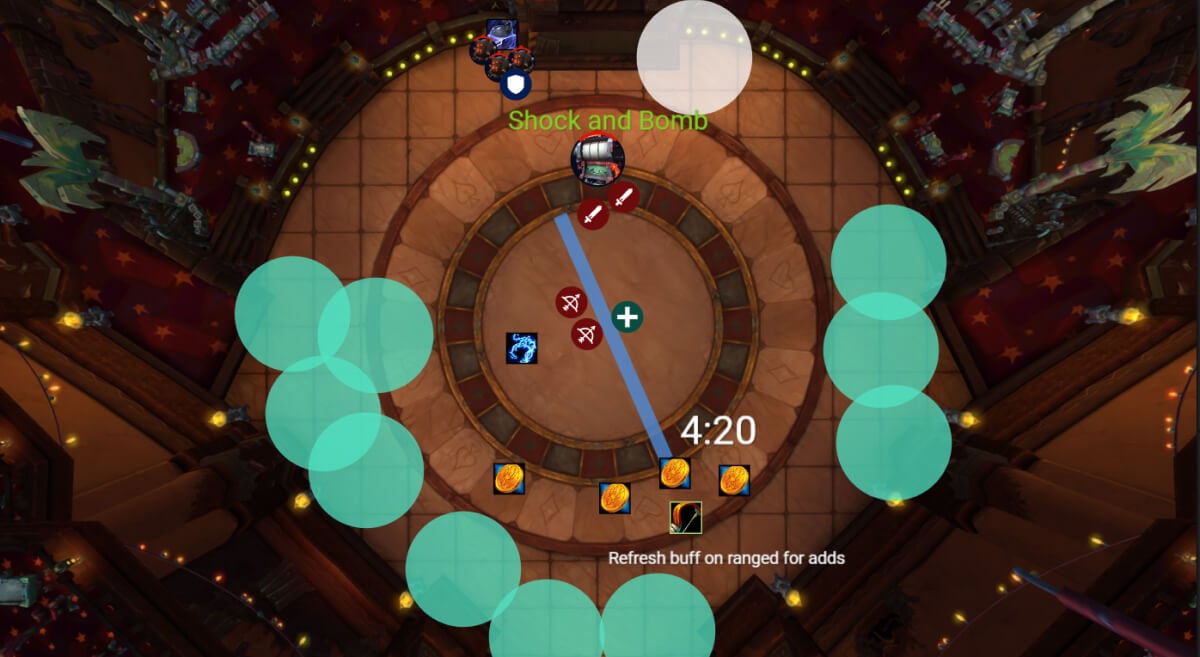
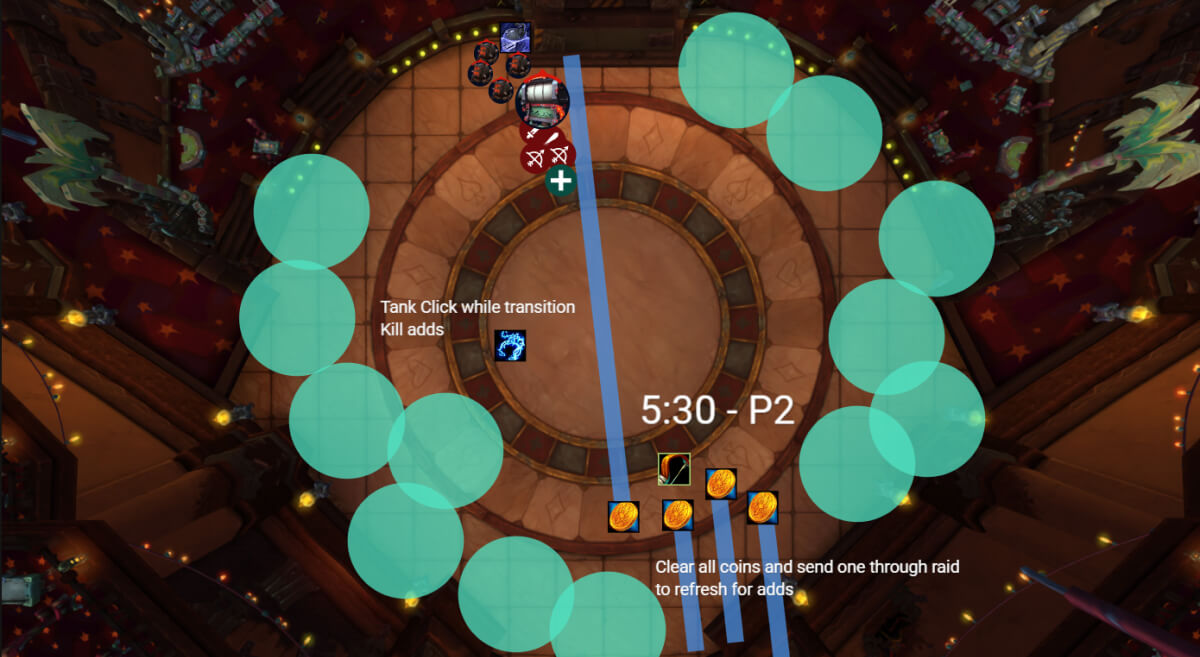
And lastly, at around 5:30 or when you are about to push the boss into P2, the coin player should remove all coins from the area by shooting them into a wall, and send one into the stacked camp for the buff.
Now for Everyone else, there are a few notable sets that you have to handle in a specific way.
Phase 1
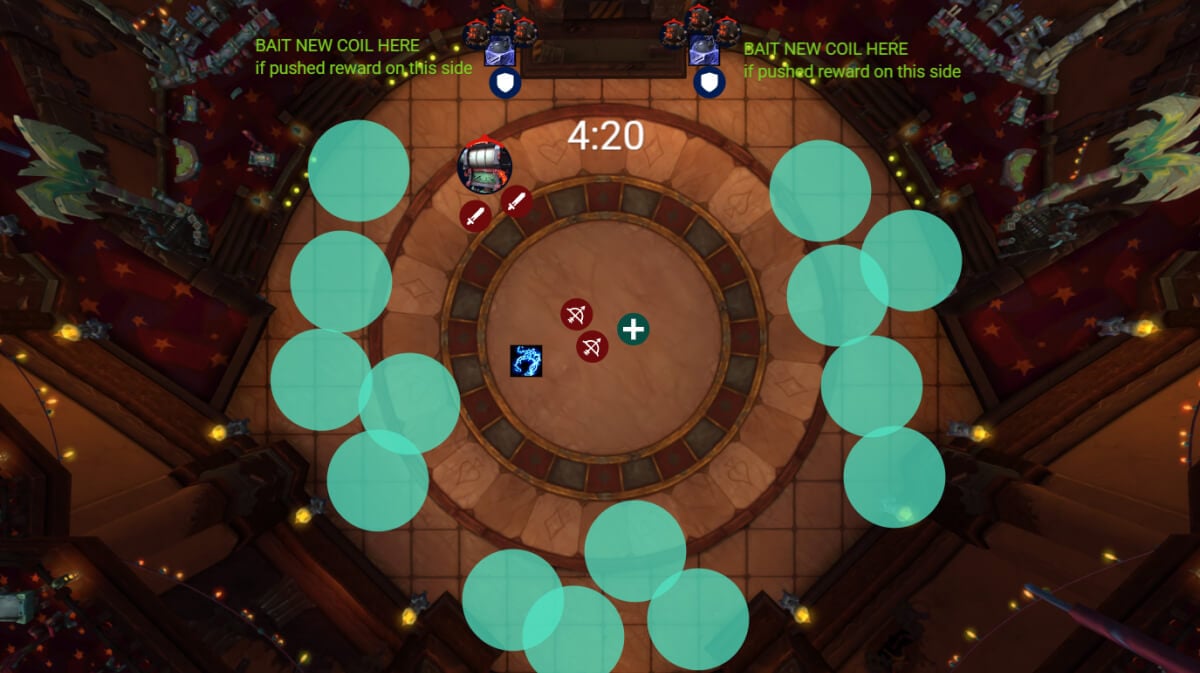
1st set - Coin & Shock
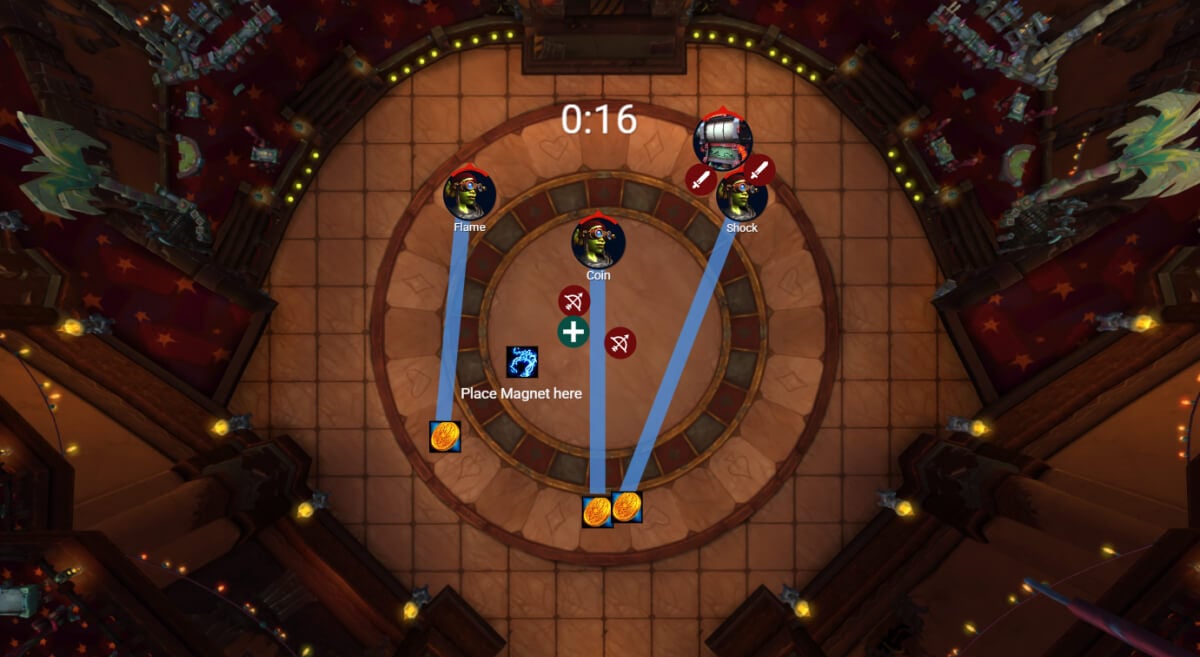
There is only one thing that needs to be done on this set, which is spawning the Magnet Coil in this position.
Once there, tanks will interact with the coil each time boss is doing Spin To Win to remove some puddles from the fight
Note: The magnet pulls players towards it, but it does nothing if it pulls you all the way, so Players do not need to fight the pull unless they need to dodge something.
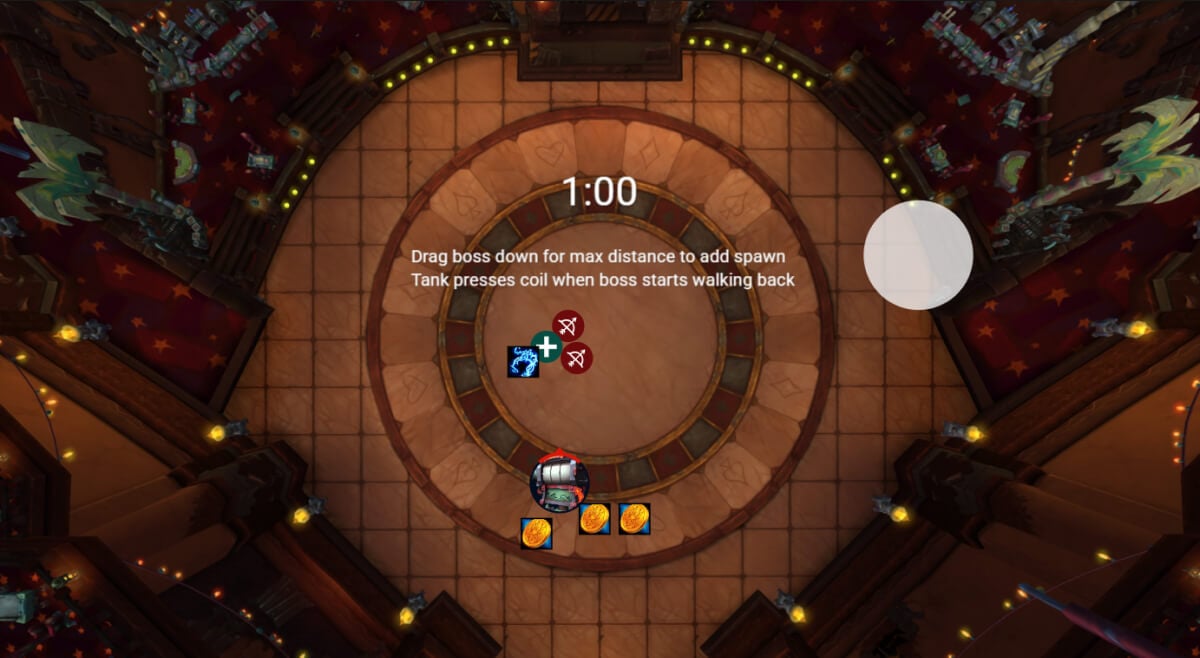
On this set only, drag the boss down before Spin to Win, to gain some extra seconds before the next Reel Assistants spawn.
2nd set - Coin & Bomb
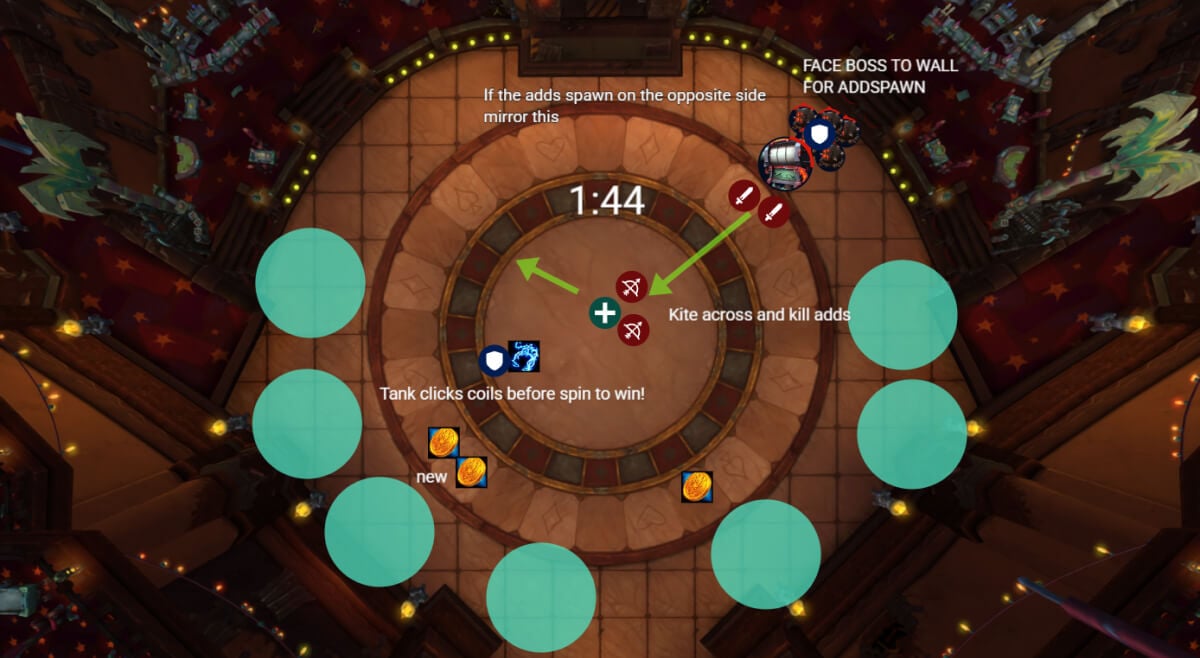
Here you get the Bombs that cannot be Crowd Controlled (no slows or stuns will work).
Kite the bombs towards the middle, and once you get cut off in the back due to circles, move to the left.
If the adds spawn on the opposite side because of Reel Assistant RNG, you just do the same but mirrored.
3rd set - Flame & Bomb
Here you get the regular bombs, which can be CC’d, so make sure you use slows and knocks here. It is very important that everyone targets those bombs and kills them ASAP. When they die they will drop a circle on the ground that shoots out a lot of flames. The flames will eventually come back to that same spot.
Doing this too slowly will overlap with the next set of Reel Assistants and make everything messy.
4th set - Flame & Coin
This is just the raid DoT that you should know from Heroic difficulty, stack up in melee and heal through the damage.
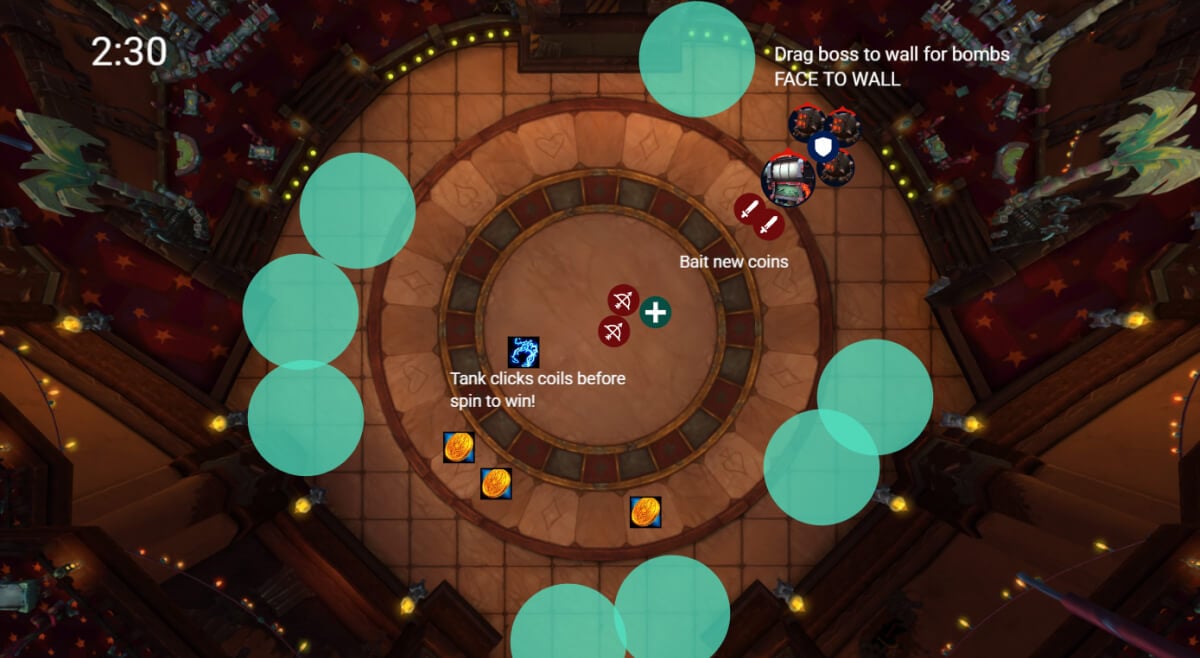
5th set - Shock & Bomb
If 3 healing, you want to push the boss here before 6th spin to win.
Once you trigger the reward, the Tank should place the coil in one of the corners marked above, depending on where the boss was standing before the push. Those Bombs should just be killed and slowed.
6th set - Flame & Shock
If you are 4 healing you will have to play this.
This is the last set of the fight. Use slows and monk rings or druid vortex to keep the bomb adds in the corner. Kill the 2 main Reel Assistants, then finish the bombs. Lastly kill the last Reel assistant.
It is important that you stop damaging the boss here. You want the boss to reach 30% when he hits 100 energy.
Phase 2
Phase 2 is basically just like heroic, with a tighter damage check.
Stack up close to the boss to bait the coils, do not get knocked into them, and move to the side if Fixated by the flame.
Players with Blue circles run as far as possible and preferably not in the direction that the raid will move to.
You will get bomb adds spawn here constantly, just slow and knock them, while passively cleaving via dots and such.
Kill the boss before the enrage.
WeakAuras
Northern Sky: Liberation of Undermine WeakAura Pack
This WeakAura also requires the Northern Sky Database and Functions WeakAura.
https://wago.io/NSUndermine