Raid Setup
Introduction
Welcome to our The One-Armed Bandit Heroic Guide, the only raid boss that lets you gamble with your life, literally. This oversized slot machine doesn’t pay out jackpots, only pain, as you and your team will be feeding it coins for “rewards” (which, spoiler alert, are all terrible).
Throughout the fight, giant coins will roll across the room, and while getting hit is generally a bad idea, standing just close enough will grant you a damage buff, because what’s a little risk without some reward?
With some preparation and practice, you won’t need luck to be in your favour, good luck!
Fight Style: Multi-Target fight majority of the time
Recommended Setup: 2x Tank / 4x Healer / 14x DPS
Enrage: Hard - If you fail to insert coins on time, or insert the same combination again + Bomb combo in P2
Hero/Lust usage: Phase 1 or Phase 2 depends on your preference
Method Boss Review
While we suspect that whoever designed this boss might be a fan of casinos, we can’t deny how much we love the creativity behind this encounter. Every role gets a chance to shine, pushing players to their limits through precise execution, positioning, and strategic planning.
Having multiple ways to approach a fight is always a great design choice, adding depth and replayability. However, we can already see this being an absolute nightmare for PUG groups, chaos is almost guaranteed.
That said, this is easily the best boss of the tier and arguably the coolest encounter since Halondrus.
Method Boss Rating: (5/5)
Easy Mode
Phase 1:
- Tanks should drop puddles at the edges of the room.
- Tanks should use the Coil to remove two puddles, expect heavy damage.
- Kill Reel Assistants to collect tokens.
- Insert the correct tokens (see strategy section).
- Interrupt Overload! and dispel Withering Flames away from the raid.
- Stand near the Pay Line for a damage/healing buff, just don’t get hit.
- Interact with Pay Line coins to make them roll again, it removes 5% damage done from the boss
- Dodge fire swirls moving around the room.
- Kite bomb adds and kill them before they reach players.
Phase 2:
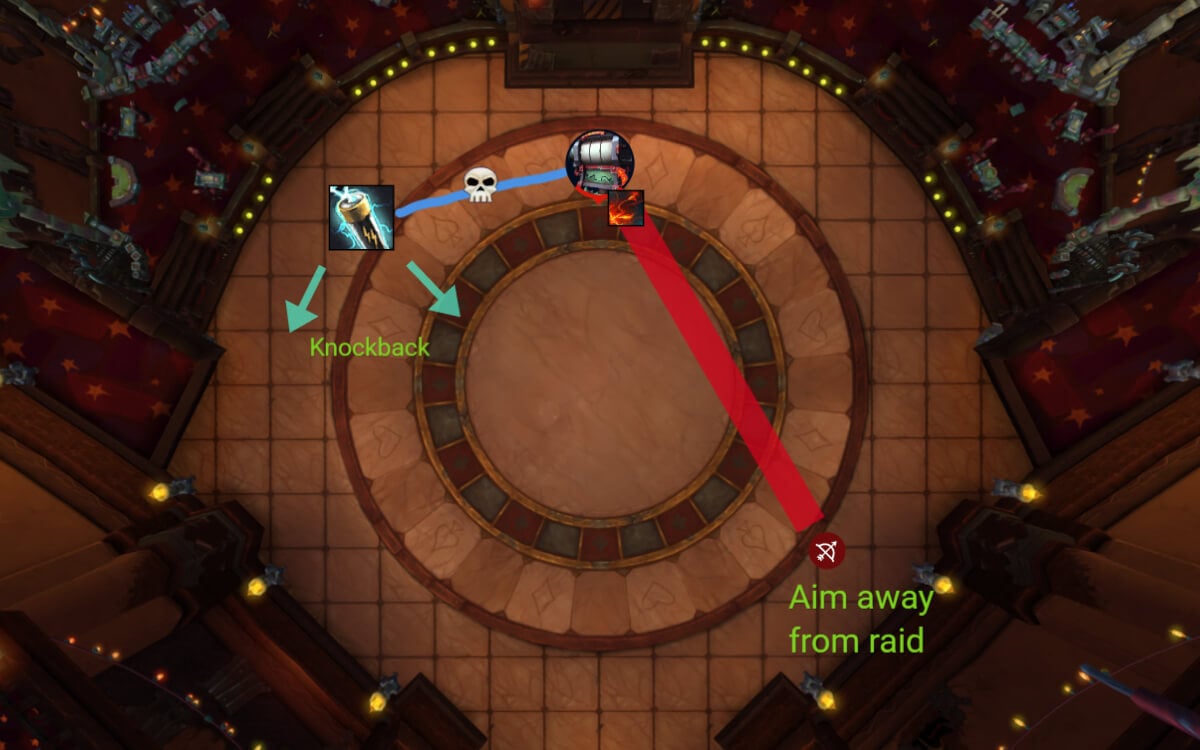
- Watch out for the knockback.
- Avoid the laser connected to the boss.
- If targeted by a fire beam, move away from others.
- Prepare for massive pulsing raid-wide damage; healers, be ready.
Mechanics
The boss will spawn 3 random reel assistants. Each Reel assistant will drop a coin when killed. You have 30 seconds from the moment the reel assistants spawn to insert 2 coins into the boss, otherwise Fraud Detection gets activated which serves as an enrage.
Fabulous Prizes
There are 6 different combinations of prizes that you can receive, however you cannot repeat the same combination twice because this activates Fraud Detected!
To see what the different combinations do, check the strategy section.
Reel Assistant
Those adds will constantly cast Electric Blast to one target, and deal damage to the entire raid. They also have an ability called Overload! that needs to be interrupted, otherwise the raid takes massive damage.
While Reel Assistants are up, players will need to be dispelled when Withering Flames is cast on them.
Each time the boss spins the reels, it gains a permanent 5% attack speed increase buff. This forces you to finish Phase 1 faster, in order to reduce the amount of stacks the boss gains during that phase.
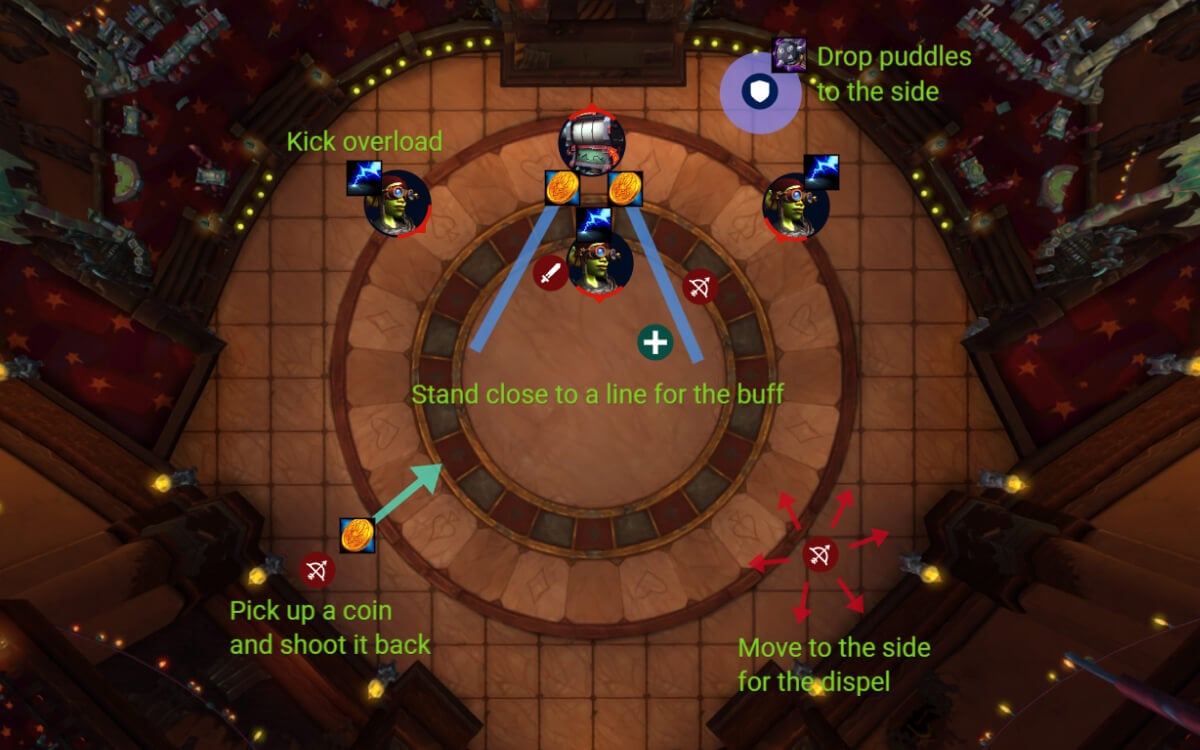
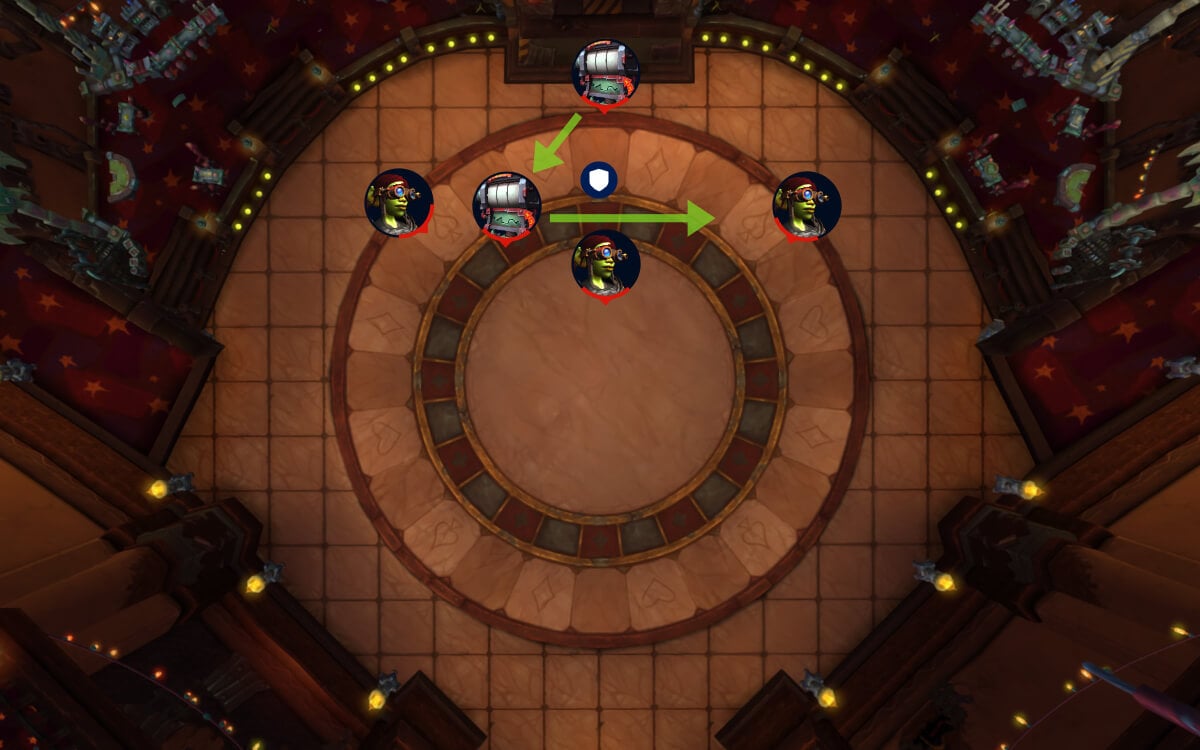
A large coin will roll across the field in a random direction. Standing close to the line, will give you a healing/damage buff when the coin passes you. However, getting hit by it will inflict heavy damage and stun the player for 6 seconds.
Additionally, when the coin hits the wall, it will stay on the ground and permanently buff the boss by 5% (damage done) until that coin is removed. To do this, players can interact with a coin and shoot it in a random direction, once it hits the wall it will be destroyed, and boss will lose a stack of Up the Ante.
This ability applies an absorb to everyone and while the absorb persists, the player is taking damage every second and has their movement speed reduced by 10%.
Massive tank hit that leaves a permanent puddle on the ground and forces a tank swap due to 350% damage taken debuff. Can be placed wherever the tank wants, preferably to the sides, away from others.
Interacting with a coil will inflict heavy damage to the tank, but will clear out 2 of the closest puddles.
Phase 1
Now that we know how the reel combos work, and in which order you should do them, let's take a look at the overall setup in Phase 1.
These are some things you will have to deal with for the entirety of Phase 1, regardless of what combos you get:
- Reel Assistants need to be kicked when they cast Overload!, all 3 of them are doing it.
- Players should hug a line but avoid getting hit by a coin to receive damage/heal buff
- Tanks need to move to the side for The Big Hit, dropping the puddle away from the raid.
- If you are targeted by Withering Flames, move to the side and call for a dispel.
- Ranged player should pick up a coin on the floor and shoot it in a random direction to remove 5% damage buff from the boss (plus standing close to the coin applies the buff again).
Additionally to all this, you also have the combo specific abilities that we described earlier in the guide.
Once you kill a Reel assistant, instantly pick up the token and put it into the boss using the extra action button. There is no reason to delay this. You have a total 30 seconds from the moment the Reel assistants spawned, to insert the tokens, otherwise you will trigger Fraud Detected!, which results in a wipe. Remember to still kill the last Reel assistant to remove the Overload! and Withering Flames casts.
Recommended Boss Movement for Extra DPS
One-Armed Bandit will always go back to the top to spin the reels. Once your raid-leader identifies which combo you should be doing, move the boss between the two reel assistants that you want to kill, then move over to the one that is remaining.
In the scenario where the two Reel Assistants that you want to kill are the furthest away from each other, just move from one, to the other, ignoring the assistant in the middle and only putting DoTs or cleave damage on it until the 2 main Reel Assistants are dead.
Tanks should press a coil every time there are 3 or more puddles on the ground, but you have to be careful with the timing. If you need to move to a Reel Assistant that is standing next to the Fire coil, activating it will send out flame patches that need to be dodged while everyone is standing close to the Coil, which makes it super hard.
Eventually, once you’ve done every combo once, or you have reached 30% boss health, Phase 2 will trigger.
Phase 2
This is a heavy burn phase in which you are fighting against time. You have no influence on the Reel combos anymore, the boss will now do them in a specific order.
Shock Combo: During Linked Machines, a coil will spawn, knocking everyone away from it. Afterwards the boss will connect to the coil with a beam. Touching the beam will deal lethal damage to the player. Since the beam is tethered to the boss, it will follow him around if you are moving the boss.
Fire Combo: During Hot Hot Heat, One-Armed Bandit will target a player with a large laser, move away from others and dodge the laser once it's locked in.
Coin Combo: Scattered Payout is just massive raid wide damage that needs to be healed through.
Bomb Combo (Enrage): Explosive Jackpot kills the entire raid. Kill the boss before this happens.
WeakAuras
Northern Sky: Liberation of Undermine WeakAura Pack
This WeakAura also requires the Northern Sky Database and Functions WeakAura.
https://wago.io/NSUndermine