Raid Setup
Introduction
Welcome to our Heroic Queen Ansurek boss guide, the final boss of Nerub'ar Palace. This guide will teach you about Queen Ansurek’s mechanics and the strategy we recommend to deal with this boss on Heroic difficulty!
Fight Style: Single Target + AoE Fight
Recommended Setup: 2x Tank / 4x Healer / 14x DPS
Required utilities: None
Hero/Lust usage: On Pull
Mechanics
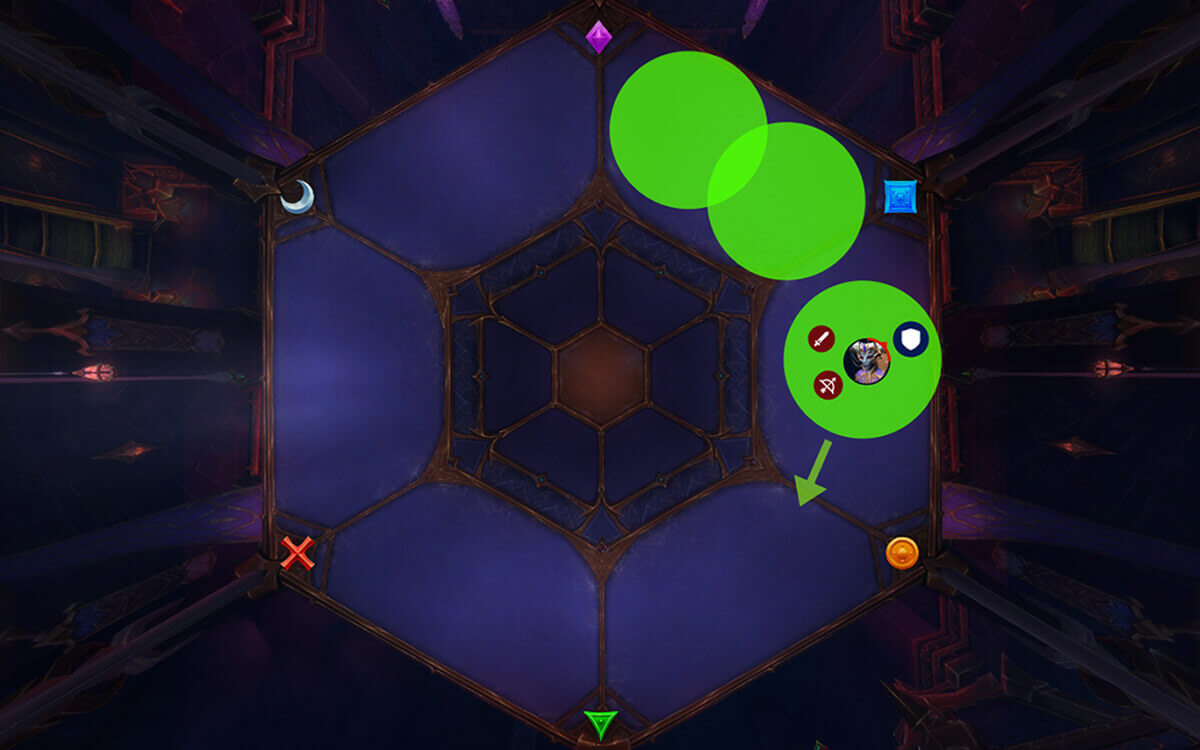
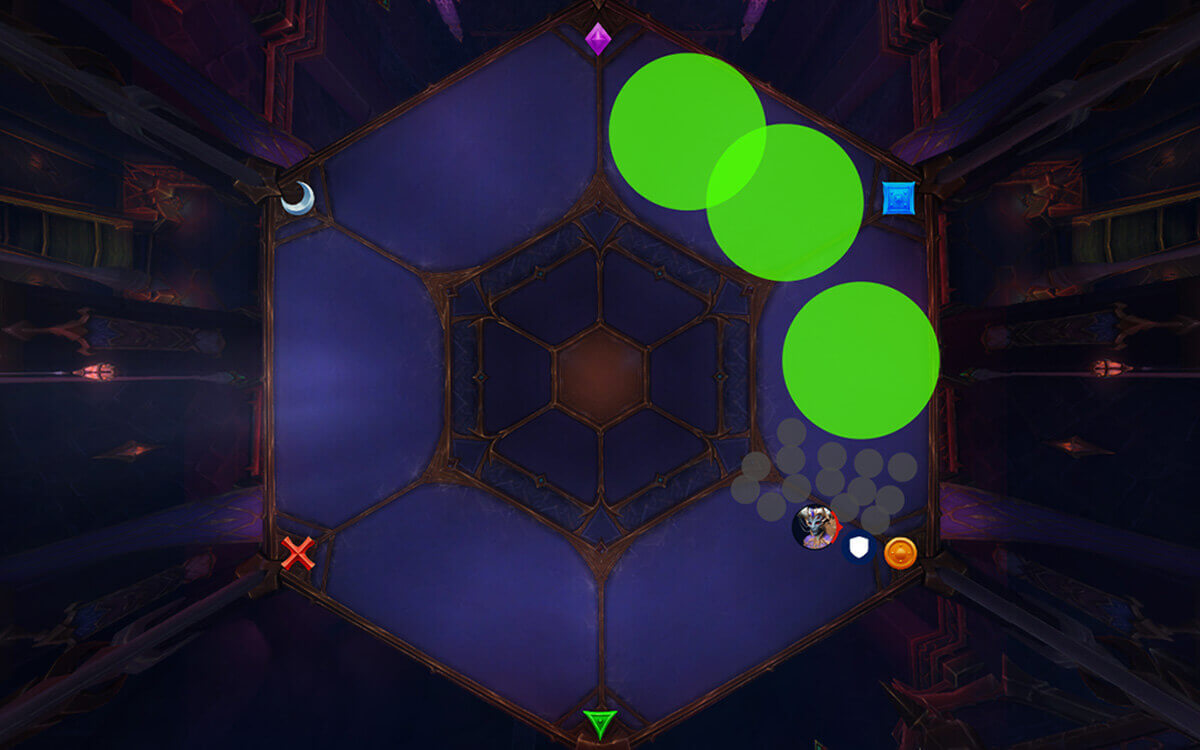
Affects 2 players with medium sized green circles that need to be placed somewhere close to the boss/raid. When placed, a small green blob will remain on the ground, and walking into the center of it will trigger an explosion and knock everyone up in the air.
This ability needs to be used to jump over Venom Nova waves. Your entire raid, split into two groups, needs to be within the two Reactive Toxin circles before the blob has been triggered to reduce the damage taken to the player who triggered it.
Additionally after the detonation, several moving blobs will have to be dodged and 2 players will be affected with a large green circle which forces them to move away from the raid to avoid hitting other players with it.
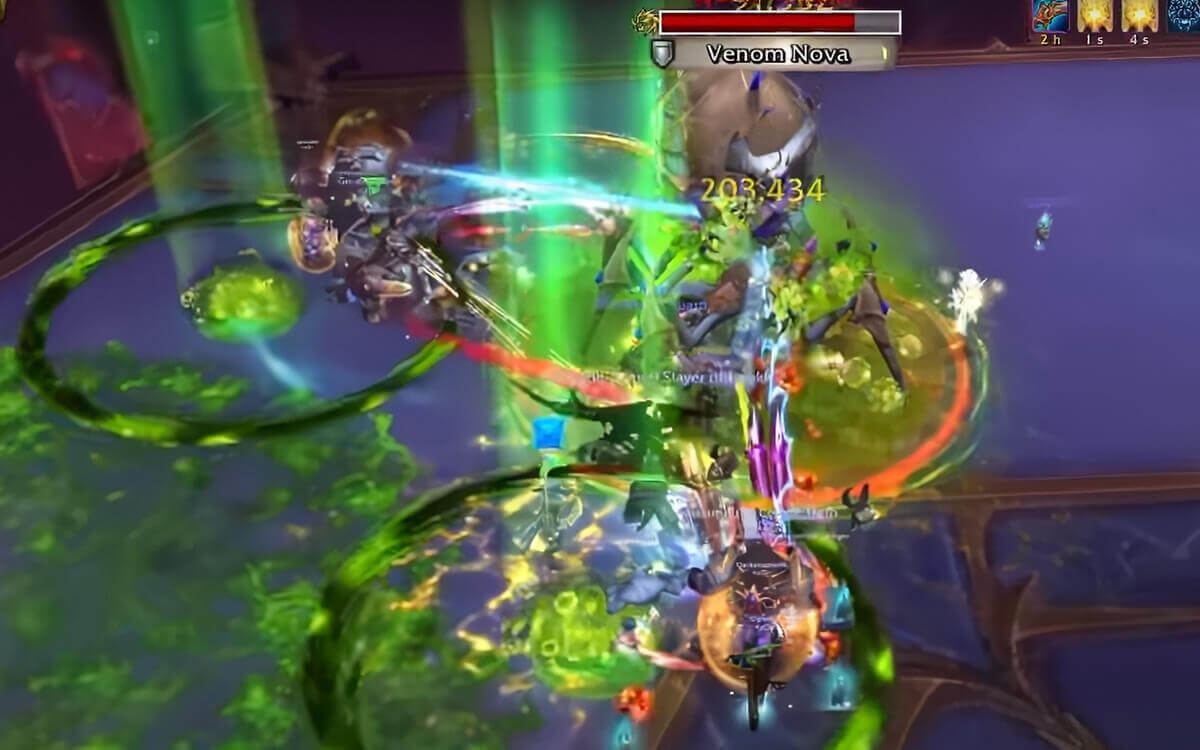
A green wave unleashed from the boss that needs to be dodged with the Reactive Toxin knockup.
Triggers an enrage effect if the wave passes through a Reactive Toxic blob on the ground (so if Reactive Toxin is not triggered by the raid).
Every player gets a small circle that after a few seconds roots and deals damage in a small radius around the player. This can be removed with all abilities that remove root effects.
Heavy tank hit, afterwards it covers a small portion of the area with green puddles and prevents the tank from taking a hit from this ability again for 30 seconds.
Heavy tank hit that puts a healing absorb on the tank based on the damage taken by this ability. Strong defensives and externals are recommended to reduce the effect.
Several lines of web shoot across the area dealing high damage to players hit and slowing them for 95% for 3 seconds. Avoid them.
Queen Ansurek receives a large shield that needs to be nuked down in order to get out of the intermission.
Additionally, it attaches spiderwebs to every player, dealing damage every 1.5 seconds. The players also deal damage to other players in a small circle around them.
Instantly kills a player that gets too close to the boss, mainly when pulled with Wrest.
When the cast is finished, it pulls all players towards the boss.
Make sure to not be pulled off the platform when this happens.
Triggers a hard enrange if the cast finishes. This only happens if players are too slow to kill all the adds in Phase 2.
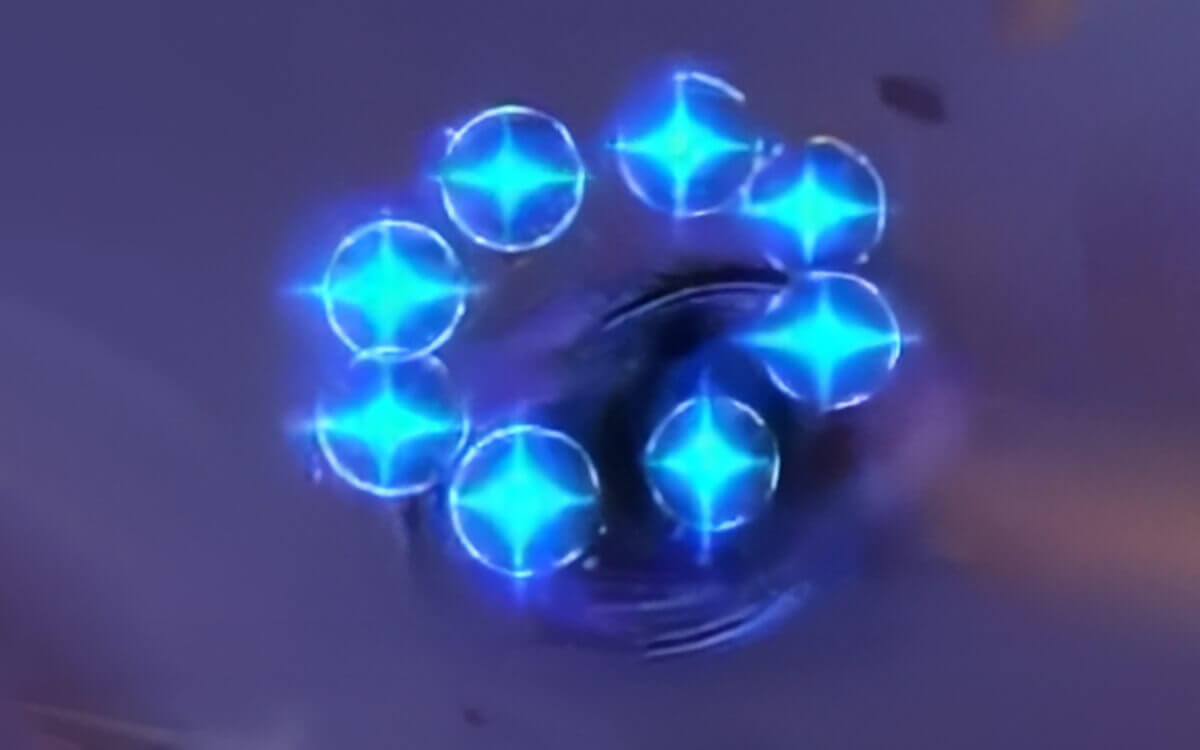
An orb will spawn at a random player's location, this orb then splits into several smaller orbs, after a few seconds they shoot out, dealing high damage to any player hit.
Several players receive a debuff that deals low damage to the player every 1.5 seconds.
When it expires or is dispelled, it inflicts a decent amount of damage to everyone within the area. Your goal here is to stagger the dispels so you don’t have several players explode at the same time due to the debuff expiring naturally.
Triggers a hard enrage if the Devoted Worshipper is not defeated before the cast finishes.
A heavy melee hit on the tank that does a knock-back.
Additionally, it spawns several swirls that have to be dodged.
The current tank gets infested, taking heavy damage initially and gets a damage over time. The Tank will get a large purple circle that upon expiration deals heavy damage to anyone within it and spawns Gloom Hatchling adds that will try to reach the boss.
Each add reaching the boss will inflict heavy damage to the entire raid and also increase all damage done by Queen Ansurek by 20% for 20 seconds.
Two players gain a large Spider-Web circle that, after a few seconds, explode and deal heavy damage to the entire raid, reduced by distance.
Additionally, every player will get shackled towards the spot where it exploded, making them take damage every 3 seconds until the shackles are destroyed.
Two players get a large purple circle that upon expiring, deals damage to anyone caught in it and spawns Abyssal Conduit.
Abyssal Conduit are portals that need to be used to pass through Frothing Gluttony waves.
Using the Conduits will destabilise them and cause an explosion that deals heavy damage to anyone within 12 yards, and will leave a puddle of Gloom on the ground.
This is a wave that applies a heavy DoT to everyone getting touched by it, the DoT lasts for 8 seconds. This can be skipped by using Abyssal Conduit teleports.
Additionally, this wave will trigger an enrage effect if it touches Queen’s Summons adds or their essences that are dropped after death.
Several lines of web shoot across the area dealing high damage to players hit and slowing them for 95% for 3 seconds.
Unavoidable raid-wide damage that increases in damage done by 12% each time Abyssal Conduits are spawned. When this debuff is at 4 stacks, if Frothing Gluttony is cast, it will instantly trigger an enraged effect called Cataclysmic Evolution.
Adds start off with an absorb shield that prevents you from interrupting this cast.
Once the shield is destroyed, this ability should be interrupted as it deals 50% increased damage with every successful cast.
Upon death, each Queens Summon add will drop an Essence that needs to be picked up by a player. Holding the essences inflicts heavy damage every second.
Travelling through an Abyssal Conduit destroys the portals and removes the essence from the player. Once removed, the same player is unable to hold another essence for 4 minutes.
If the player holding the essence gets touched by the Frothing Gluttony wave, it will trigger an enrage effect and wipe the raid.
Phase 1 Strategy
First, split the raid into 2 even groups.
You will want one group to focus on soaking the Reactive Toxin that is close to the edge of the platform, and the other group to focus on soaking the Reactive Toxin that is closer to the middle of the room. This way it will be easier for everyone to remember where they should go to soak.
You will also need to assign 6 players to pop the blobs, 2 per Reactive Toxin cast, preferably ranged to maximise damage output. The same player cannot pop the Reactive Toxin blob multiple times.
Positioning:

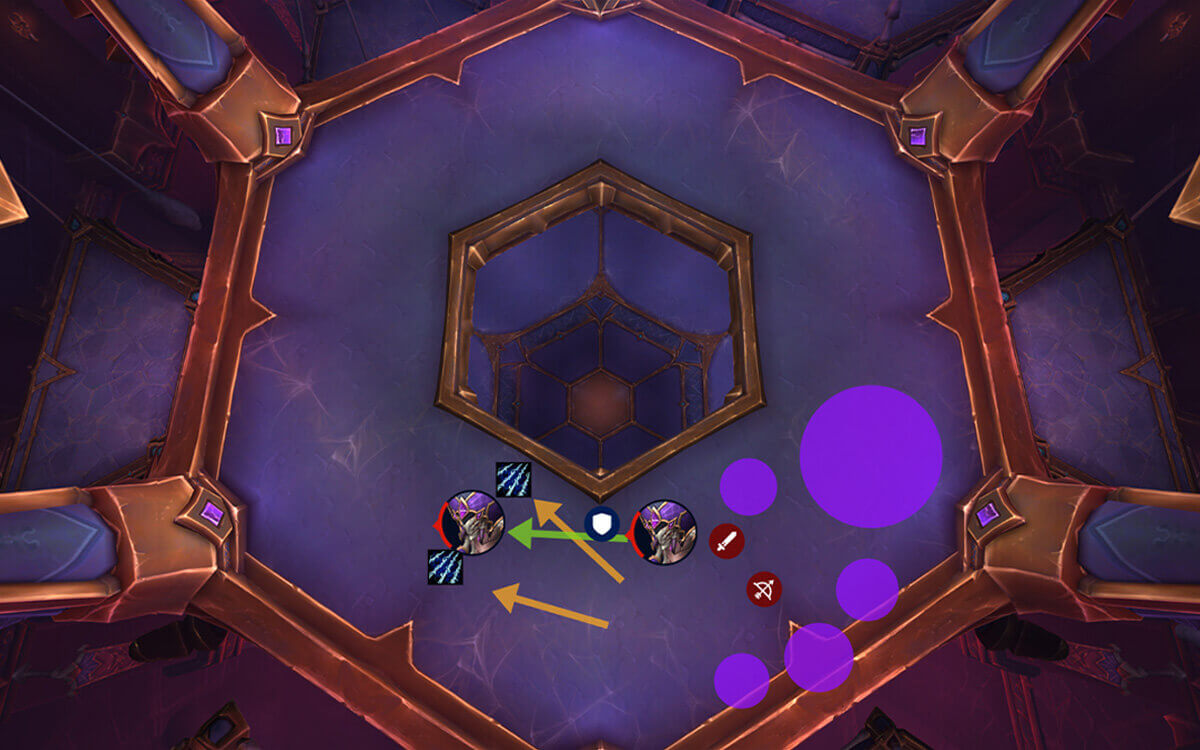
You want to start the fight closer to the edge of the platform, and shortly after you will get the first Liquefy cast on the tank; which will cover a large portion of the area under the boss in a green puddle. You should then move the boss clockwise and you get the first Reactive Toxin cast.
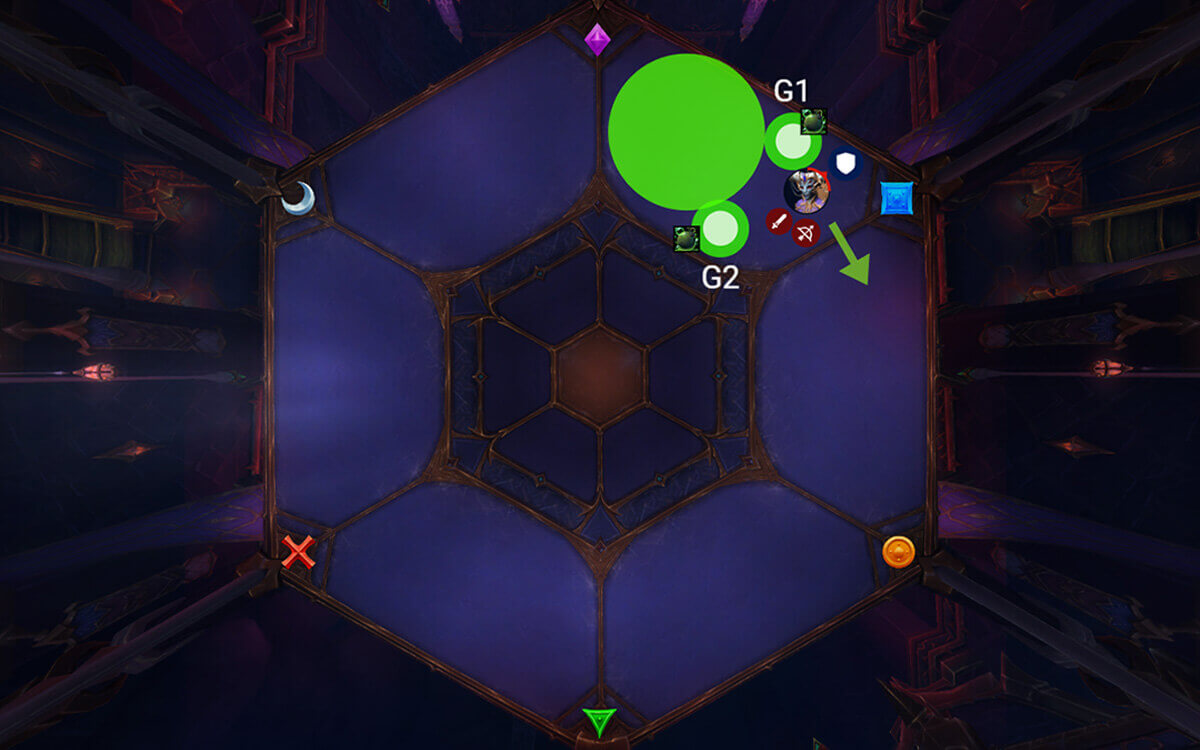
Place the 2 Reactive Toxin blobs in roughly the spots marked in the image above and both groups should instantly run there to soak.
Everyone in the group should be hugging the edge of the circle, towards the boss and the designated blob poppers should walk into the blob just as the Venom Nova cast is about to finish.
Immediately after being knocked into the air, as you are falling down, two players will have a large circle that deals damage to anyone caught within it; this doesn’t leave a puddle on the ground, so the players should just quickly move away from everyone, it doesn’t matter where.
You will also have to dodge large green waves that will come out of the Reactive Toxin spots.
If you did everything correctly, you should now have the entire section between Purple and Blue marker covered in green puddles.
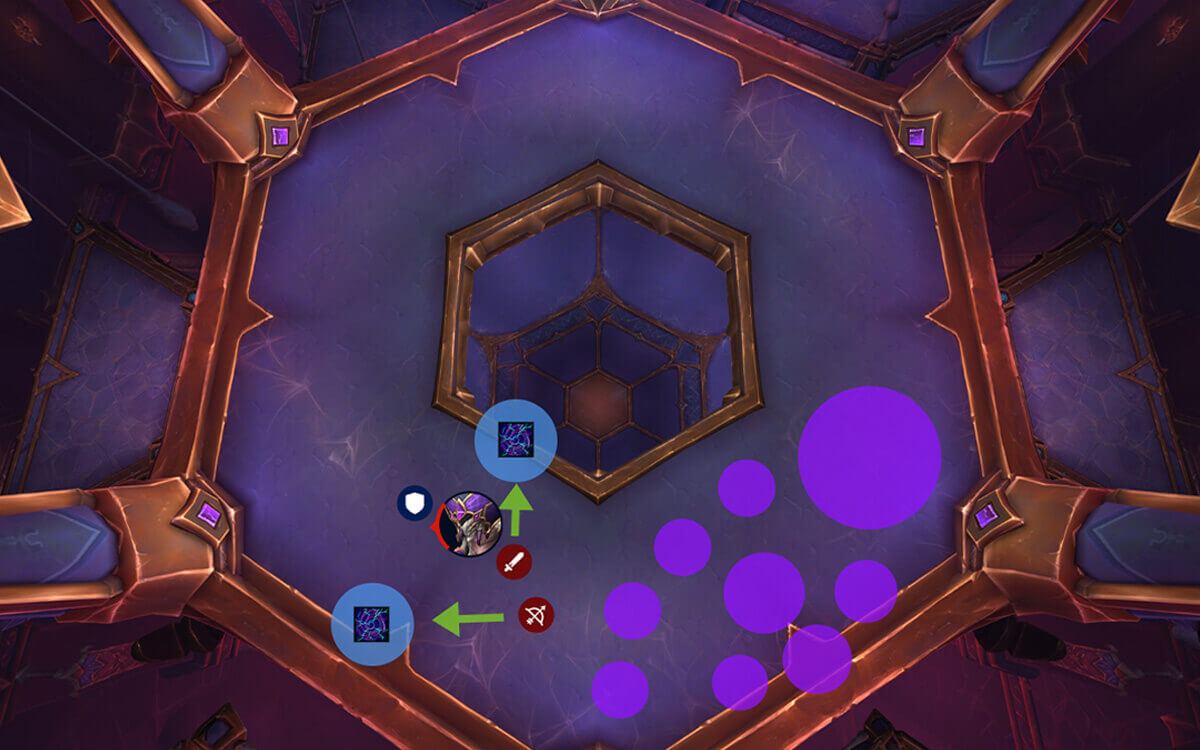
Now, move the boss into the middle of the section between Blue and Orange marker before the second Liquefy cast.
This way you will now cover most of that section in green puddles, and then you want to move the boss towards the edge of the Orange marker section.
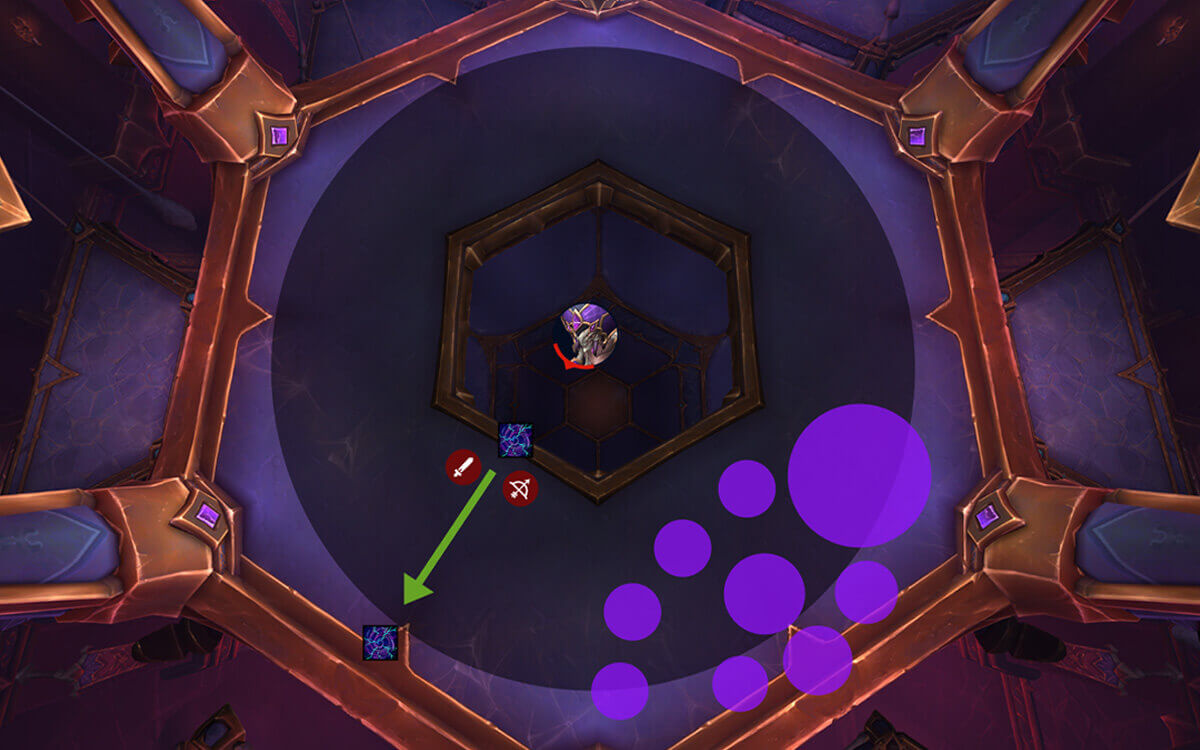
Here we will want to drop our first Silken Tomb (roots), because they also leave a puddle underneath.
To do this, you will need to cuddle up towards the section of the room that you just came from.
Players that can remove the root themselves should prioritise the far spots, while others should get as close as possible towards the boss, so that the roots can be cleaved down.
You then get a Web Blades cast that simply needs to be dodged and the phase repeats itself from here.
The movement and positioning will always be the same and very logical because you will always tend to place stuff close to a puddle to save space, then move the boss once the section becomes full.
You will do this until you do 3x Reactive Toxin, afterwards the intermission will start.
Note: The 3rd Reactive Toxin overlaps with Web Blades, so it is recommended to place both Reactive Toxin circles towards the edge of the platform because Web Blades is always targeted towards players, so your standard spot would be filled with lines in that case, and there is usually nobody standing at the edge of the platform.
Intermission Strategy
The boss will move to the middle of the room, and gain a massive shield that needs to be nuked down in order to cancel the intermission.
You want your entire raid to play in the same section, because healing is very demanding and you will want to be in range of all healers/group heals.
Every player is latched onto the boss via web lines and will inflict damage to anyone getting touched by the small circle, so you will want to be loosely stacked together without overlapping the circles too much.
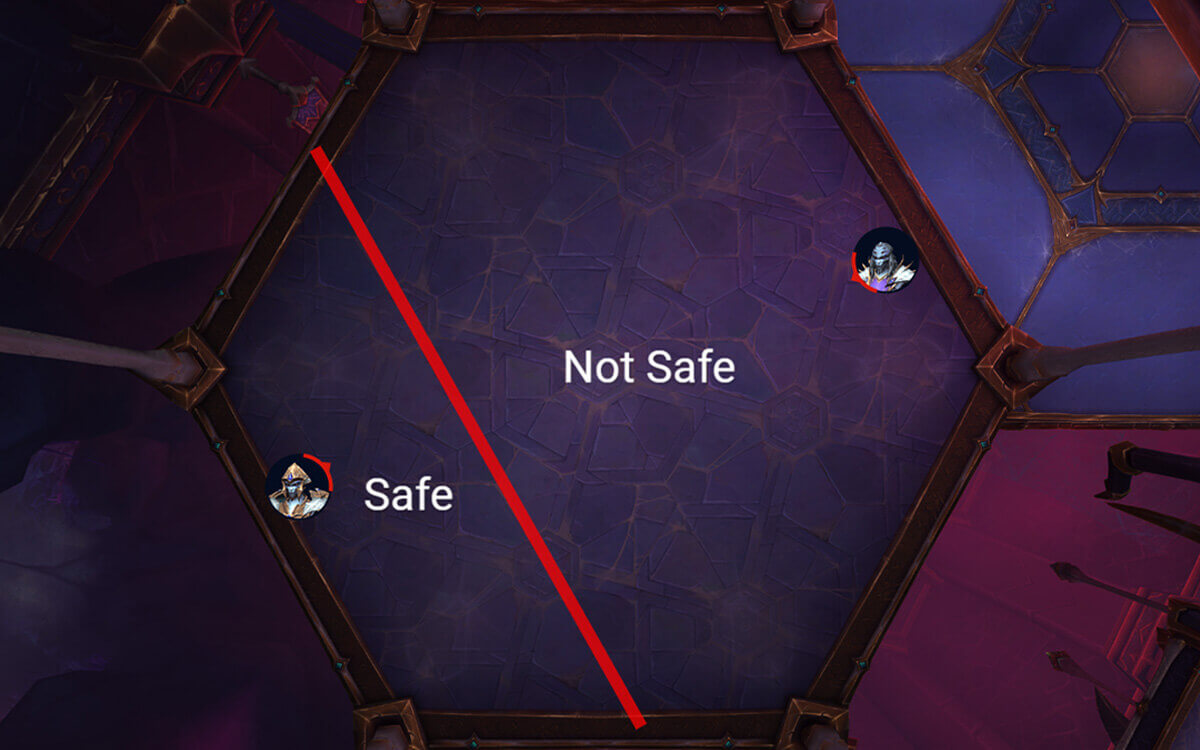
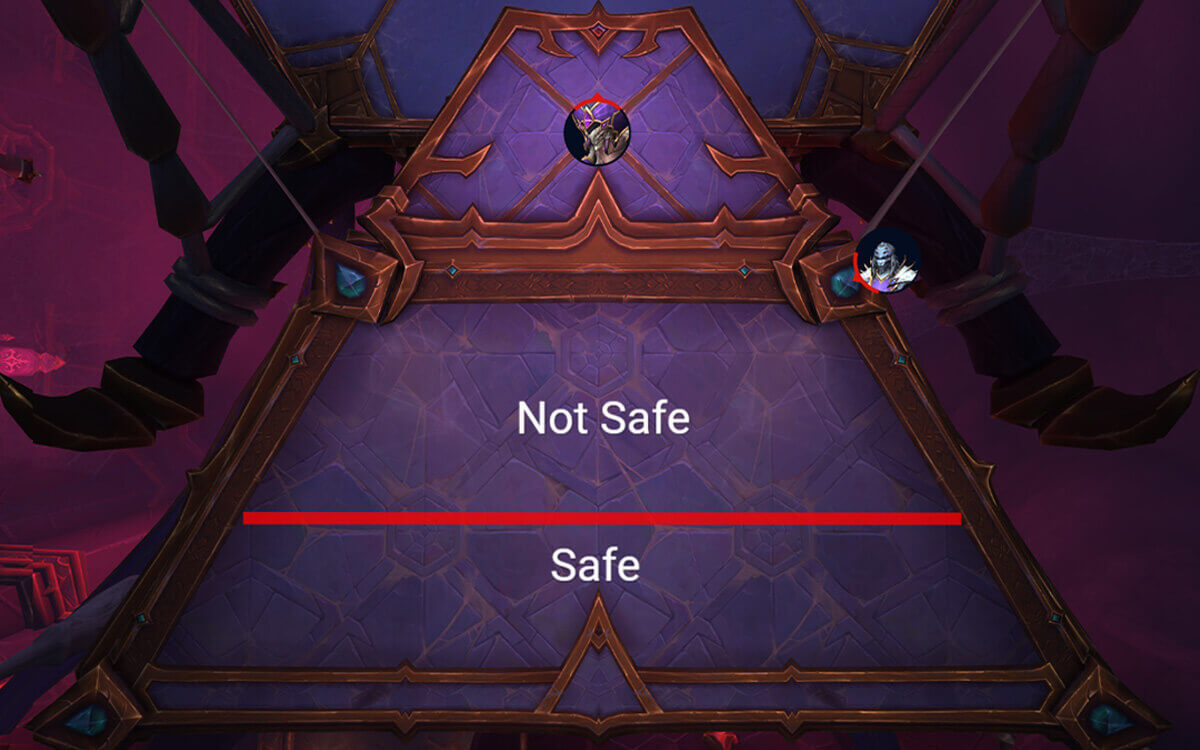
Every few seconds, the boss will cast Wrest, which pulls every player towards the boss. Players standing too close will get devoured (die).
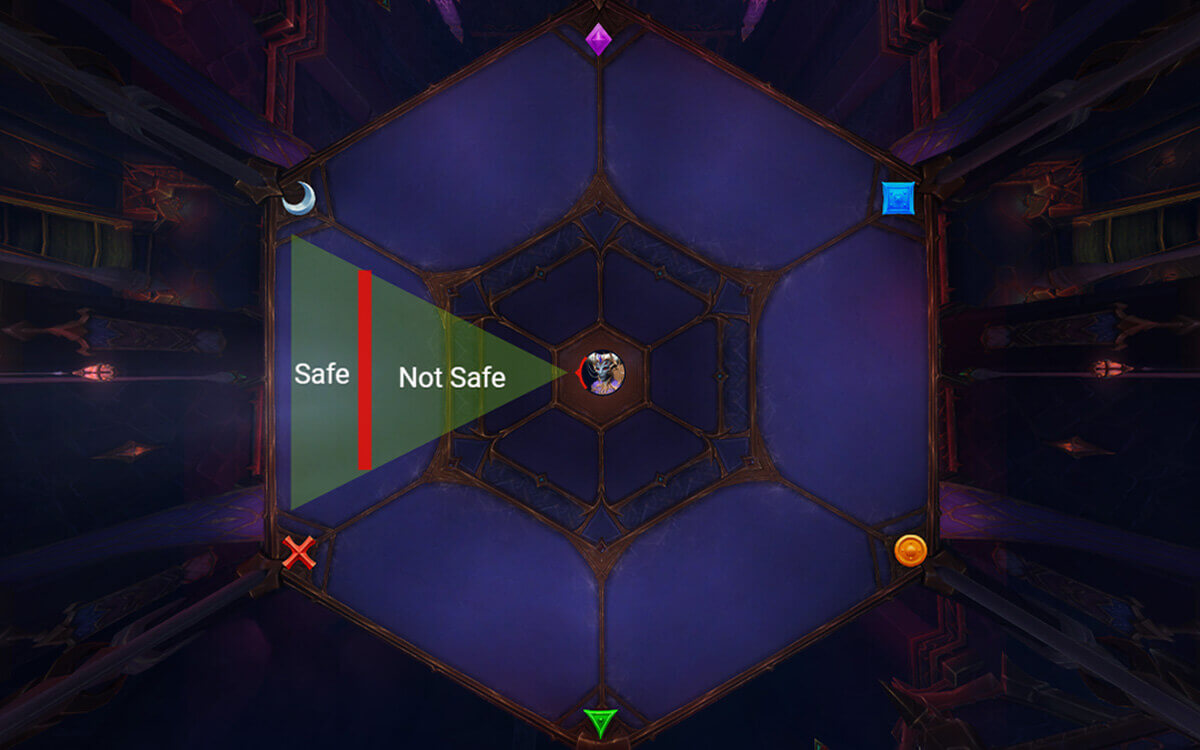
You only need to be in the safe spot just before the cast finishes, there is no followup apart from the very low strength pull the boss constantly does to latched players.
Classes that can interrupt the grip can stand anywhere if they are confident in their skills. Things like Double Jump, Hover, Disengage, Blink etc will work.
There will also be very large blobs that you simply need to dodge.
Once the Shield is destroyed, you will have to kill 2 adds on opposite sides of the room by splitting the raid into two groups.
It recommended that you use the same groups that you assigned to soak Reactive Toxin in Phase 1, this way you don’t have to create multiple groups.
The 2 adds are both Ascendant Voidspeaker and the first thing you need to do is to interrupt Shadowblast, because this can easily kill a player.
While the add is up, random players will spawn Gloom Orbs that split apart into multiple orbs that shoot out, these need to be dodged.
When the Add is dead, it will spawn an orb that knocks everyone in the direction they are facing after a short delay; you want to position yourself at the edge of the platform, aiming at the mini platform in front of you and phase 2 will begin.
Phase 2 Strategy
Both groups will have identical adds to kill. However, only one group at a time will get a Wrest cast (the grip from the intermission).
1st Mini Platform (1x Chamber Guardian + Chamber Expeller)
Both adds will be stacked once you arrive, but shortly after, the Chamber Expeller will jump away and target a random player with a laser that needs to be dodged.
The group that gets the first Wrest grip cannot stack up the adds until the grip is finished, while the other group can instantly move the Chamber Guardian on top of Chamber Expeller.
There will also be several puddles to dodge, but that's it for mechanics on this platform.
Once both adds are dead, click the crystals and you will get a bridge spawn.
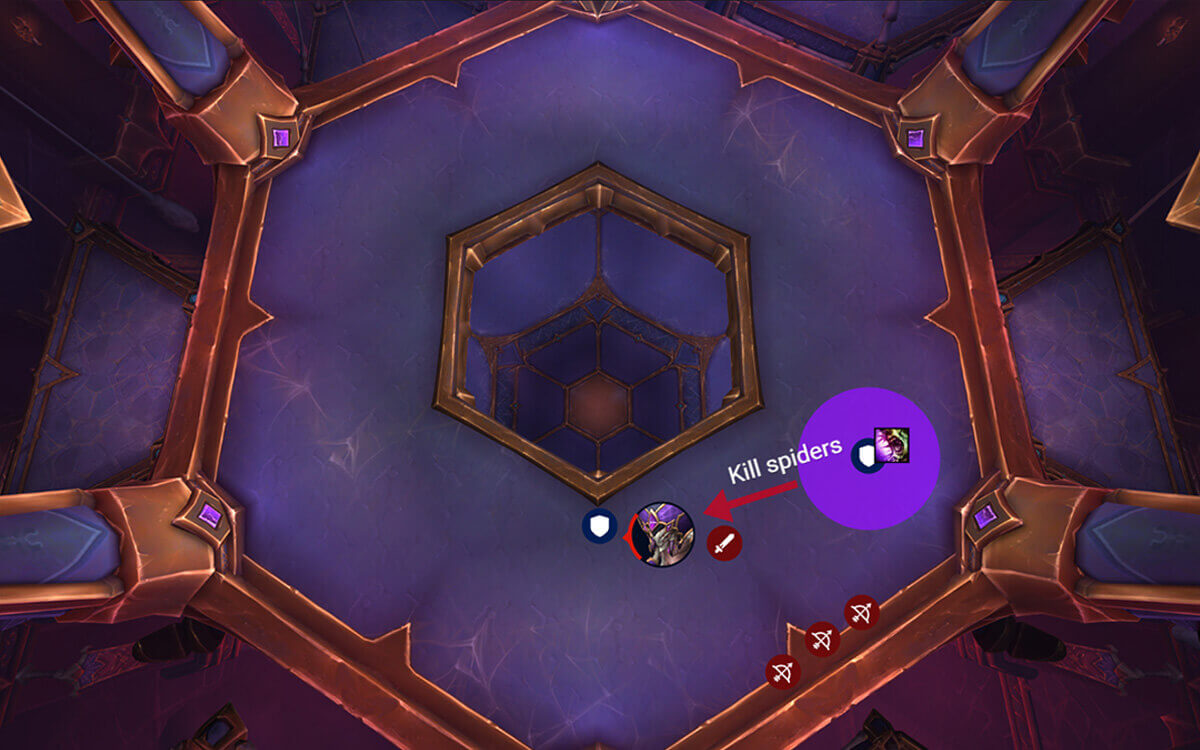
2nd Mini Platform (Little spiders + Devoted Worshipper)
The tank should pick up a bunch of Little Spiders (or crabs) on the bridge and move them all on top of the Devoted Worshipper.
The Devoted Worshipper has an ability that needs to be dispelled called Gloom Touch; this simply inflicts damage to all players in the area when dispelled or expired. So you will want to dispel one by one to stagger the damage and prevent several Gloom Touches from expiring at the same time, which will most likely kill everyone. The debuff expires after 12 seconds.
You want to kill the Devoted Worshipper before the Cosmic Apocalypse cast is finished. Once all adds are dead, you will be able to click the crystals again for a new bridge.
This platform also has a Wrest ability, so make sure you are standing safe if your group is targeted by it.
3rd Mini Platform (Little spiders + Ascendant Worshiper)
This is the easiest platform because you are fighting against the spiders and the same add that you had before when you needed to get the knock-back towards your platform. So you will have to Interrupt Shadowblast and dodge Gloom Orbs.
You don’t have to deal with Wrest on this platform; because the boss is casting Acidic Apocalypse, which wipes the raid if the cast finishes before both groups get knocked back towards the boss.
Make sure you are standing at the edge, facing the boss when waiting for the knockback that happens after the add has been defeated.
Phase 3 Strategy
Queen Ansurek won’t do anything for a while, until the Aphotic Communion cast is finished. So until that happens, you can just blast.
Afterwards, she jumps towards a purple circle marked area; make sure to dodge that.
The first ability you have to deal with is Infest; the current target tank will get infested, and will need to move out with a large circle to spawn little spiderlings and also avoid hitting anybody with it.
At the same time the other tank needs to taunt the boss and take the Gorge hit.
All Ranged players should be standing at the edge of the platform, this is because the Gorge hit causes Queen Ansurek to expel several swirlies towards ranged players that all leave behind a puddle.
Players should be ready to instantly apply crowd control effects on the spiderlings as they move very fast and even 1 spiderling reaching the boss may lead to a wipe. Hunter traps are amazing here. Spiderlings also drop puddles when they die.
Just as you killed the spiderlings, you will get Royal Condemnation cast on 2 random players.
These two players get a large web circle that actually does not clip players, so it doesn't matter if it's on top of anyone, but they do distance based damage to the entire raid. Because of this, you want to go in front of the boss and place those 2 abilities relatively close, this way you can have Queen Ansurek and the 2 Web anchors (Royal Shackles) stacked up for better cleave.
This is also a very natural movement, as the area behind you will be filled with puddles from spiderlings and Gorge swirls.
Note: no player is allowed to touch the web anchor, otherwise they get cocooned and need to be broken out.
You will now get your first Abyssal Infusion, this mechanic creates 2 Portals that you need to use in order to skip the Frothing Gluttony (waves).
2 players will get targeted by this; you want to place one close to the middle of the room and the other one opposite to it, on the outside of the platform. You should try to put them as close as possible to the edge as it gives you more time to react to the wave this way.
Melee should prioritise the middle spot to drop the portal, while ranged should take the outside (far) one. If 2 melees or 2 ranged get it, you have to figure it out on the fly.
Make sure you are not touching the circle as the portal is being placed, since it deals damage. There will also be orbs shooting out of the portals when they initially spawn, dodge them.
Waves are cast pretty much instantly after you dodged the orbs. So, just get close to the middle portal and fight against the slight pull that Queen Ansurek does on everyone to avoid accidentally taking the portal. You should just play it safe and stay a few yards away from it, there is really no need to risk taking it too early as you have plenty of time to take the portal before it's too late.
The Wave comes from the outside, moving towards the boss, so once the wave passes the outer portal, it is safe to take the middle portal.
After exiting the portal, every player will be affected by Abyssal Reverberation, which is a small circle around the player that forces everyone to spread as fast as possible.
The portals will then explode, leave a puddle and shoot out several orbs that need to be dodged.
The next two major abilities that happen are Infest and Royal Condemnation but you deal with them exactly like you did the first time.
Royal Condemnation targets should always go in front of the boss, while the infested Tank should always go to the back to spawn the adds.
Ranged should always be somewhere behind the boss in order to spawn the puddles that happen after Gorge hits, which always instantly happen after the Infest cast.
The final ability in this phase is the Summoned Acolyte adds.
3 will spawn at the same time, with a shield, while casting Null Detonation. You are not able to interrupt Null Detonation before you nuke down the shield, but once you do, make sure that no more casts go through.
When you kill those 3 adds, you will need 3 players to pick up the Acolyte's Essence that is dropped to the ground. The Essence and the Adds cannot be touched by the wave that comes shortly after, because it triggers a wipe mechanic if they do. So, the players who are picking up the essence need to make sure to do the portals correctly, because you will still wipe if the player holding the essences gets touched by a wave.
From here the fight repeats with all abilities that you’ve done so far; and in case you get 4 sets of Portals this will also trigger an enrage.