Raid Setup
Introduction
Welcome to our Mythic Queen Ansurek raid boss guide! We will breakdown the Mythic mechanics and the strategy we recommend to deal with this boss on Mythic difficulty.
Fight Style: Single Target + AoE Fight
Recommended Setup: 2x Tank / 4x Healer / 14x DPS
Required utilities: Evoker Time Spiral, Monk Ring + Tiger's Lust, Paladin Blessing Of Freedom, Druid Vortex, Speed boosts
Hero/Lust usage: On Pull
Mechanics
Reactive Toxin now has an additional effect that prevents you from popping the blob at the same time. There has to be a 1 second delay between the pops, otherwise the entire raid dies.
Additionally, after the first set of Reactive Toxin, you will get an additional ring for the remaining two, forcing your raid to split into 3 soak groups.
Once Wrest is cast (players pulled towards the boss) they will drop Grasping Silk (grey puddle) on the ground, at the location they were standing when the pull happened. Abilities that prevent the grip will also ignore Grasping Silk and not drop the puddle.
Each Side of the platform now has a Shadowgate. The Shadowgate will detonate after 10 seconds, wiping the raid.
If a player runs through the gate, they will reset the 10 second counter, take damage and get a stack of Gloom Touch.
Once all adds are defeated on the current platform, the gate will be disabled.
This ability will always go on the healer and the player who took the Shadowgate. It works the same as on heroic, but now additionally deals damage to all players standing in close proximity to affected players.
Chamber Acolyte
One Platform will get two new types of adds called Chamber Acolyte. All they do is hang from the ceiling and cast Dark Detonation, an ability that will wipe the raid after 10 seconds if not interrupted.
Additionally, you will need to assign proper dps cooldowns and target assignments to kill every add to progress onto the next platform.
Strategy
Just like the last few fights, on Queen Ansurek, you will have a bunch of things to set up before you even pull the boss for the first time.
Depending on which WA package you decide to use, you might have different requirements to change/set but overall I suggest to have everyone remove all Say messages from DBM/BW and also remove any form of Marking by those addons.
Interrupts:While interrupts are not a complex thing in this fight, you still want to have assignments to avoid random deaths during progress.
You will need 2 players to mark the adds on Bottom Platform, 2nd Platform and 3rd platform. Optionally, you can also have a 3rd player who is marking the Ascendant Voidspeaker on 3rd platform in case the other player swapped sides with Shadowgate.
Here is an example how those assignments should look like:
intstart
npc:223150 - This is the Ascendant Voidspeaker
spell:447950
(orange) Mazaw Keps Gerlox Hype
(Skull) Tikker Barry Pekrz Alorani
(Green) Bobir Keps Gerlox Hype - Optional 3rd set assignments to adjust for players using shadowgate
npc:226200 - This is the Chamber Acolyte
spell:455374
(blue) Tikker Henning
(yellow) Mazaw Freddy
Intend
Roots
Roots have become much easier due to recent changes, you now have 1 set less (4th set is missing) making it easier to free yourself. You will still have to free several players on the 3rd set in most scenarios.
Here is an example of what spells can be used and when for roots:
| Class / Spec | 0:16 (0) | 0:56 (40s) - Time Spiral | 1:50 (54s) - Time Spiral | 2:16 (26s) |
| Warrior | Reflect | Reflect | Reflect | Reflect |
| Ret Paladin | Freedom | Freedom | Freedom | Freedom |
| Holy Paladin | Early Master’s Call | Master’s Call ASAP | Master’s Call | |
| Hunter | Feign | Feign | Feign | Feign |
| Rogue (not sub) | Cloak | Gnome | Vanish | Gnome |
| Holy Priest | Holy Paladin Freedom | Holy Paladin Freedom | Holy Paladin Freedom | Holy Paladin Freedom |
| Shaman | Spirit Walk | Spirit Walk | Spirit Walk | Spirit Walk |
| Mage | Blink | Blink | Blink | Blink |
| Warlock | Portal | Portal | Portal | Portal |
| Monk | Gnome | Tiger’s Lust | Gnome | |
| Druid | Shapeshift | Shapeshift | Shapeshift | Shapeshift |
| Havoc DH | Ret Freedom | Ret Freedom | Ret Freedom | Ret Freedom |
| Death Knight | AMS | AMS | AMS | AMS |
| Pres Evoker | Tiger’s Lust | Dream Flight | Deep Breath | Tiger’s Lust |
| Pres Evoker 2 | Dream Flight | Deep Breath | Dream Flight | |
| Dev Evoker | Deep Breath | Deep Breath | Deep Breath |
Keep in mind this was made when there were 4 root sets, so you can ignore 2:16 and if possible, use something that you would do on 4th, for 3rd set if cooldown allows it.
Players that need to be freed on the 3rd set, need to make sure to take the closest spot in front of the boss to maximize damage uptime on their root
Shadowgate
The recent changes to Shadowgate made it possible for players to use it again, so there are all sorts of scenarios you can do now. Technically nothing stops you from having the same players do the Shadowgate for the entirety of Phase 2.
Our suggestion would be that instead of having the same 2 players do Shadowgate, you create Shadowgate teams for each platform. This way you can spread the dps cooldowns better.
Example Groups:
- Bottom platform - 2 Healers (they only need to use gate once)
- 1st Platform - Mage + Mage (or any other ranged dps)
- 2nd Platform - 2x Melee DPS (someone who is not strong on AoE)
- 3rd Platform - Mages again or any other ranged dps
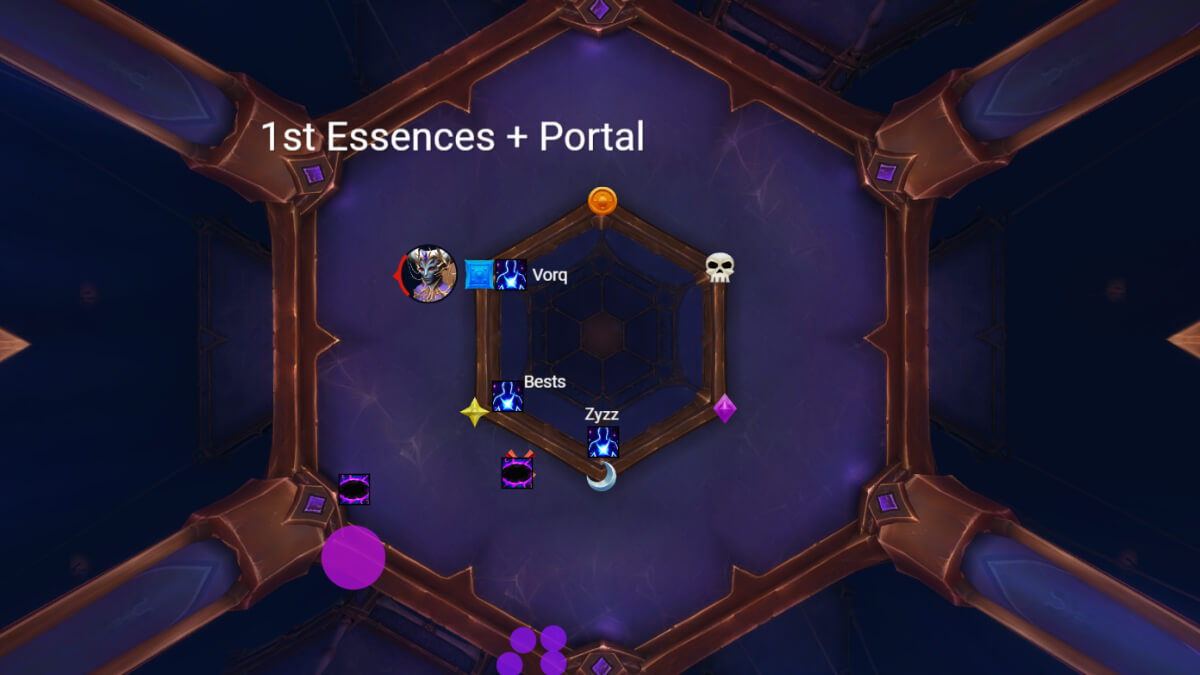
Essences
Finally, we have the Acolyte's Essence to assign. You will need 2 sets of Essence pickups, The 1st set has 3 Essences and the 2nd set has 7 essences.
1st set we suggest having your tanks and a dps pick it up. DPS should be someone who can skip the wave without using the gate.
2nd set you will again have your tanks pick up theirs, plus a DPS/Healers who can skip the wave without the gate as a priority.
Skipping the wave is not a must however, it does make the fight a bit easier because players do not spawn the ring that forces you to spread. It also adds a bit of safety due to less random gate explosion deaths. For those of you that did not catch it on Heroic, when a player holding an Essence goes through the gate, the gate destabilizes and will explode in a few seconds, leaving a puddle on the ground.
On Mythic, if you have an Essence carrier take the gate before everyone else, you risk several players who took it 1 sec later dying due to the explosion and puddle on the ground.
It is suggested that all Essence carriers, who are taking the gate, always delay taking by 0.5 seconds compared to others. So when the call is made, just don’t instantly take it.
Phase 1
Phase 1 is nearly the same as the Heroic version, however due to tighter timings on overlapping abilities and overall increase in damage taken, it makes it very challenging to execute and all mistakes will be punished heavily.
The simple rule of Phase 1 is that if you get hit with anything that is avoidable, you will die. This includes getting rooted when you are supposed to unroot yourself instantly.
Just like on heroic, players going to the wrong Reactive Toxin group, will add an additional stack of the debuff to the entire raid. It is very important that you never get over 4 stacks.
When you pull the boss, you want your entire raid to stack in a line, and move the boss towards the edge to drop the Liquefy there.
Afterward the entire raid moves clockwise and you will get your first set of roots.
You want to make a sort of a formation, similar to the one that we used on Silken, so that the players never have to look for a spot to drop the roots.
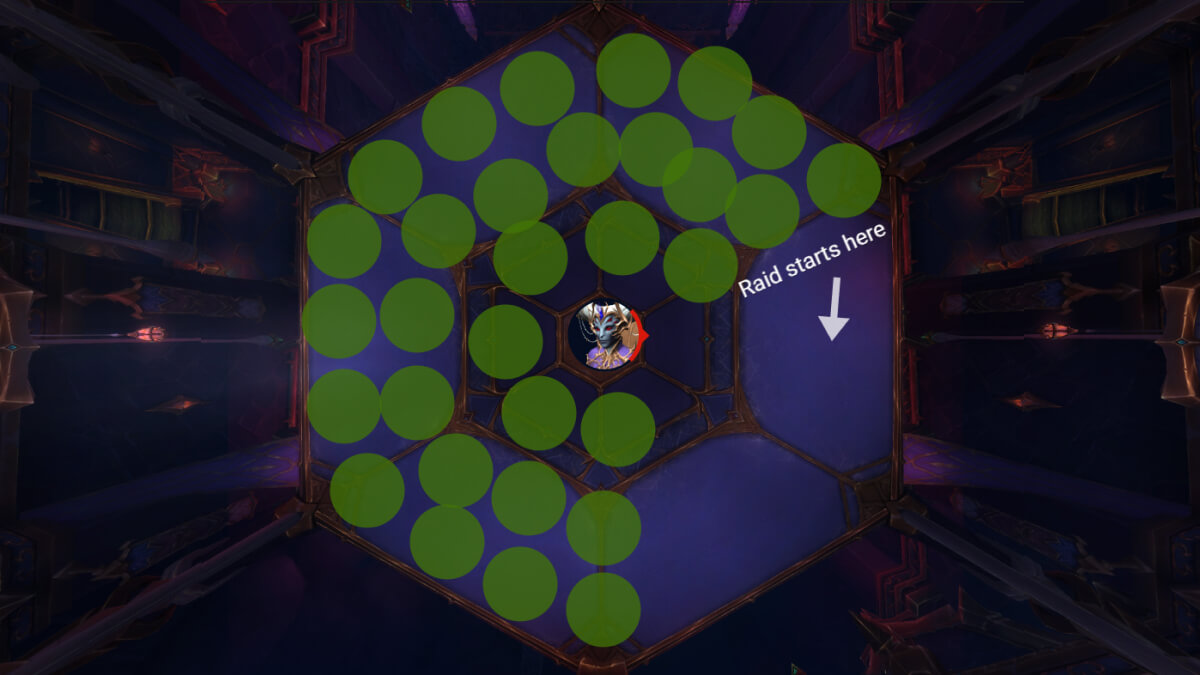
Reactive Toxin Positioning
The main thing to know here is that Yellow and Orange Circles have to be placed more towards the edge of the room, while the Purple one should have a bit of a gap.
Yellow and Orange soakers will mainly consist of melee players, so having them closer together will ensure that everyone is in range of the boss without having to move out of the circle.
Players popping yellow/orange will have to pay attention to the timing a lot due to a small window during which both can pop. After a few pulls this will become easier.
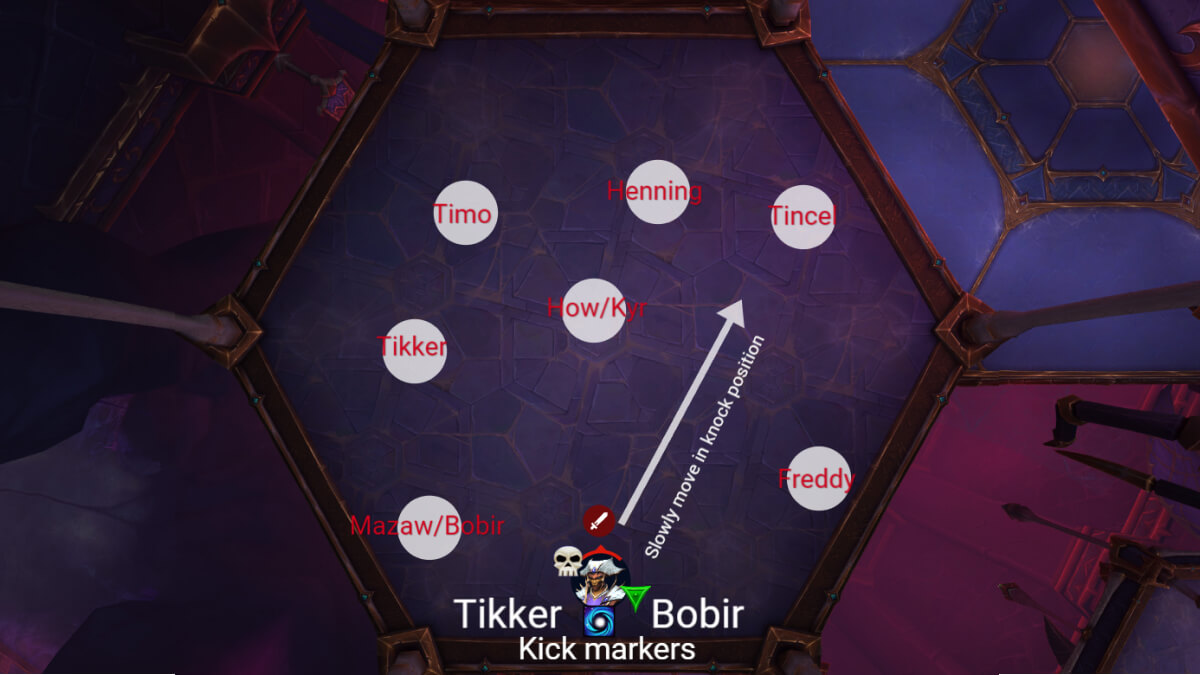
Once popped, the players should move out to the positions shown on the above picture.
Keep in mind that you will always get knocked towards the boss, no matter what direction you are facing, therefore it is good to have players who can get out of the knock faster to pop the toxins, that way they have more time to move to their big circle drop spot.
Suggested movement:
- Yellow player should just run forward so they end up behind the raid
- Orange player should just run towards the edge of the room
- Purple player should move towards the middle
Here is an example how a triple toxin should look like:
Tanks will need to make sure to position the boss close to the previous puddle to save space on Liquefy cast. The same goes for other players when dropping roots, filling gaps and getting closer to previous puddles is the key.
Phase 1 might sound simple, but it is the hardest phase of the entire fight by a lot. The strategy is fairly simple, but getting the hang of Reactive Toxin pops and groups will take some time. Random deaths to Web Blades will also add an additional layer of difficulty, and the overall healing requirement is the hardest of the entire fight.
Once you have done all 3 sets of Reactive Toxin, the intermission will begin.
If done correctly, the room should look like this:
Intermission
Extra Tip: Use hero for intermission until you start getting into P3, it will save you a lot of time.
Once the intermission starts there are several things happening right away.
- First you will have debuffs expiring from the last Reactive Toxin application, this deals damage and leaves a DoT like always.
- At the same time, you have to dodge the orbs and lastly prepare for the Grip. It is crucial that everyone understands the importance of playing clean here because getting hit by anything, even just standing in a puddle for a bit will most likely kill you.
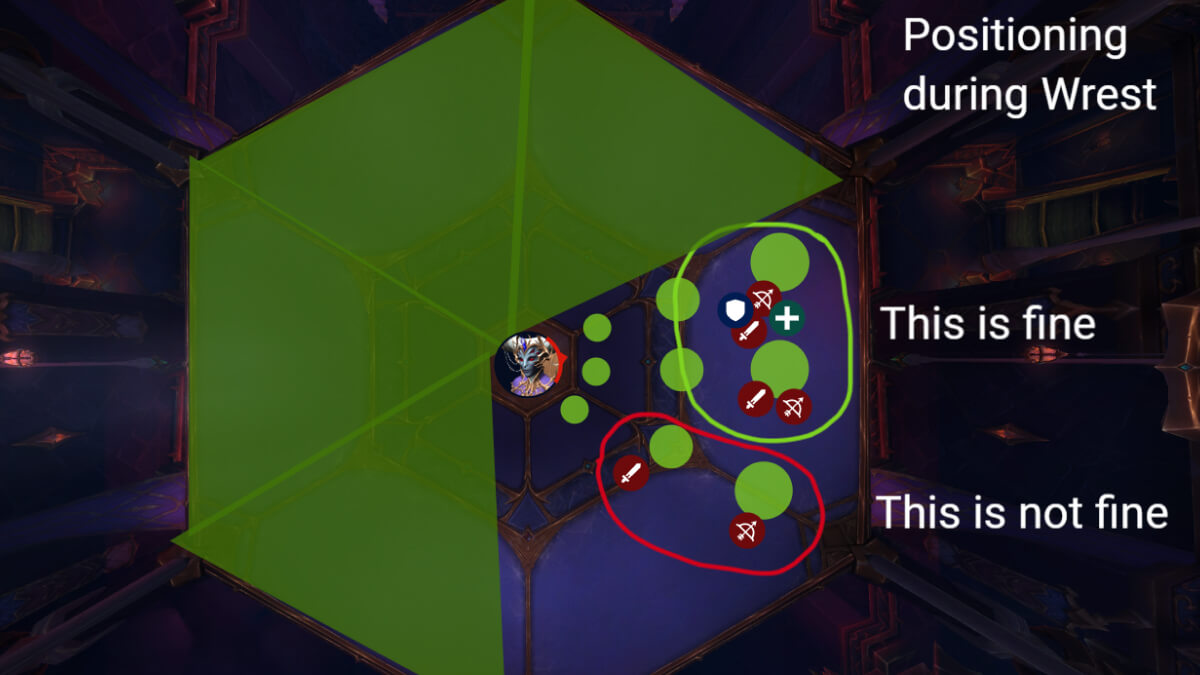
The Grip itself is done the same as heroic, by running to the back to have enough distance. One difference is that every player that does get gripped, will leave a puddle that just grows over time. Players who can prevent the grips (like DKs for example) will not spawn a puddle.
When you run to the back, your raid wants to be close to the previous puddles, but you want to avoid stacking too tight together.
You will be dodging large blobs as the grip is happening, and often players will try to reach the stacked group and get hit because of it, or die due to overstacking. It is completely fine to be on the opposite side of a blob, away from the group because you do not need to save this much space, but keep in mind that if anyone spawns a puddle in the middle of the room early on, this puddle will expand in a way that you will have no space left either in ranged or melee camp.
Here is an example of a proper grip formation:
Once the shield is destroyed, P2 will begin and everyone needs to run to their assigned side.
Phase 2
Phase 2 is a simple phase that should become easy after a few attempts. The hard part is always going to be getting there with everyone alive.
You will want to make a formation for the bottom platform right after the intermission, this has the purpose of forcing several ranged players to move to their position and by doing so, naturally dodge orbs that are spawning behind them.
There is no damage check at all, and killing the add too fast is often not recommended due to CDs.

1st Platform
On this platform, you are fighting the same add combination as on heroic. The only difference is that you have a Gate now; you might want to have your players stand to the sides initially when they arrive to the platform, in order to not spawn the beam on top of the gate, which could potentially hit a player coming out/going.
Have several DPS target Expellers to properly spread DPS, the example on the picture is just a suggestion, feel free to experiment.
You should have only 2 gate uses here.
Early into the Phase 2 progression, you might struggle to kill all adds and open the bridge just before a Wrest cast finishes, the best thing to do here is to simply play as if you are going to get gripped, and if it does not happen, perfect!
2nd Platform
In this section, one platform is the same as heroic in terms of adds, but the other one has 2 additional adds called Chamber Acolytes.
You have already set the interrupt rotation for those at the start of the guide. The cast lasts for 10 seconds, so this usually is not a factor to worry about.
I would suggest assigning 1 range DPS on each add, preferably one with strong ST or Multi-Dot to make sure those adds die in time. The benefit of this, in the long run, is having consistent Phase 2 pushes and skipping a Wrest set.
It is advised that the entire raid pops personals during the first Wrest on this platform, regardless if you are getting it or not, because at this point the dispels are going off and the damage taken is pretty high.
Keep in mind that Healers are guaranteed to get the random gloom touch debuff as soon as they arrive at the platform. Therefore, healers should already position themselves in the corner and dispel as soon as possible, usually instantly if the raid is healthy.
On this side, you will also take two gates. Whoever is doing the 2nd set of gates, should do it much earlier than usual. I'd say 6-7 seconds remaining on the timer. This is because it overlaps with Wrest and a player might get gripped away just as they are trying to take the gate, and later into the progression, another issue will appear around this set.
Due to high dps and clean gameplay, you will potentially kill every add and create the bridge just as the 2 players are taking the gate (if we assume they did it late and not early). This is an issue because those two players would come out of the gate at the 3rd platform, getting instantly meleed by the big Add there and needing a dispel.
Platform 3
On this platform, you are doing the exact same thing as you did on the bottom platform. This means you want to have a formation so that players are naturally dodging the orbs on the ground.
Remember that due to gates, and the strategy you chose to do, you might have different players on this platform now, so make sure that kicks and markings are sorted with that in mind.
As the add is going down, slowly move it into the knock position.
You will do 2 gates here, but the 2nd gate players do not need to get dispelled as this occurs naturally during the knock up, without hurting anyone.
Phase 3
Prepare for a powerpoint presentation.
The best suggestion I can give you right away, is that everyone watches videos and contents of this guide, especially for this phase, because this can become the easiest phase of the fight if everyone knows their task.
You start the fight at the side that the boss is facing (one group will already be standing there).
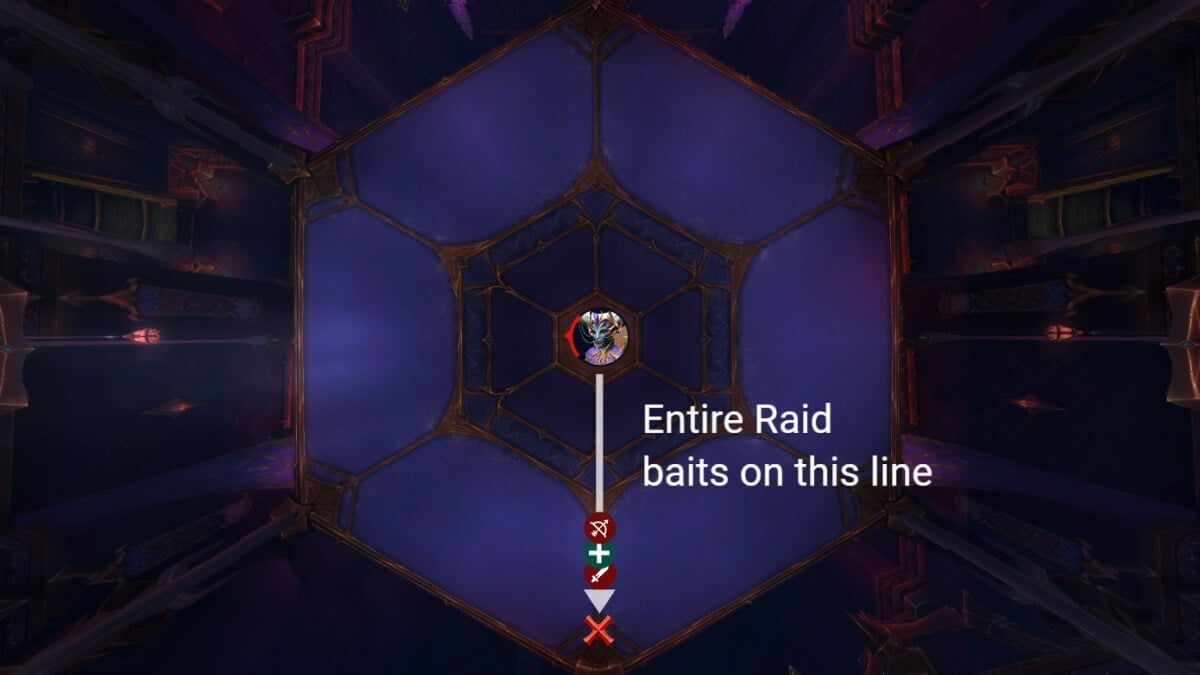
When the boss lands, the entire range team goes to the corner and baits.
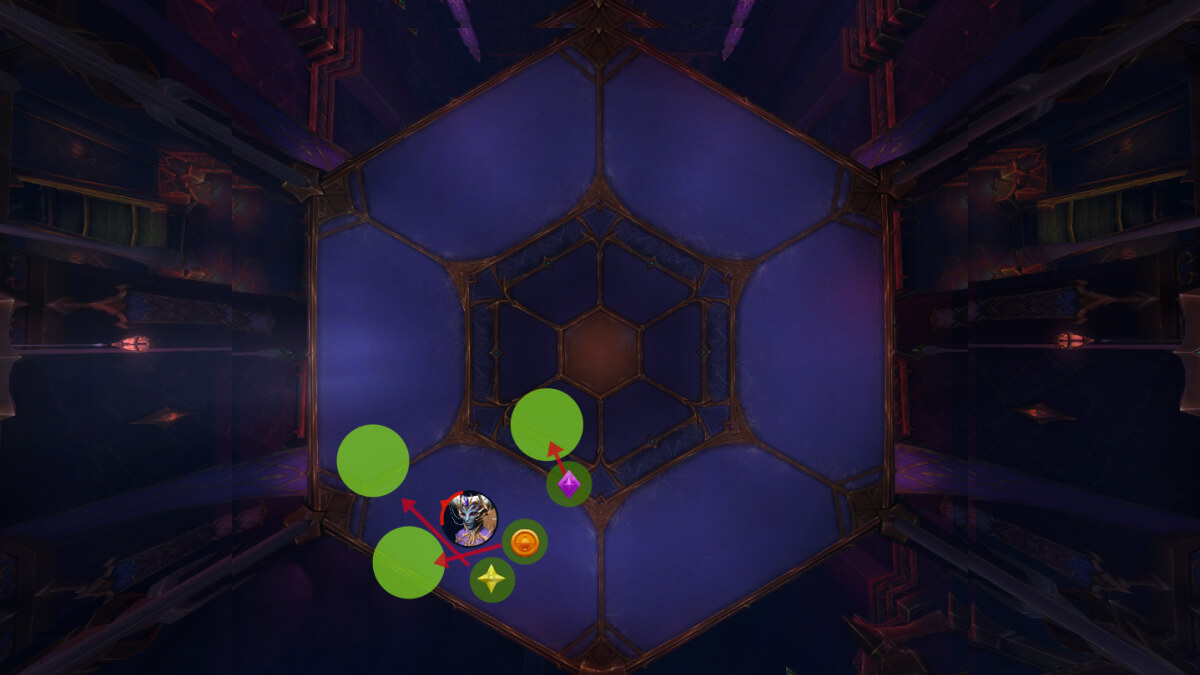
Queen Ansurek is then moved to the opposite corner, the tank gets the circle and melees just need to make sure to stand outside of it.

When the swirly appear, ranged players want to dodge towards the boss, to spawn follow up swirls on the edge. Melees should just make sure to not get hit.
You will want to assign CC rotation on the spiderlings here. Monk Rings, Binding shots and Vortexes are your best bet. If you happen to have 2 monks, having back to back rings will ensure safety.
Tanks will have to be courageous here and tank the boss almost on top of the spiderlings, provided there is a monk ring down. This will give you additional boss damage but also better cleave on the spiderlings. Once the CC is falling off, Tank should move the boss away if any spiderlings are still alive and the raid should just kill them off.
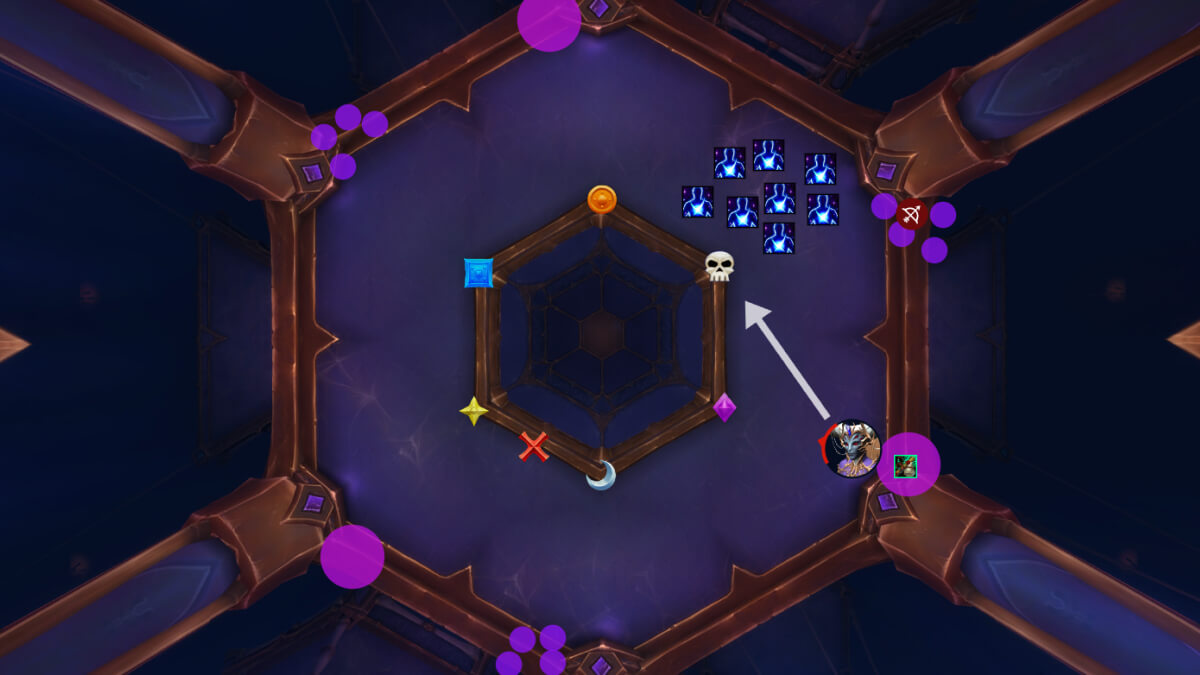
When the big adds spawn, the entire raid moves to Moon and starts the rotation from there.

Kicks are here free for all because adds die fast and the cast is pretty long as well, but do make sure that someone at least is interrupt to avoid unnecessary raid damage.
Essences will drop after each killed add, those need to be ignored until it's time to pick them up by pre assigned players. Make sure to move away from the marker as you are killing the add to not accidentally pick up an essence.
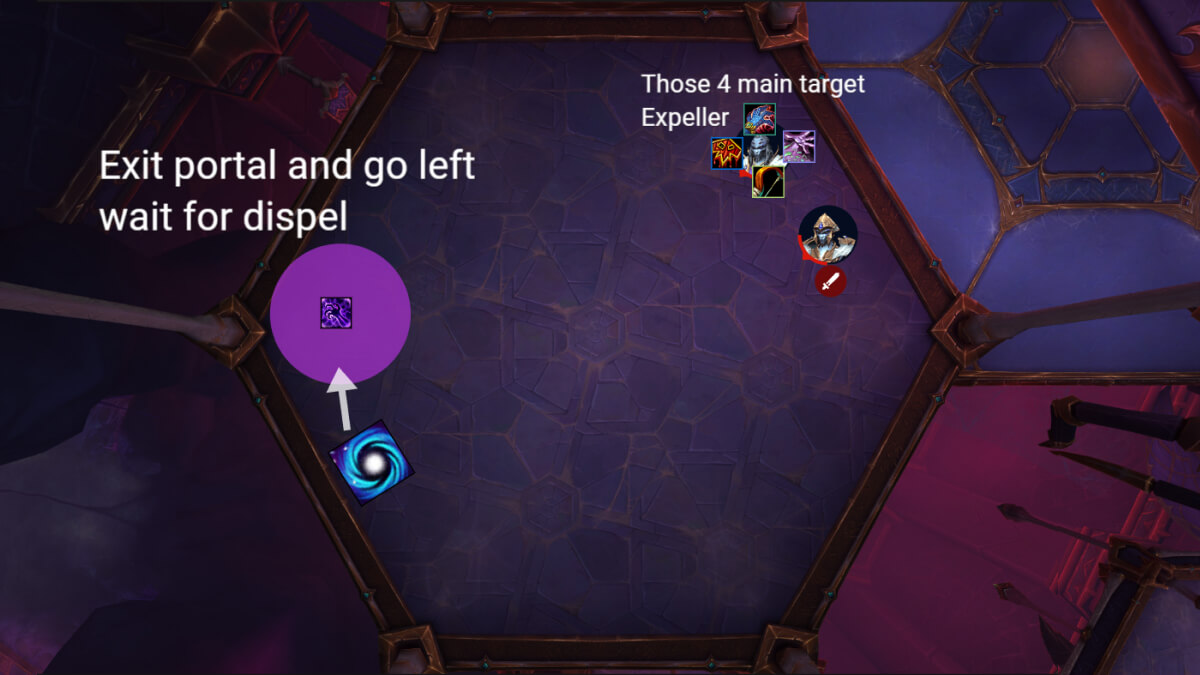
You place the Portal in melee (red marker) and the other towards the pillar corner.
Essences must be picked up before they get touched by the wave.
It's best to have your tanks and a mobile dps that can skip the wave without using the gate (not necessary but it's a bonus) pick up the 1st set of essences.
Your raid leader should call when it's time to take the gate, but make sure that if an essence carried is taking the game as well, they never take it before others. So basically if your raid leader says “go”, just wait an additional second and then take the gate if you are holding an essence.
The reason for this is the Heroic mechanic that most people forgot about. Whenever an essence goes through the gate, the gate becomes unstable and explodes. If an essence carrier is to take the gate before anyone else, chances are high that half of your raid gets killed due to the explosion of the gate the moment they land on the other end.
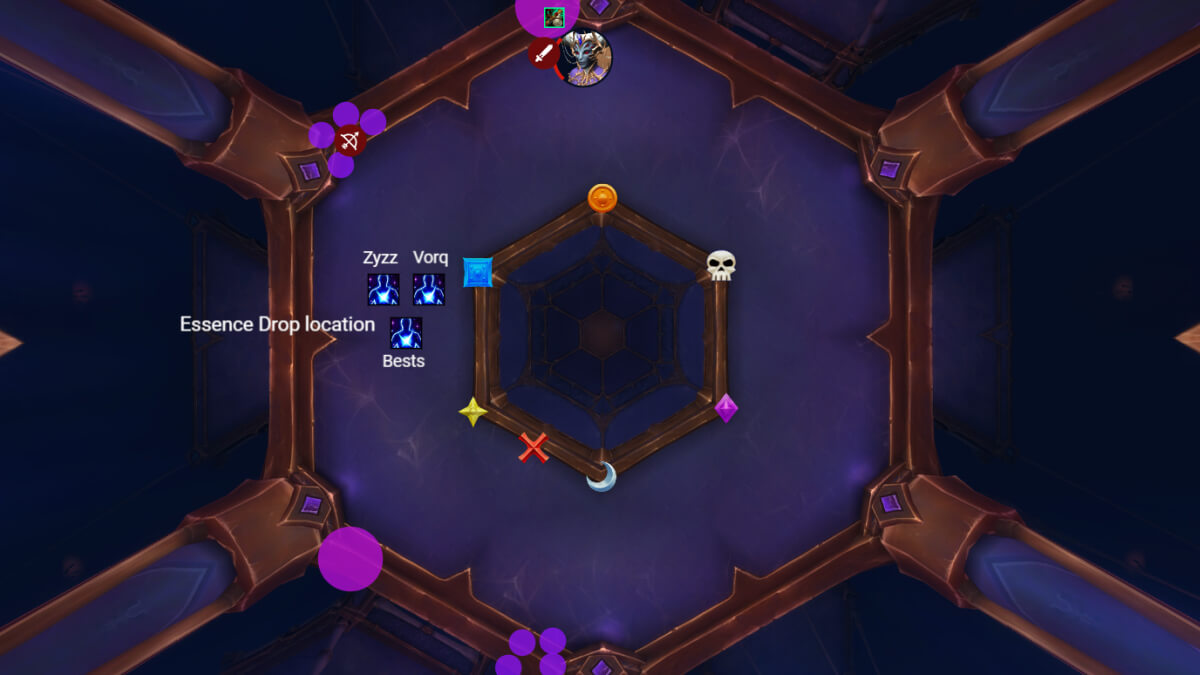
Drop the essences in the back and get ready to repeat the start of Phase 3 setup.
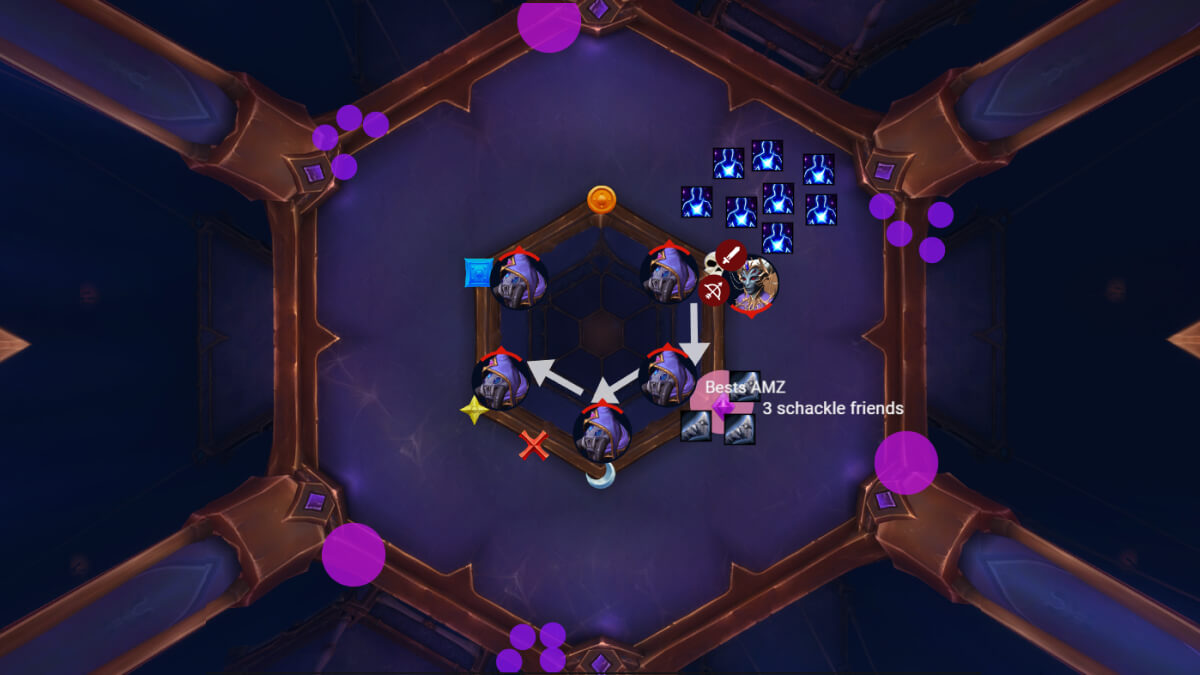
On this set of little spiderlings, you will want your entire raid to swap to them to make sure they die as soon as possible.
The reason for this is that shortly after, you will get your first royal shackles cast. If you are late on the spiderlings, you might have players completely out of position for this ability that can kill half of your raid very fast.
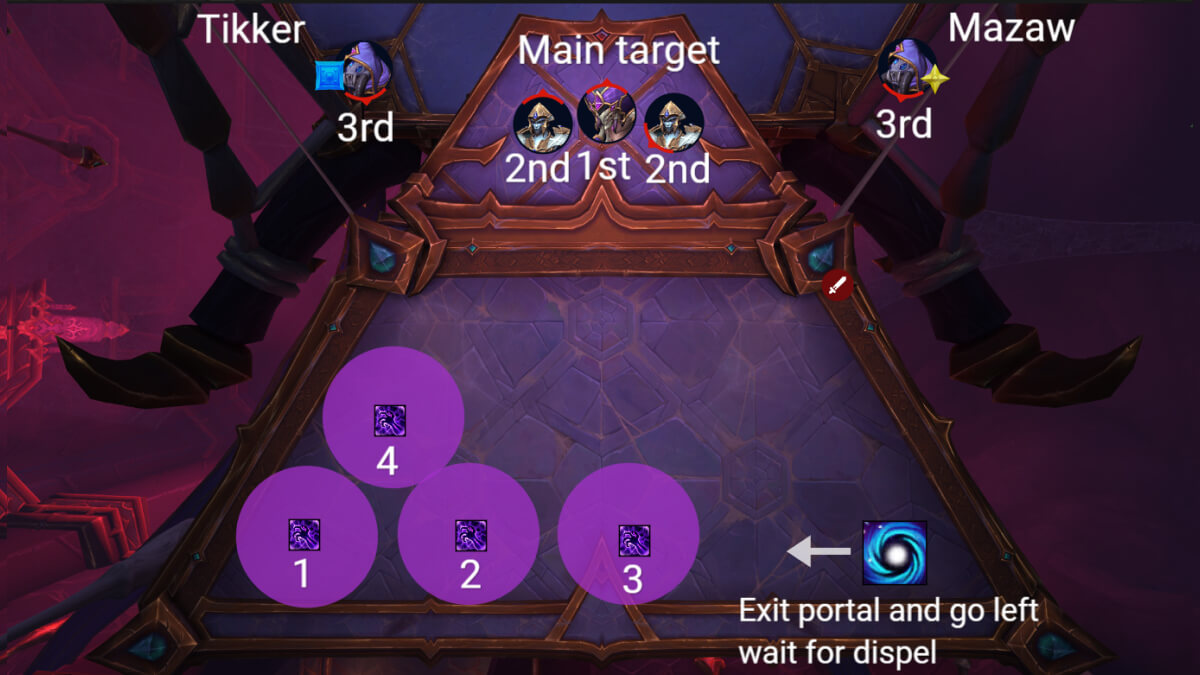
As soon as the spiderlings are dead, the entire raid should move to blue marker.
The 3 players targeted by royal shackles should go to Orange and make a triangle formation there, because standing on top of each other will kill you.
Make sure to drop AMZ/Barrier/Darkness or similar to the raid stack position and use strong defensives for this.
Ranged players should mainly focus on the close add (blue marker) and the far one (purple).
Make sure you kick the initial casts to not overlap it with shackle explosion.

As soon as the shackles are placed, the boss gets moved on top of them and they get cleaved down.
Here you have to think about several things:
- Ranged players should stay in between orange and blue markers instead of following the boss, they need to place the portal there.
- Have a Priest/Evoker stand at the Pillar where another Portal should be placed and have them grip/rescue a player with a portal to that position. This way you should be able to guarantee the portals are placed properly.
- Players who are supposed to pick up essences should go to those positions instantly when portals are being placed.
The setup should look like this:
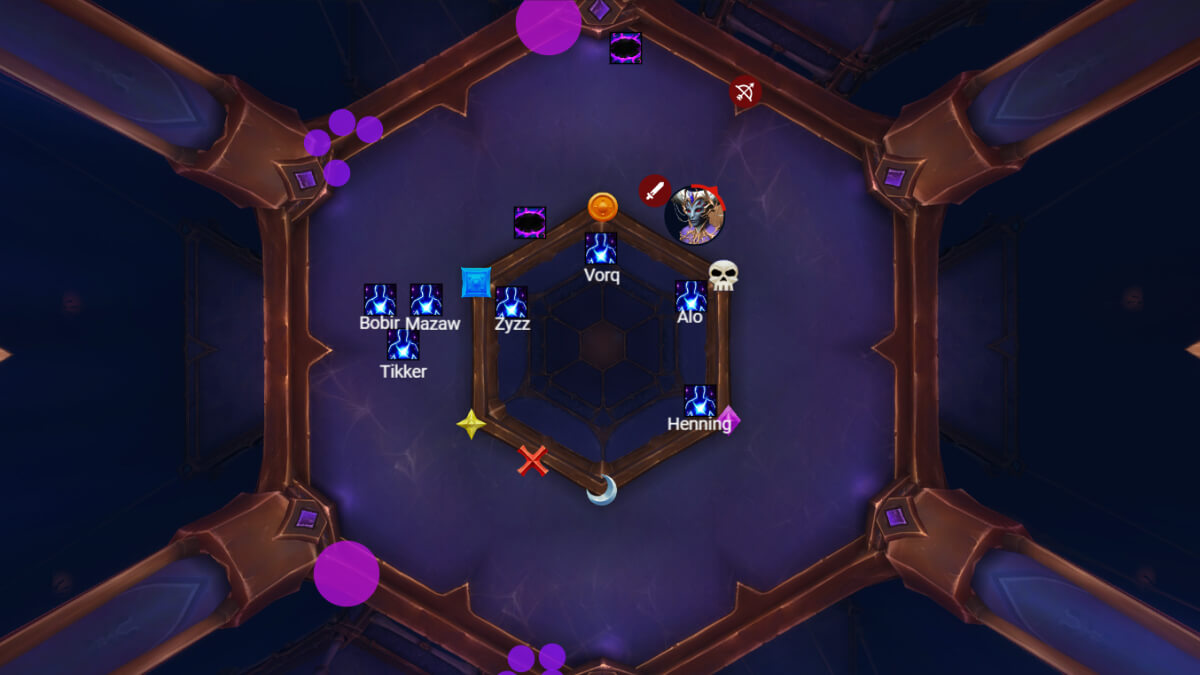
You want a mobile player that can skip the wave to pick up the far Purple one (mage is the best option for this) and you also want a melee player that can skip to pick up Skull (warrior for example).
The Orange/Blue essence is always reserved for tanks and the 3 in the back you can assign anyone.
If you managed to take the gate and drop the essences, you should be well within kill range now, but due to deaths and bad execution you might need to play a bit more.
You do another P3 start setup, with baits and spiderlings. Same rule as with the last set, you want your entire raid to focus them down.
You will move to Skull and get another set of shackles at the purple mark, here you use everything that you have left.
It is very important that you do not tunnel vision here, all you really need to do is cleave the adds and interrupt! You can ignore portal placement, essences and all because you are trying to kill the boss before the next wave is cast, so the only thing that can really wipe you are the interrupts.
Move the boss around, while cleaving and kicking and Mythic Queen Ansurek should die.
Thank you for using Method boss guides. We wish you best of luck on this boss and see you again in Season 2!