Raid Setup
Introduction
Welcome to our Heroic Broodtwister Ovi’nax boss guide, in Nerub'ar Palace. You will learn about Broodtwister Ovi’nax mechanics and the strategy we recommend to deal with this boss on Heroic difficulty!
This boss is like if Broodkeeper Diurna and G'huun created a wormy offspring. Broodtwister Ovi'nax might look like something you'd find under a rock, but this squirmy troublemaker is here to make your raid interesting. Don't let the creepy-crawlies distract you, although they are great padding opportunities for both DPS and healers on this boss.
Fight Style: AoE fight
Recommended Setup: 2x Tanks / 4x Healers / 14x DPS
Required utilities: Mass grips, slows, vortex, ring of peace
Hero/Lust usage: On Pull
Method Boss Review
Heroic Broodtwister Ovi’nax is a really fun encounter that lets you play the fight in several different ways. In the past, bosses like Kurog, despite offering several options, guilds always opted for the easiest ones because there was no benefit in fighting a harder boss.
With the Ovi’nax encounter, you have several options in how to do the eggs, which is always something nice because it changes the dynamic of the fight. This is also bound to happen naturally due to mistakes like breaking the wrong egg or missing to break an egg; which in turn will influence the damage/healing profiles in, sometimes, fun ways.
Lets just hope that the live version does not end up being changed in a way that forces you to do the same Eggs every pull.
Currently, on Heroic difficulty if the black blood puddle touches an egg, it feels very punishing, especially if it's the Worm egg, so we hope this will get nerfed when the fight is live.
Method Boss Rating: (4/5)
Easy Mode
- Keep the boss on top of other adds for extra cleave
- Do not let adds/eggs touch Sanguin (on the floor)
- Kick Worms and Kite Parasites
- If infested by a Parasite, stand in melee before the debuff expires
- Dodge puddles
- Prioritise Parasites > Worms > Spiders
- Move out with Sticky Web and call for a dispel
- Break the correct eggs (check strategy section)
- If an add is mutated, it becomes the highest priority target
Mechanics
4 players get a small purple circle, which after a few seconds will go off, dealing moderate damage to anyone around, applying an absorb and destroying an egg if the circle is touching it.
Players are required to use this mechanic to pop the eggs to defeat the boss.
At full energy, Ovi’nax will drain one of the blood containers (the closest one) dealing damage to the entire raid and placing an absorb on everyone.
Additionally, Sanguine (ground puddle) will start spreading out of the container, slowly covering the entire area. The boss will drain a canister a total of 3 times before the entire side is covered in sanguine, and the next time Ingest Black Blood is used, the boss will simply move to the next closest container.
Players can decide based on the boss position which canister to drain next.
Whenever sanguine touches an egg, it triggers a large explosion that deals heavy damage to the entire raid and also causes the creature in the egg to Mutate.
These are black swirls on the floor that need to be dodged, if you are hit you will take a moderate amount of damage and a small absorb.
Large white circle that inflicts low damage per second to the player and a 50% slow until dispelled.
When dispelled, it deals moderate damage to anyone within the circle, so moving away from everyone is suggested before the dispel.
This is a Tank hit that deals moderate damage, but also deals additional damage after 8 seconds based on how much Health the tank is missing at that moment.
Colossal Spider
The spider just hits the Tank, increasing its damage by 25% with each hit.
Mutation: Increases HP by 75% and applies a 10% healing reduction (Mutation: Necrotic).
Voracious Worm
Constantly casts Web blast, which deals low amounts of damage to a random player.
Additionally, they attempt to cast Poison Burst, which deals moderate damage to the entire raid if not interrupted.
Mutation: Increases HP and Cast speed by 75% (Mutation: Ravenous).
Blood Parasite
Fixates on random players, and if it reaches them the parasite will infest its target, taking a low amount of damage per second and after 10 seconds spawn 2 additional parasites.
Mutation: Increases HP by 75% and movement speed by 10% (Mutation: Accelerated).
Strategy
Broodtwister Ovi’nax Map
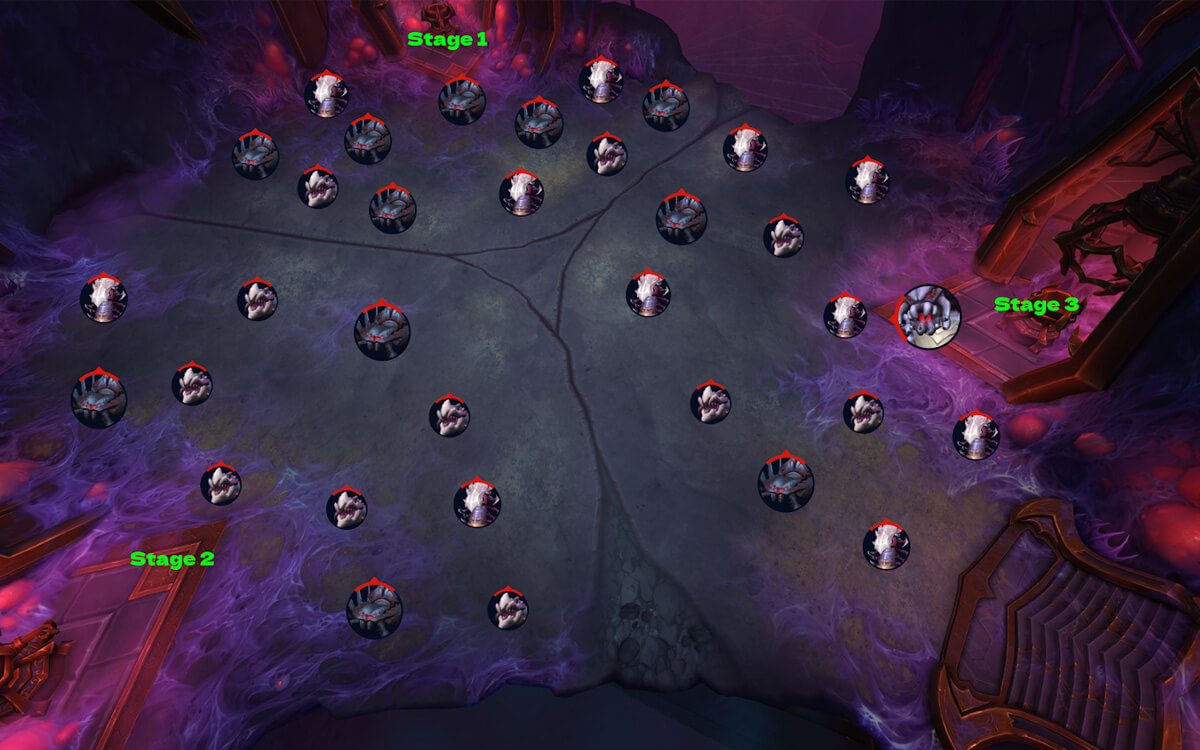
Start the fight in the Stage 1 area, and loosely spread around that area to make it easier to dodge Sticky Web circles and Vile Discharge. This will happen throughout the fight, and are the only two abilities you have to worry about apart from egg related stuff.
Sticky Webs will also be constantly applied to several players. Those are large dispellable circles that slow the player by 50%. Make sure to move away from others before calling for a dispel to avoid clipping other players with the dispel explosion. Rule of the thumb is to never dispel a melee unless they call for it because they are always surrounded by several players.
Pay attention to Vile Discharge puddles if you have a Sticky Web circle, it can be hard to dodge if you wait until the last second and you have a 50% slow on you.
Shortly after you pull the boss, an Experimental Dosage cast will happen as well as Ingest Black Blood, because Ovi'nax starts the fight at 90 energy.
Pop the correct eggs (see next section) by using Experimental Dosage circles and start killing the adds.
4 random players will get Experimental Dosage circles that they should use to break the eggs. You can see the recommended egg break order down below.
Because it can be hard to remember and react to which egg you need to break, it's best to use DBM or BigWigs markers on players, and have 4 players with good memory always mark the next eggs to break using world makers.

This way, once a player gets Experimental Dosage, they will have a marker assigned to them and they simply have to move there.
Note that you have a total of 12 Experimental Dosage circles per stage, but 11 eggs. This means you are allowed to miss one egg and still be able to clear the entire stage.
Important things to note:
- Healers: Unstable Infusion is an absorb that gets placed on all players every 7.5 seconds. This cannot be prevented and should just be healed up as soon as possible, because every application will simply add more to the absorb amount.
- Tanks: When moving adds, make sure they do not touch the sanguine covered ground as this will cause mutation.
- Most Raid damage comes from Volatile Concoction. Tanks need to use strong defensives to mitigate damage taken from this and call for healer externals - a portion of missing HP will be dealt as damage to the entire raid.
- Your biggest priority in this fight is to prevent the eggs from being touched by the Black Blood puddle; if this happens, you will first take heavy raid damage and then have to deal with a Mutated add.
- Mutated Worm does heavy raid damage ever 2 seconds until killed, so your entire raid will have to swap to it.
- Mutated Spiders and Parasites are easier to deal with, but you should still aim to never get any of the mutated.
Stage Overview
Special Note: In the examples below, you will notice that while every stage is different, once you are fighting in one section of the room, the sets are always the same. These can be defined as phases because they play differently in a way. Let’s break it down.
Stage 1 (The “Chunky” Phase)
In Stage 1 you will mostly have a double set of Spiders, which results in reduced healing on the entire raid and more damage on the tanks, but because this is early into the fight, the overall damage is low and you can get away with passive cleaving the spiders while fully focusing on the boss.
Stage 2 (The AoE Phase)
In Stage 2 you will mostly have a double set of Parasites, which means lots of AoE; this is important as it can quickly spiral out of control if you are slow at killing Parasites. You will need proper slows, grips and use of Vortex / Ring of Peace to ensure everything can be grouped up effectively and killed quickly.
Make sure the players who are fixated by the parasites actually do kite them, because every infest will create more parasites and it will drain your overall boss damage if you constantly have to AoE to get rid of parasites.
Stage 3 (The Interrupt Phase)
In Stage 3 you will mostly have a double set of Worms, meaning you will need to set up a proper interrupt rotation; this is important as having Worms finish their cast can quickly lead to deaths. The Parasites in this stage will be easier to kill, since you are only fighting against 1 set at a time.
Stage 1
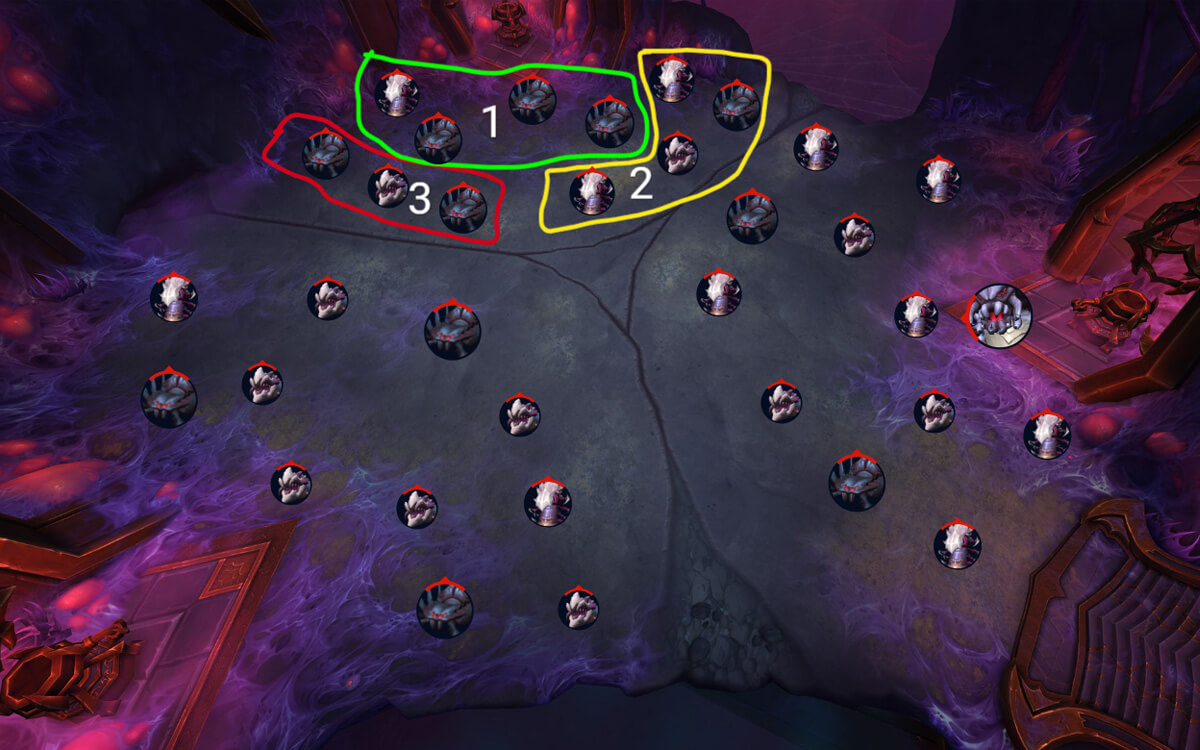
This is your starting area. On the first Experimental dosage, you can pop 3 spiders and a worm and group everything up on the worm to kill it as soon as possible. Afterwards, you cleave on the Spiders and focus on the boss.
Because this happens at the start of the fight, you will have all externals and defensives available for the tanks, so make sure to invest them while there are 3 spiders up, just to play it safe.
After the initial pull, all sets are very easy, provided you interrupt the worms on the 2nd set.
Stage 2

Once you arrive to this side, your first set will be heavy AoE, so make sure you save up on resources and cooldowns (including grips, vortex, monk ring etc).
You will have 3 parasite groups and a spider, nuke them and the rest of this stage will be very easy.
This stage is easier than the initial stage, but things can get wild if there are a lot of infests and you constantly keep spawning new parasites.
Stage 3
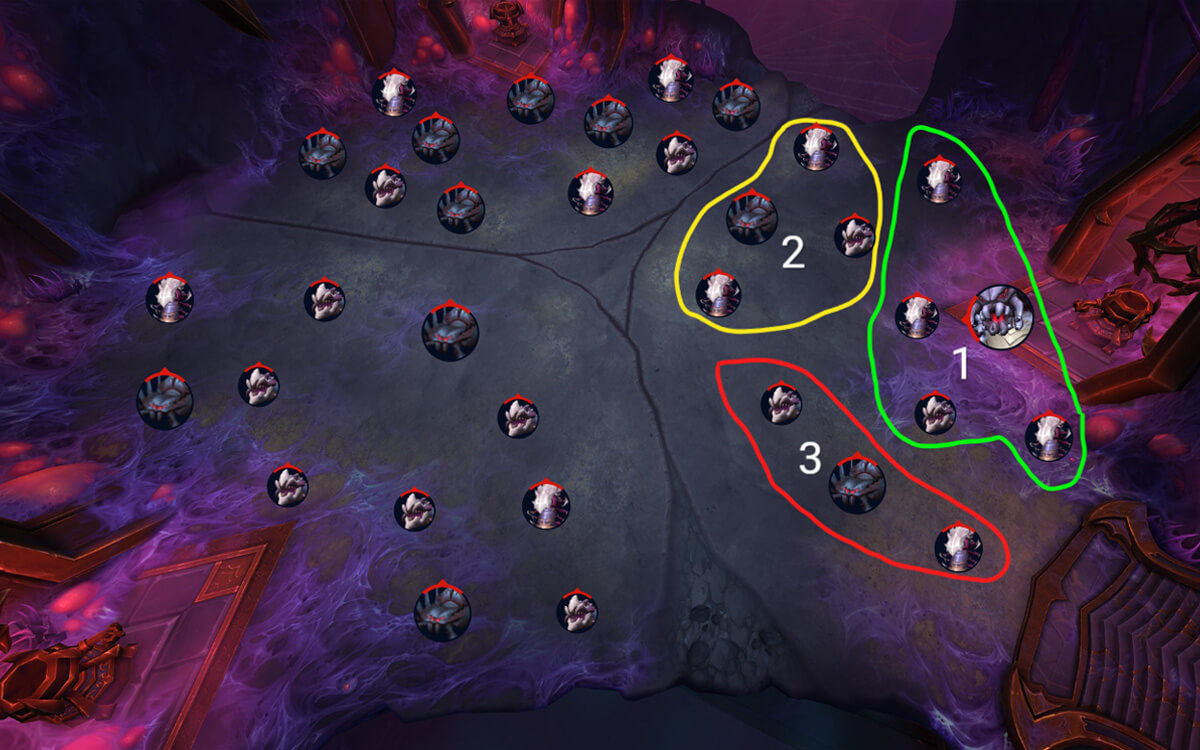
This stage is the hardest one, mainly because of the first set, where you need to break 3 worms and a parasite.
Assign a range group on one of the far Worms to nuke it down and keep it interrupted, and assign a few players to kick the other far worm; you will only need 1-2 kicks there because melees and the boss will move there once they kill the worm in the middle.
Once all worms are dead, you can start killing the Parasites. You don’t really have to care if you have some parasites walking around while you kill the worms, because you can stack those parasites with the next set and just AoE everything down.
From here, based on Ovi’nax’s health you can decide to skip breaking the far eggs if you know the puddle is not going to reach them before the boss dies.
Correcting an Egg Error
It is a common issue in this fight that you often pop the wrong egg or have several players go to the same egg, and miss out on popping one. If this happens you need to be aware of what your options are. Every missed egg means almost guaranteed mutated adds. So on the next set, if you have the option to choose which one shall mutate, parasites are always the best, followed by the Spider and then Worm.
Whenever you know you will get a mutated worm, your raid needs to be prepared to nuke it down fast. Mutated spiders are not as problematic, but keep in mind that the 75% HP increase means they will just live much longer and having a healing reduction on the entire raid for an extended period of time is not recommended, so if you have one, prio target it.
Parasites are just a bit faster and have more HP, making them the least problematic of the 3, plus your dps won’t complain about it helping with their parses.