Raid Setup
Introduction
Welcome to the battle with Heroic Sikran in the Nerub’ar Palace raid! This guide covers Sikran’s mechanics and the strategy we recommend to deal with this boss on Heroic difficulty!
Unfortunately, this boss doesn't bring anything new or innovative to WoW encounter history, you just need to stick to the basics and you will defeat Sikran, Captain of the Sureki in no time.
Fight Style: Single Target fight
Recommended Setup: 2x Tanks / 4x Healers / 14x DPS
Required utilities: None
Hero/Lust usage: On Pull
Guide Author's Thoughts
During the 1st test, this was a candidate for one of the most boring bosses in WoW ever. After the 2nd test, it is a better fight for sure, but fundamentally still lacks abilities to make it somewhat engaging. With WeakAuras and Boss Mod markers, there will be almost nothing for players to worry about.
For healers, this fight might be a bit more fun as there is constant raid damage going on with periods of large bursts when everyone is stacked.
We might see some changes to the amount of Decimate targets and some different damage profiles, but currently this feels like it will be the fight you will get on live.
Method Boss Rating: (2/5)
Easy Mode
- Tanks alternate between Captain’s Flourish hits
- Pull Sikran to the side of the platform and make sure nobody is standing between the boss and the edge of the platform
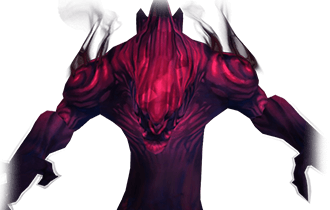
- 4 players marked by Phase Blade (red arrow) move to the edge and places the spirits loosely spread (preferably 5 yards away from each other)
- Other players need to move away from the Phase Blade charge path otherwise they spawn a spirit also
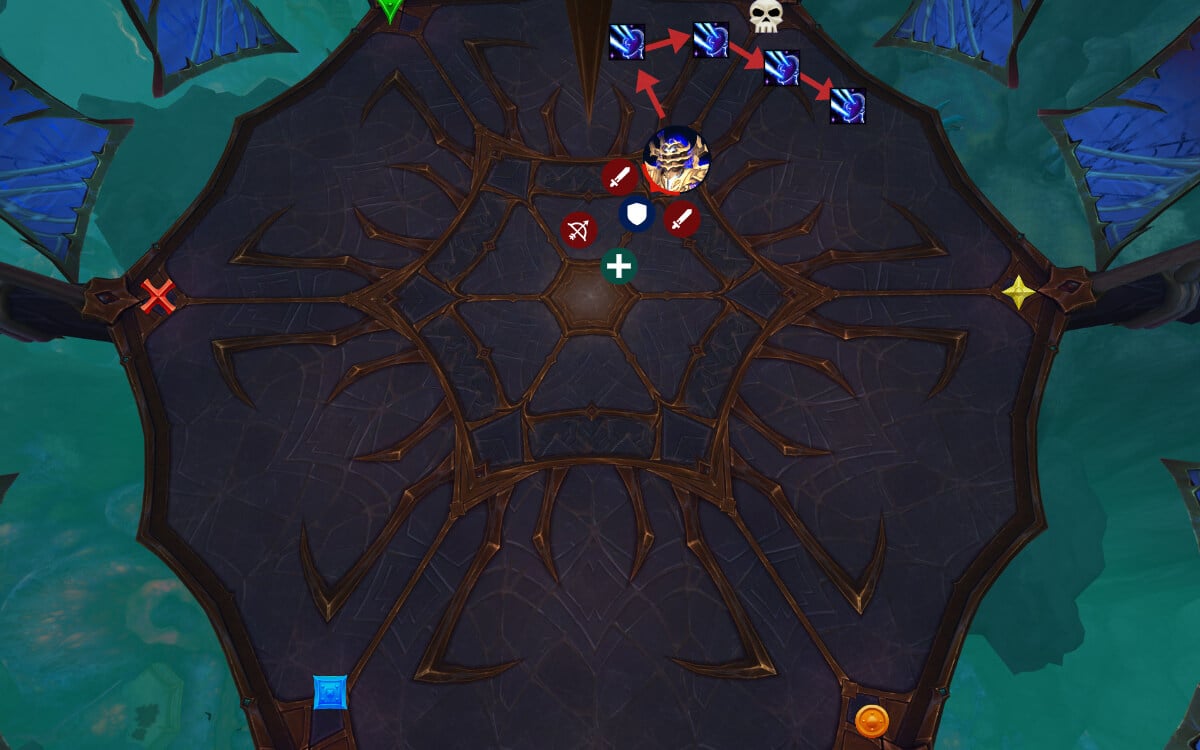
- Decimate targets (blue arrow) move out of the raid and try to hit as many spirits as possible
- Avoid standing in a Decimate path, unless you are the one targeted
- Dodge Swirls on the ground (Rain of Arrows)
- Move away from Shattering Sweep (20 yards) and be ready for raid wide damage, the amount of damage depends on how many spirits you have left over
Mechanics
Sikran marks 4 players with a red arrow; after a short delay, the boss charges between all of the players that are marked, dealing low damage and reducing healing those players take for 20 seconds.
Each player hit by the charge will spawn a Cosmic Simulacrum, this includes non-marked players that stand in the charge.
Spirits that are untargetable and will pulsate low damage to the entire raid while up. When killed by Decimate lasers or Shattering Sweep, each spirit puts a DoT on players inflicting low damage and reducing healing received. This stacks and ramps up in damage pretty fast if you kill several Spirits at once.
When killed, they also drop a puddle on the ground that remains till the end of the fight.
This mechanic places a Blue arrow on several players. After a short delay, Sikran shoots a laser beam towards them. Players hit receive a debuff that increases damage taken by this ability similar to Zskarn, so you want to avoid getting hit twice in a row.
Hitting Cosmic Spirits will destroy them, and trigger their death effect Cosmic Shards / Cosmic Residue.
When Sikran reaches 100 energy, he will do a short channel, after which everyone within 15 yards takes massive damage and gets a damage taken increase debuff for 20 seconds.
Additionally, Sikran will destroy every remaining Cosmic Spirit on the map, so ideally you want to have very few, if any at all, remaining when this happens.
Tank combo in which Sikran will cast Expose twice in a row, finishing off the combo with a Phase Lunge. One tank takes Expose hits, the other takes the Phase Lunge, and then swap the order after the Phase Lunge cast.
Strategy
This is a fairly simple fight with only a few mechanics that repeat throughout the fight; however, mistakes are very punishing and can quickly lead to a wipe at any point of the fight.
Sikran Positioning
My recommended strategy is going to be very boring, as I suggest that you try to play the Phase Blade mechanic as if it's Mythic difficulty. What does that mean exactly? On Mythic you must place the spirits 5 yards away from each other, unlike on Heroic where you can stack them up.
So, why am I suggesting to use the Mythic positioning instead? Simply because I believe that stacking up the spirits will lead to more problems throughout the fight that could be easily avoided by spreading spirits.
Here are some issues that you might encounter if everyone stacks:
- Every player targeted by Phase Blade gets hit by it several times. While this does not spawn extra Spirits, it does do a fair amount of damage that can lead to some players dying to this.
- Decimate targets (blue arrow) will try to hit the same clump of Spirits, which will overlap lasers on top of each other and both players will get hit by 2 lasers; damage is increased every time you get hit by an additional laser, so it's very deadly.
- If you are going to do this fight on Mythic difficulty, it will feel completely different to what you are used to on Heroic difficulty.
Alright, with that out of the way, let's now take this fight step by step.
Strategy Breakdown
As shown in the Positioning picture at the start of the guide, you want to place the boss towards a marker, creating a nice gap between the maker and the boss. Nobody should be standing in that gap, as this is the charge route during Phase Blades.
The 4 players targeted should ideally create a formation in which the first player targeted is the first in line, 2nd player targeted is 2nd in line, and so on; this will make the boss charge each player exactly once. However, this is not always doable and it's fairly hard to see which number you are without a WeakAura, but as long as there is a line formation (similar to in the picture), the damage should not be problematic.
Once the Spirits are placed, everyone should stack up behind the boss to make it easier for healers to heal, because at this point you have at least 4 spirits up dealing damage to the entire raid. If any extra players get hit by the Phase Blade charge there will be more spirits and more raid damage being inflicted.
Before the Decimate cast, you want to place the boss almost in line with the previous Marker, this will create a perfect angle for Laser Beams to hit all (or most) spirits without it being too difficult. Everyone else needs to be on the opposite side of the boss to avoid getting clipped by the lasers.
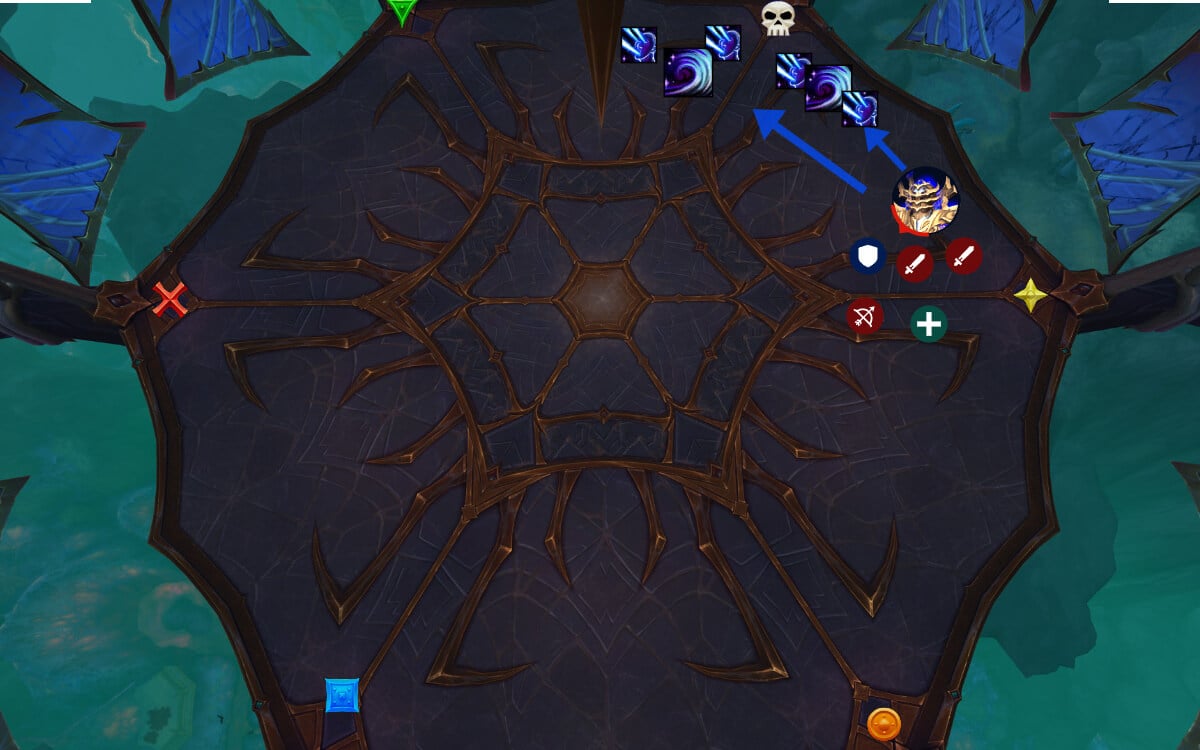
After this is done, you do the exact same formation like you did on pull, but this time on a different marker, and you repeat the same process.
All Spirits that are hit by a Decimate laser beam will apply a DoT to players, dealing damage and reducing healing taken, it will also spawn a permanent puddle beneath them.
The only difference between the sets of mechanics is the Rain of Arrows cast (swirls on the ground):
- 1st Decimate: swirls happen at the exact same time, forcing players to spread at the same time as when heavy raid damage is about to happen.
- 2nd Decimate: swirls happen before, so here the raid can simply stack up during lasers for more efficient healing and damage reduction.
After two Decimate casts Sikran will reach 100 energy and do a Shattering Sweep, forcing you to move 20 yards away from the boss. If you did the Spirits correctly up to this point, this ability does not hurt at all, since on average you should get up to 2 spirits destroyed with it. However, if you had bad luck and someone fully missed clearing adds with Decimate, then you might get around 4 to 6 stacks here, so you want to use all your defensives and raid cooldowns to survive this.
From this point, the fight resets and repeats all the way until the end without any alteration apart from the space available getting smaller due to puddles on the ground that you spawn when you destroy spirits.