Raid Setup
Introduction
Welcome to our Heroic The Silken Court boss guide, the penultimate boss of Nerub'ar Palace. This guide will teach you about The Silken Court’s mechanics and the strategy we recommend to deal with this boss on Heroic difficulty!
The Silken Court is the ultimate showdown in Nerub'ar Palace, where nostalgia meets challenge in the most unexpected way. Prepare yourself for an encounter that will push your DPS to the limit while leaving you humming Miley Cyrus's "Wrecking Ball" as your raid wipes to the relentless force of a Reckless Charge, smashing through your team. But it's not just about survival — this boss is a prime opportunity for those looking to cement their place in the history books with a legendary parse. Ready to smash through the competition? Let’s dive in!
Fight Style: 2 Target Council fight with shared HP and add cleave
Recommended Setup: 2x Tank / 4x Healer / 14x DPS
Required utilities: Grips, Vortex, Speed-Boosts, Monk/Mage Ring
Hero/Lust usage: On Pull
Guide Author's Thoughts
It’s been a long time since we had the penultimate boss that is a Council fight, but here we are! Very good decision by Blizzard to make the HP shared, because this allows your entire raid to do their absolute best to inflict as much damage as possible to both bosses without holding back.
The only downside to this encounter is that it has another dispel-wipe mechanic, and the overall feeling that this fight is essentially Tindral 2.0, but we do feel that it's an upgrade compared to Tindral fight. Let’s just hope this is the case on Mythic as well.
Method Boss Rating: (4/5)
Easy Mode
General:
- DPS should mainly focus Anub’arash and multi-dot/cleave on Takazj.
- DPS should always attack the boss that is taking increased damage when the ultimate ability is interrupted (Reckless Charge & Cataclysmic Entropy)
- Tank with better magic resistance should tank Takazj
Phase 1:
- Healers should dispel the Poison stacks on the Tank once damage gets too high
- Grip the Scarab adds to Anub’arash and keep them in cleave range for extra damage
- Dodge Impaling Eruption (frontal cone on random player) and free players that get hit
- Make 2 groups of 2 players who get the Binding Webs from Web Bomb, and then form a line to stop Reckless Charge (check strategy section)
- Dodge Burrowed Eruption
Intermission:
- DPS the shield on Takazj and dodge frontal cones
Phase 2:
- Dodge Impaling Eruption
- Grip the Scarab adds
- Have 3 players with Stinging Swarm get dispelled on top of Takazj during Cataclysmic Entropy (check strategy section)
- When gripped by Web Vortex, spread fast and break all lines
- Dodge Entropic Desolation (large circle from Takazj)
Intermission 2:
- DPS the shield on Anub’arash and dodge the circles
Phase 3:
- Combination of Phase 1 and Phase 2
- When Gripped by Web Vortex, break all lines except for 2, because you need it to stop Reckless Charge
- Dodge Spike Eruption Spikes
Mechanics
Both bosses are sharing HP, meaning you should focus on multi dotting or cleaving as best as you can; there is no requirement that the bosses “must die at same time” on this fight, something that we mostly have to be careful of on Council fights.
When at 100 energy, Anub’arash will burrow into the ground, then pop out on the opposite side of the room to where Takazj is standing and after a short delay, charge in the indicated direction.
If the boss collides with a wall, the raid will take lethal damage.
Players need to use Binding Webs to stop the charge.
This ability hits the entire raid when the boss erupts from the ground, dealing moderate damage.
Shattershell Scarab
Several Scarabs will spawn, fixating on random players. These adds start with an 80% damage reduction shield that drops by 10% every 3 seconds.
Players getting melee hit by Scarabs take moderate damage and take increased damage for additional melee attacks by 5%.
When Scarabs reach 100 energy, they become CC immune and have their movement speed increased by 25%.
Targets a random player in your raid with a large frontal attack that deals heavy damage and impales all players it hits.
Spikes need to be killed in order to free Impaled players.
Simple tank nuke that deals 100% increased damage with each additional hit for 35 seconds.
Random puddles of web spawn in the room, slowing players by 20% and inflicting light damage to players standing within. Touching the centre of the web bomb will deal moderate damage to players within 10 yards, and will bind two players together.
The line between the two players deals moderate damage every 0.5 seconds and will snap when moving 30 yards away from each other.
The line needs to be used in order to prevent Anub'arash from hitting the wall. The boss needs to pass through 2 lines to stop the charge.
Takazj gains a massive shield that needs to be nuked down to stop the intermission.
The Raid will take damage from Entropic Barrage, which increases in damage with each stack by 25%.
Random cones of web will also shoot all around the boss, dealing moderate damage to players hit, knocking them back and applying a DoT that lasts for 12 seconds.
See the strategy section of the guide for how to handle this mechanic.
Several players get affected with this debuff, causing them to take 25% increased damage. The DoT deals low damage every second until dispelled.
Once dispelled, it will jump to the nearest target Player or Takazj. Your goal is to have all applications of Stinging Swarm dispelled on top of the boss so that she goes into Stinging Delirium when Cataclysmic Entropy is cast.
This will disorient her and increase her damage taken by 125% for 5 seconds.
This is a wipe ability that needs to be interrupted with Stinging Swarm dispels, otherwise it kills the raid.
Grips every player in the raid towards Takazj, binding every player to another. Your Goal here is to break the lines as soon as possible to reduce damage taken.
Large circle around Takazj that deals heavy damage to anyone standing in it. Forces players to move at least 22 yards away from Takazj.
Frontal cone that knocks back and deals heavy damage to anyone hit. Targets a random player in the raid.
Anub’arash gains a shield and spawns circles around the room that forces the entire raid to “Dance” around it.
Getting hit by it will impale a player, dealing moderate damage and forcing your raid to free you.
Launches 3 waves of circles that impale players that get hit by it. Similar to Intermission Spike Storm.
Strategy
Unlike the previous few council fights, here the bosses actually share the same HP pool, meaning multi-dotting and cleaving is very beneficial. On Heroic, there is nothing preventing you from stacking the bosses, so you should do that whenever possible. Keep in mind that Takazj jumps around frequently, so chasing her is part of the fight.
Phase 1 Strategy
Pull the bosses together and pop Hero/Lust.
Preferably, have your entire raid bait the frontal in a good spot, just to avoid unnecessary movement during your DPS cooldowns. If someone does get hit by Impaling Eruption, then you will need to free them (killing the spikes).
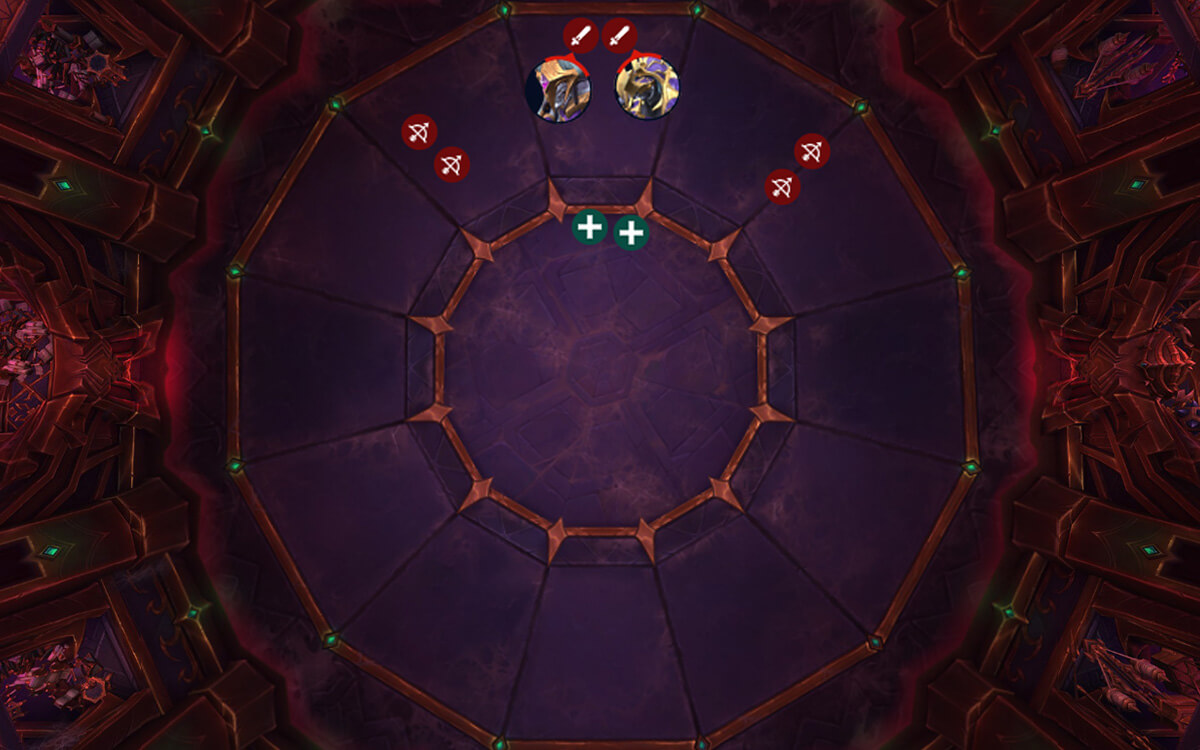
This would be a good pull formation to reduce the impact of Impaling Eruption and to make it easier to spread with Venomous Rain circles.
Tanks taking Takazj also need to pay attention to stacks of Poison Bolt / Void Bolt, it can quickly become lethal if not dispelled.
Shortly after, Takazj will jump to the other side of the room, but it is not recommended to follow her, because there are several things that will happen a few seconds after:
- Scarabs will spawn that need to be gripped on top of Anub’arash and cleaved down
- Web Bombs will spawn that need to be picked up by the Bomb Squad
- Anub'arash will then burrow underground and do a Reckless Charge
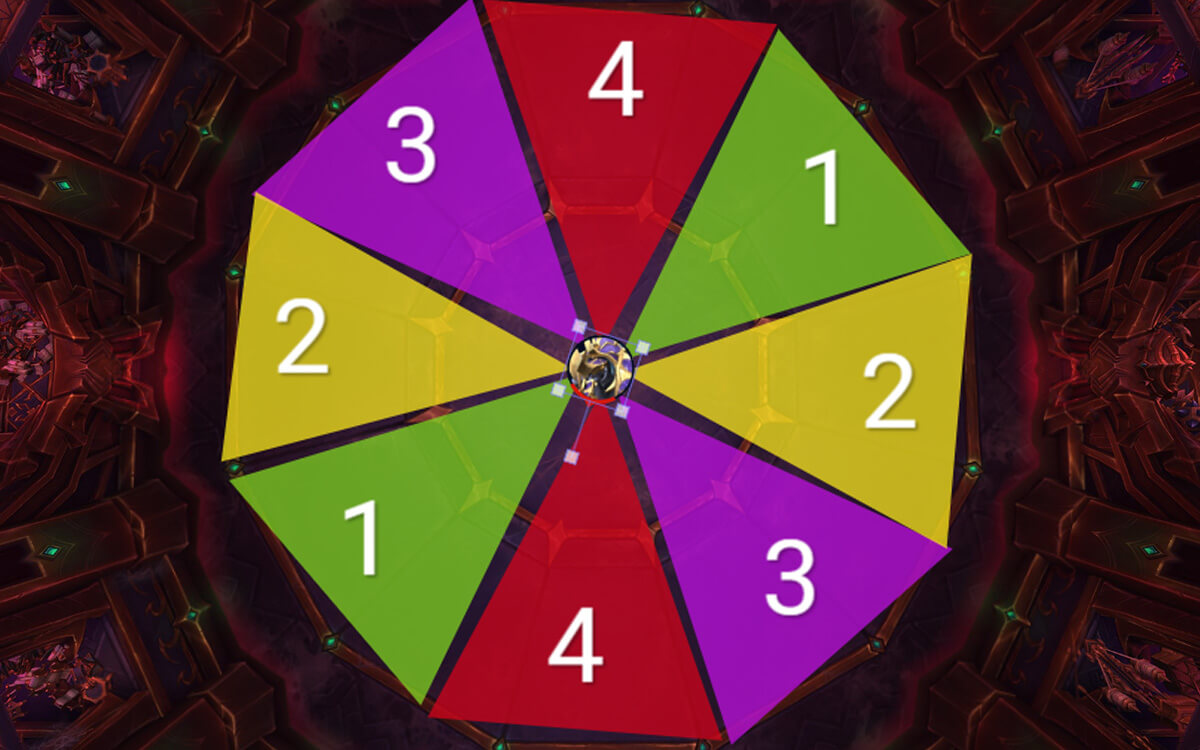
Web Bombs
You need to assign 4 players to deal with the Reckless Charge ability; however, I'd suggest that you assign 6 instead, so that one team serves as a backup in case something happens. You will also need 6 players on Mythic, so if you plan to progress on this difficulty, it's a good habit to pre-practice already with 6 players. Ranged players are better for this, but melees can do it also, they will just lose a bit of uptime on the boss.
To get bound to your partner, both of you have to be standing within the same web puddle. One of you needs to step into the middle to trigger the Web Bomb, and if the other is in range, you will get bound together.
Healers: You need to keep an eye out on all bound players, since they take increased damage during the time they are bound together.
Reckless Charge
Anub’arash will emerge from the ground, and create a big line towards the opposite side of the room.
After a few seconds, he will charge through the line. Your goal here is to “catch” him with 2 lines of Binding Webs.
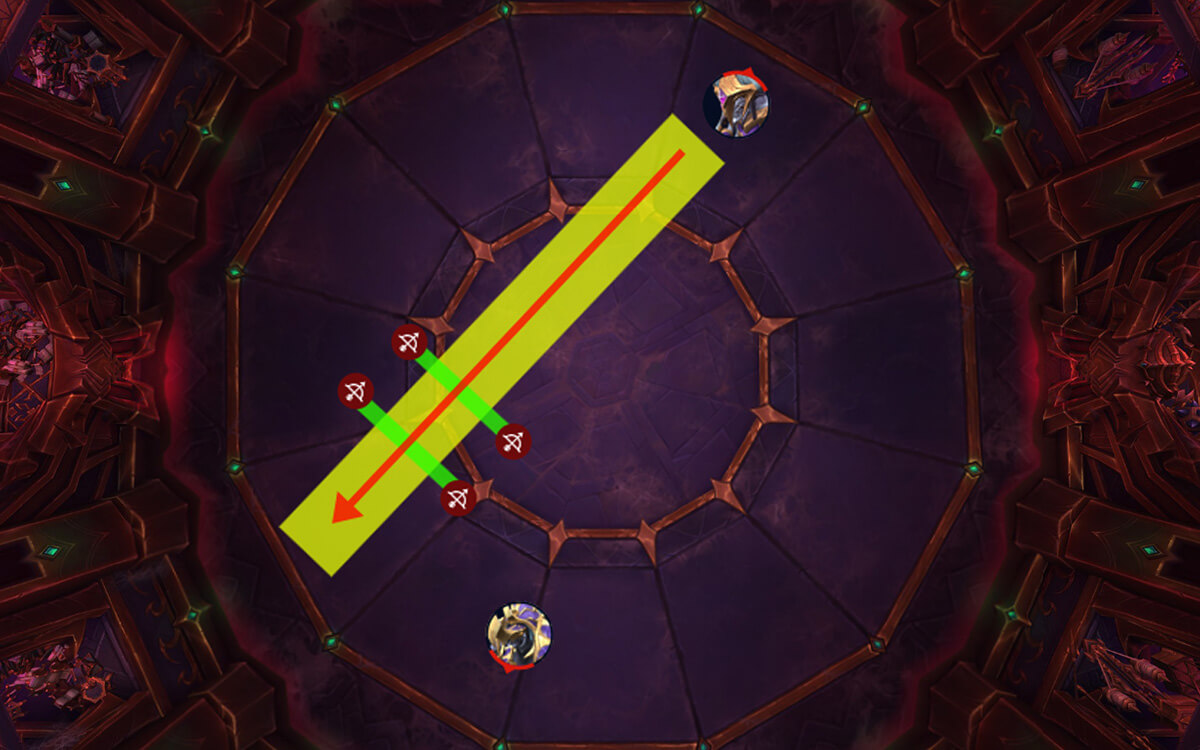
The players doing the lines need to make sure they are not standing in the charge line, but just outside of it so they don’t get hit by the charge themselves, as it deals massive damage.
It also doesn’t matter at what point the boss stops, he will stop when he hits the 2nd line, but preferably you would want him to stop as close as possible to Takazj.
DPS Note: Everyone should be attacking Anub’arash when the charge is stopped, because he takes increased damage for 7 seconds.
After the charge, the players can and should break the line, because they take damage as long as they are bound together.
At this point the phase resets and you get the entire set of abilities one more time before reaching intermission.
Intermission Strategy
Anub’arash will burrow underground and be away during the entire intermission and Takazj will go into the middle of the room, gaining a massive shield.
While the shield is up, the raid will take constant damage that ramps up with time. Additionally, there will be waves of Web Blasts happening in a frontal cone shape coming from the boss.
What you need to know here is that most of the time, the entire room will be filled with frontal cone animations, but because it takes a few seconds for a cone to go off, you can use the newly created cones as your “Safe Spot”.
So think like this, if you are already standing in a cone, and a new one spawns next to you, you instantly know that the new one is the safe spot, because the one you are standing on will go off before that one. So all you really need to be doing is chase newly created cones to stand in.
The room will fill up with 2 cones at the same time, and will also go off in the exact order that they spawned. So that's also a great way to dodge the cones, if you can remember the order.
Phase 2 Strategy
In this phase, Anub’arash will not use his ultimate ability (Reckless Charge), and instead you will have to deal with Takazj’s ultimate.
You still get the Scarab adds and the frontal, but now also a new frontal from Takazj, called Strands of Reality; it is basically the frontal from the intermission, but only one of them.
Takazj will use her new ability called Web Vortex, pulling the entire raid towards her and connecting everyone with Binding Webs.
You want to use speed boosts and quickly spread to break the links. Ranged players can also use Warlock gateway to quickly move away from the stack, which should break all the links in the scenario where a ranged was linked to a melee player; however, it is not really necessary, simply running away will work.
Stinging Swarm Dispels
This entire phase revolves around getting the 3 Stinging Swarm dispels on top of Takazj to Interrupt Cataclysmic Entropy cast.
3 players will get Stinging Swarm at the start of Phase 2, and they do not expire. If dispelled it will jump to the next closest target (Player or Takazj), but it only lasts for 12 seconds on Takazj.
There are several ways you can achieve correctly handling this mechanic, and it will come down to preference, but here is an example of how to do it with minimal risk factor.
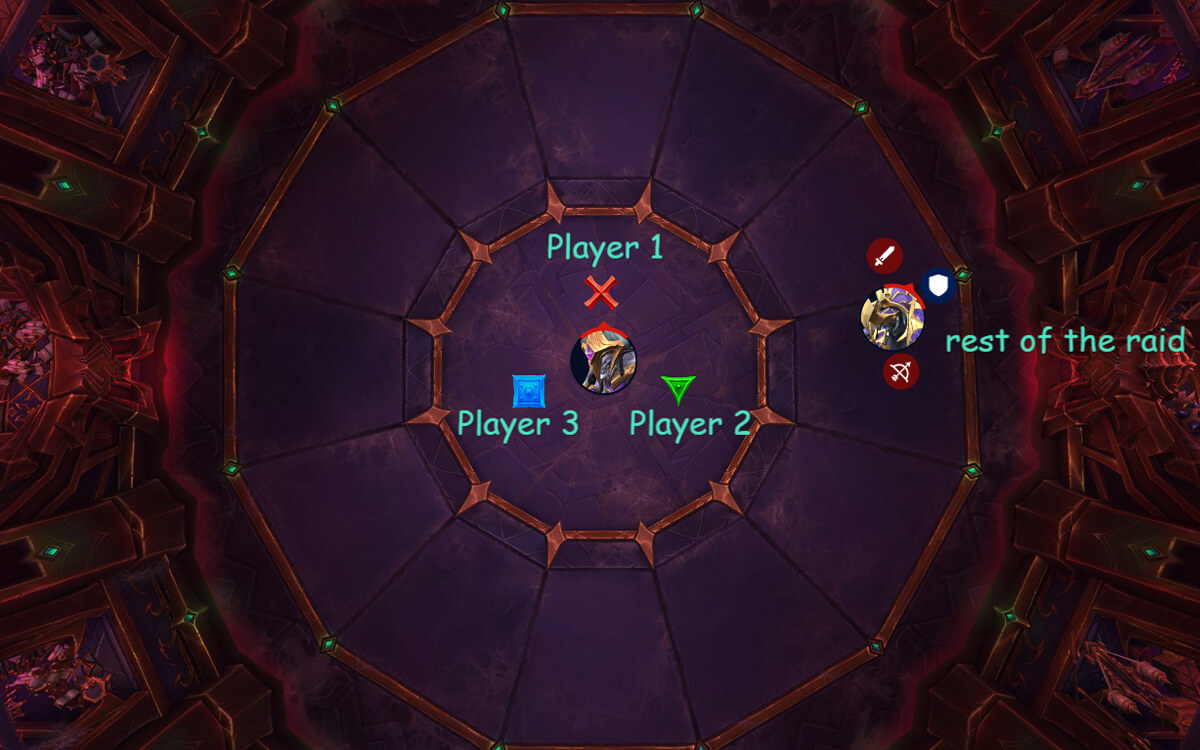
Place 3 markers around the middle of the room. Just before 100 energy, the 3 players with Stinging Swarm should get close to their marked positions.
NOTE: You cannot preposition at the markers, this is because Takazj will do Entropic Desolation just before she starts casting Cataclysmic Entropy, and because the size of Entropic Desolation is 22y, it will force you to move away from the markers.
The moment that the Entropic Desolation cast is finished, those 3 players should get on their markers and you assign each healer to Dispel one marker (4th healer can be a backup). Because Takazj is naturally the closest target, there is no risk involved if everyone is in position and each healer does their job.
If done correctly, bring Anub’arash into cleave range and everyone focuses on Takazj, because she takes increased damage for several seconds.
Note: Keep in mind that you cannot lose the debuffs if they are accidentally "dispelled" via death, immunity or dispel, because it will just jump to another player. If the debuff jumps to Takazj because she was the closest target, then the debuff will be removed after 12 seconds. If this happens, it’s not an instant wipe, because you can save it by refreshing the debuff just when it's about to expire by dispelling another player on top of Takazj. This will give you a total of 24 seconds. If Cataclysmic Entropy happens during those 24 seconds, you can interrupt it, but if it comes after, then unfortunately it’s “gg, go again”.
Just like in Phase 1, you will have to do this 2x before reaching the 2nd intermission.
Intermission 2 Strategy
This intermission is very similar to the first one. Anub’arash gains a shield that needs to be nuked down and your raid takes damage that increases based on duration. But now you need to deal with the Spike Storm.
Spike Storm creates several circles around the room, in various positions and of different sizes.
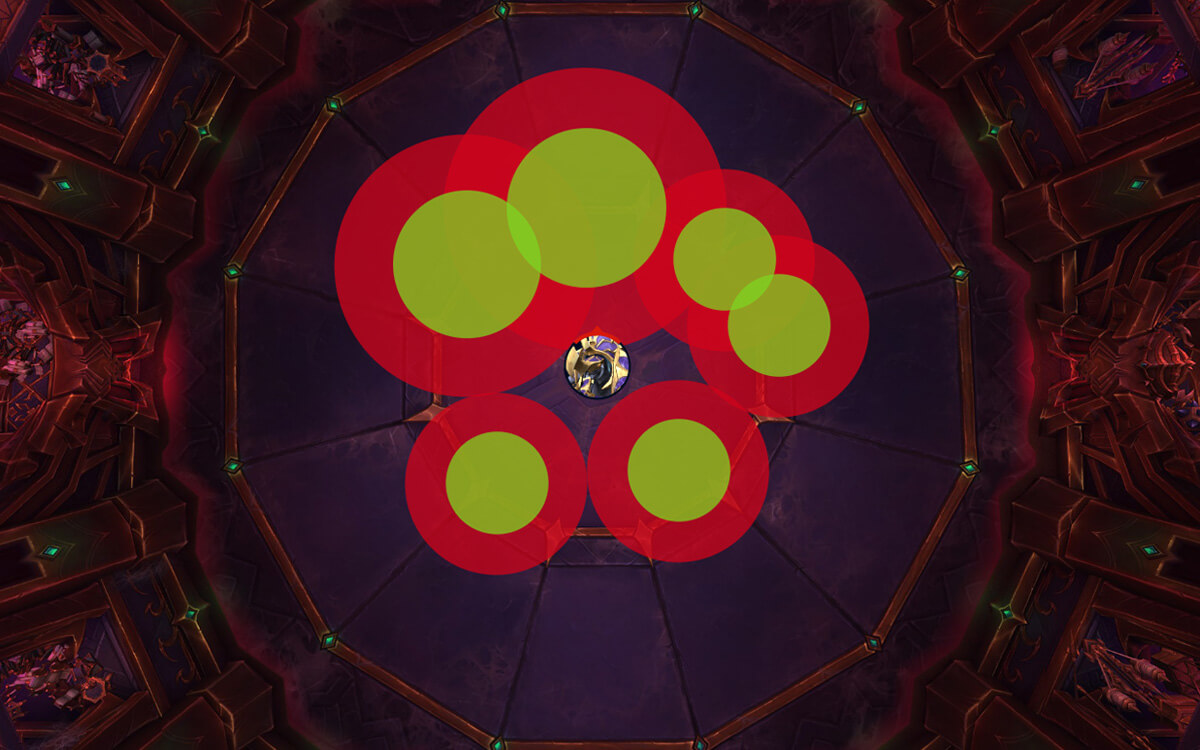
You just need to dodge the rings and stand in a safe spot, as shown in the image below.
If someone does get hit by a ring, they become impaled and need to be freed in order to prevent them from getting hit by multiple rings.
Note: While impaled, it's important to add that players do not take extra damage if they get hit by more rings, the ring itself only impales the player and the damage comes from the Impaled debuff that ticks every second for a low amount of damage. So you have the option to ignore the impaled players and focus on the shield instead, and just have healers spot heal them.
Phase 3 Strategy
This phase is essentially a combination of Phase 1 and Phase 2, meaning you will be dealing with every ability from those two phases. There are “only” 3 things that are different here:
- Unleashed Swarm is a new ability that serves as a soft enrage. The entire raid takes damage every 1.5 seconds for 9 seconds, and every time this ability is used it deals more damage.
- Spike Eruption is now used in this phase, which is the circle from the 2nd intermission, just like Takazj got her frontal ability after the 1st intermission.
- The most important difference is the Web Vortex. While it still works exactly the same as in P2, you now need to make sure that at least 2 groups of 2 players do not break their link, because you will need it to stop Reckless Charge just like in P1.
You will first get the Reckless Charge ultimate, and afterwards Cataclysmic Entropy.
Web Vortex will always happen just before Reckless Charge.
Players that get hit by the Spike Eruption circle in this phase should be freed, because they can now get hit by other abilities because they are unable to move from being impaled.
Your goal is to kill the bosses just after Takazj has used her first Ultimate ability in this phase, because the damage from Unleashed Swarm will get too high afterwards, causing you to most likely tick down.