Raid Setup
Introduction
Welcome to our Heroic Rasha'nan boss guide, found within the depths of Nerub'ar Palace. This guide will teach you about Rasha'nan’s mechanics and the strategy we recommend to deal with this boss on Heroic difficulty!
Imagine if a spider decided to throw the most radical surf party of the century, but with a deadly twist; the waves of acid may look surfable, but trust us, they're gnarlier than they look. And, just when you thought it couldn’t get any wilder, Rasha’nan swaps platforms for you and your friends to race and interrupt those gnarly acid eruptions. Grab your surfboards and your bravest friends, because it's time to show this boss who's the real king of the wave.
Fight Style: Single Target fight with frequent AoE moments
Recommended Setup: 2x Tanks / 4x Healers / 14x DPS
Required utilities: Speed boost and Warlock Gate
Hero/Lust usage: On Pull
Guide Author's Thoughts
This fight is like the budget version of Sennarth, and that says it all. Lack of creativity, abilities and overall thrill makes it the worst fight this tier, next to Sikran. Granted, Sikran on Mythic feels a bit better, whereas Rasha’nan is just as boring.
The best thing about the fight is having to explain to players why the boss starts at 60% health (because you fight her in a dungeon first).
Method Boss Rating: (1/5)
Easy Mode
- Tanks need to make sure to have active mitigation up for every Savage Assault to reduce the strength of the Savage Wound DoT that you receive afterwards
- The entire raid should be loosely stacked in front of the boss to make it easier to stack the adds and heal through Erosive Spray damage
- Players targeted by Rolling Acid need to go to the correct side to send the green waves away from the raid without hitting anyone (check strategy section)
- Players targeted by Infested Spawn (green circles) should try to stack up the circles as close as possible without clipping each other to spawn the adds grouped up (they are CC immune)
- Players targeted by Spinneret’s Strands (large white circle) should quickly move away from others and break the tether
- Everyone needs to soak Web Reave
- Interrupt Acidic Eruption after Rasha’nan moves to a different position, but make sure players are in range to soak Web Reave as this happens instantly afterwards
Mechanics
Two players get marked, then after a short delay they shoot out a wave of green acid in the indicated direction. The glowing side of the line is the direction the acid wave will travel.
The targeted player gets hit by Acidic Stupor, which deals heavy damage and stuns for 1.5 seconds.
Additionally, everyone hit by the wave has their movement speed reduced by 50% and receives a Corrosion debuff that deals a small amount of damage for 15 seconds, but this stacks up every second you spend surfing the wave.
Several players get marked by a large white circle that explodes after a few seconds and binds all players caught within. The tether inflicts low damage every 1 second until snapped.
Breaking the tether triggers Spinneret’s Websnap that deals a low amount of damage to the entire raid, however, this can quickly turn lethal if several players get tethered and snap at the same time.
A tank nuke that deals additional damage to the tank via a Savage Wound DoT that deals 60% of all damage you took from Savage Assault every second for 18 seconds.
It places a large circle in front of Rasha’nan that needs to be soaked by your entire raid to reduce the damage and the strength of the grip.
With the entire raid inside the soak, both the damage and grip are neglectable; however, if several players decide not to soak it, then it can quickly lead to several deaths due to the grip strength being enough to pull players off the platform.
Unavoidable raid damage that lasts for 4 seconds, during which your entire raid will get 4 stacks of Lingering Erosion; the raid takes heavy damage during those 4 seconds, so healers need to be ready for it.
The DoT remains for 12 seconds, but it deals very low damage, so it’s not an issue.
Once Rasha’nan swaps to a different section of the room, it will cast Acidic Eruption that deals damage to the entire raid. The initial damage is low, but with each successful cast you take 100% more damage from this ability, so ideally you never want to allow more than 3 casts total to go through.
Once interrupted, Rasha’nan will instantly spawn Web Reave; this needs to be soaked.
Green swirls that need to be dodged.
Some of the circles become Acid Pools, which are permanent puddles on the ground.
Strategy
Platform Swaps
Let's start with the order that the boss jumps, which is the only real highlight of this fight.
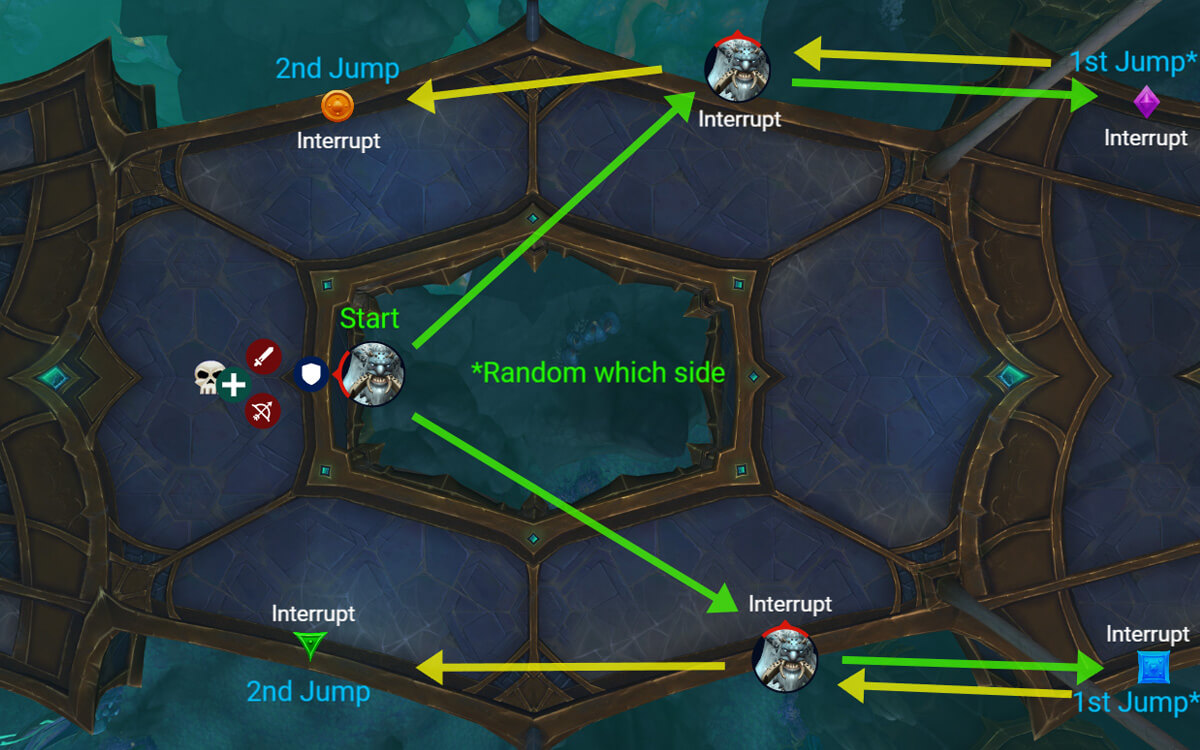
When Rasha’nan reaches 100 energy, she will jump to one of the two sides of the platform marked as 1st Jump on the image above.
Rasha’nan will make a quick stop in between and needs to be interrupted, and then when at the final destination, you will need another interrupt.
From here, you know which marker is next when Rasha’nan is at 100 energy again, meaning, if you were at the purple marker first, it will be Orange next, or if you were at the Blue marker first then Green is next.
On the 3rd jump, Rasha’nan always swaps to the opposite side of the room, but which side of the platform she chooses is completely random.
Tip: You will want to use Speed boosts and Warlock gateway for the far jumps because for these it's important that everyone is there in time to soak the Web Reave. Also, make sure to dodge swirls as you are moving to the other side of the room.
Platform Strategy
Every section of the platform has the same set of abilities, but in different orders and overlaps.
This fight forces you to be stacked most of the time due to nature of several abilities:
- Web Reave needs to be soaked by everyone to reduce the damage and pull strength
- Erosive Spray deals heavy raid damage, so staying stacked will help out with healing
- Being stacked during Rolling Acid makes it easier for players to step out in the correct direction when dropping the wave
- Infested Spawn adds cannot be gripped and they fixate on players, so you want to spawn them as close as possible and nuke them down as soon as possible
- Players targeted with Spinneret's Strands can move away from the group easier and will not randomly hit some players standing on the side
Because of this, you should focus on stacking up as much as possible to make the fight easier.
Dealing with the Rolling Acid (waves)
This ability might seem confusing at the start, but it is actually very simple when you’ve done a few of them.
Two players will get marked with a large green line, the line itself will indicate the direction in which the wave will go out, the glowing side is the direction the waves will travel. All you need to do is to stand in a spot that won't send out the wave through your entire raid.
The two players targeted will take heavy damage from the drop and will be stunned for 1.5 seconds, so healers need to pay extra attention to them.
Everyone else getting hit by the wave will only get the wave debuff (Corrosion), but not the high damage coming from Acidic Stupor.
Infested Spawn Placement
You want to spawn the adds as close to each other as you can. Ideally, you could spawn the adds around a marker in a set formation.

When they spawn they fixate on players, meaning that if you stack, they will stay closer together and it will be easier to nuke them down.
Other players without the circle should step aside and just move in after the adds spawn.
The adds don’t do much, they simply “bite” the fixated player and deal low amounts of damage to the player and everyone around them. But because the damage is low, you can stack up and heal through it.
Spinneret’s Strands
Lastly, let's take a look at Spinneret’s Strands.
Several players will get a large circle; all you need to do is to move out of the group and drop the webs, preferably in a nice spot. A nice spot being somewhere that nobody will be standing or passing through (for example, towards one of the other markers that the boss won’t jump to next).
Note: Waves that pass through the webs on the ground will clear them.
Once placed, the player and everyone who got caught in the circle (ideally nobody except for the initial target) will get tethered to the centre. While tethered, you take constant damage and you want to break this as soon as possible. Upon breaking the tether, you will deal damage to the entire raid.
Note: If only the targeted players got tethered, it is completely safe to instantly break all lines together and quickly. However, if you get several extra players caught, you will want to stagger breaking them, otherwise you risk wiping your raid.
Closing thoughts on Heroic Rasha’nan
As mentioned earlier, this fight has the same set of abilities at every section of the platform, but in a different order. However, this is not really a problem because each ability is very simple to deal with.
The mechanic combination you need to watch out for the most is Spinneret’s Strands into Infested Spawn. The damage from breaking the tethers, spawning the adds, potentially clipping someone and the instant bites from the adds can lead to fast deaths. Make sure to commit personals and raid cooldowns during moments like this.
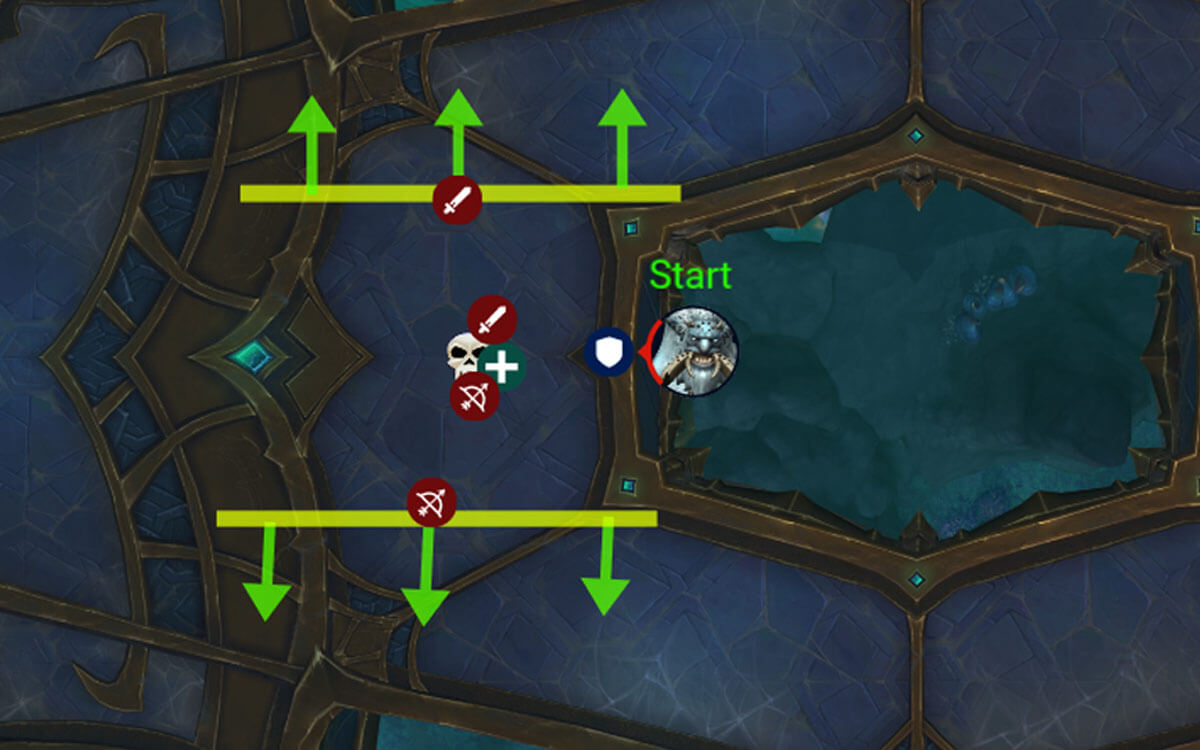
A fast player should rush to the boss when it swaps where it is on the platform and wait there. When the player feels others are within range to make it to soak Web Reave in-time, they should kick Acidic Eruption to avoid taking unnecessary damage from it.
The fight itself is very forgiving, so just make sure to not send double waves through the entire raid or to drop Spinnerets Strands on top of everyone and you should be fine.