Raid Setup
Introduction
Welcome to our Heroic Nexus-Princess Ky’veza boss guide, in Nerub'ar Palace. Learn about Nexus-Princess Ky’veza’s mechanics and the strategy we recommend to deal with this boss on Heroic difficulty!
At first glance, Nexus-Princess Ky’veza might seem gentle, but don't let her elegant name fool you. This assassination-spec rogue is all about delivering that sweet backstab damage, especially when a low-health boomkin decides that health pots are just too pricey. Picture this: you'll be yanked around the room like bumper cars in reverse. Confused? So are we, but it sounds fun, right?
Fight Style: Single Target fight
Recommended Setup: 2x Tanks / 4x Healers / 14x DPS
Required utilities: None
Hero/Lust usage: On Pull
Method Boss Review
An incredibly fun fight! If you haven’t had the chance to play this boss yet, you are in for a treat. Simple, yet challenging mechanics and a fight without unnecessary complexity that feels great for every role. The Painsmith of this tier, for sure!
We think the fight is in a very good state, but we could see some changes regarding the 2nd Twilight Massacre cast, because during testing there are no Nether Rifts afterwards.
Method boss rating: (5/5)
Easy Mode
- Place Assassination circles around the room, in a circle formation
- Stay away from others when you have the Queensbane debuff
- Place Twilight Massacre lines away from others
- Avoid getting pulled into Nether Rifts
- Dodge lines on the ground
- Do not drop to 10% health (doing so will trigger Reaper)
- Avoid all ground abilities in Phase 2 and do not move a lot with the Regicide lines
Mechanics
Marks several players, and after 6 seconds, Ky’veza shadow steps to each target dealing low damage and affecting them with Queensbane. The amount of players being marked increases after every Phase 2.
Additionally, Nether Phantoms spawn on the player's location.
This debuff lasts for 10 seconds, and after it expires it inflicts heavy damage to anyone in a 2 yard range.
The player also shoots out several orbs in random directions that inflict moderate damage to any players that get hit.
Nether Phantoms
Adds that can't be targeted, they cast several abilities, but most importantly they mimic some boss abilities like Nether Rift.
Every Nether Phantom targets one random player, and after 6 seconds, they dash through the player inflicting moderate damage and affecting them with Queensbane.
Nether Phantoms stay in the new position when they finish their dash.
Ky’veza and all her Nether Phantoms create a Nether Rift portal, pulling everyone in. Players that come in contact with the rifts will suffer lethal damage.
If positioned properly, several rifts will try to pull you towards them, cancelling each other out.
Multiple thin lines on the ground in a cone formation. They need to be dodged, as they inflict moderate damage if you are hit.
This is a passive ability that triggers each time a player reaches 10% health. When triggered, a shadow will backstab that player and deal heavy damage.
When Nexus-Princess Ky’veza reaches 100 energy, she teleports to the middle of the room and makes the room dark, inflicting low damage to the entire raid every 1 second for 24 seconds.
Targets several players with moveable lines, but cannot be dodged by the player with the Regicide line.
Players only take a small amount of damage from the ability, but this can quickly become lethal if hit by several lines at once, especially when combined with other mechanics. While taking the hit from your line, make sure you are not standing in any others.
Try to avoid other lines by running within your own line and not moving it side-to-side.
Phase 1
There is only one positional requirement that repeats throughout the fight, and it's a core concept of this encounter.
Your main goal is to always place the circles around the middle of the room. Players affected by Assassination get the circles and the Boss also counts as a circle because she spawns one at the same time as the Nether Phantom.
When the circles spawn, you have a very short delay until they become active, just enough time to move yourself into a position where each of the rift’s pull will cancel each other out.
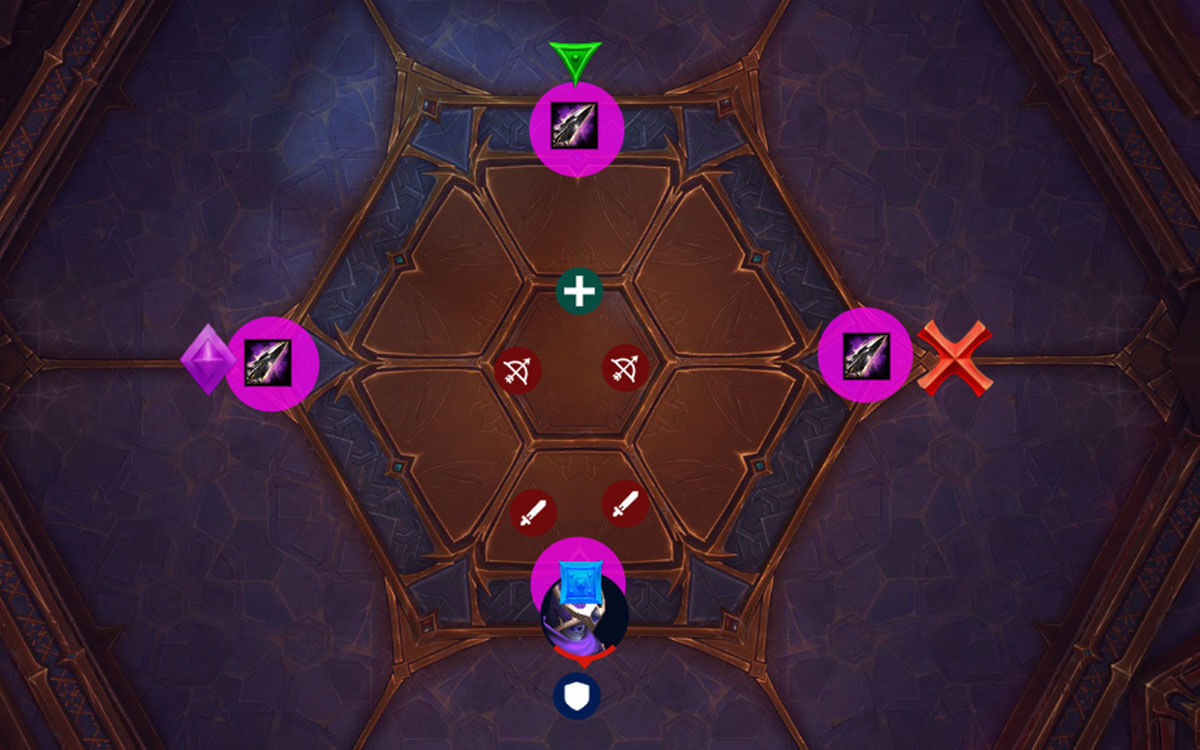
Let’s look at the dream scenario.
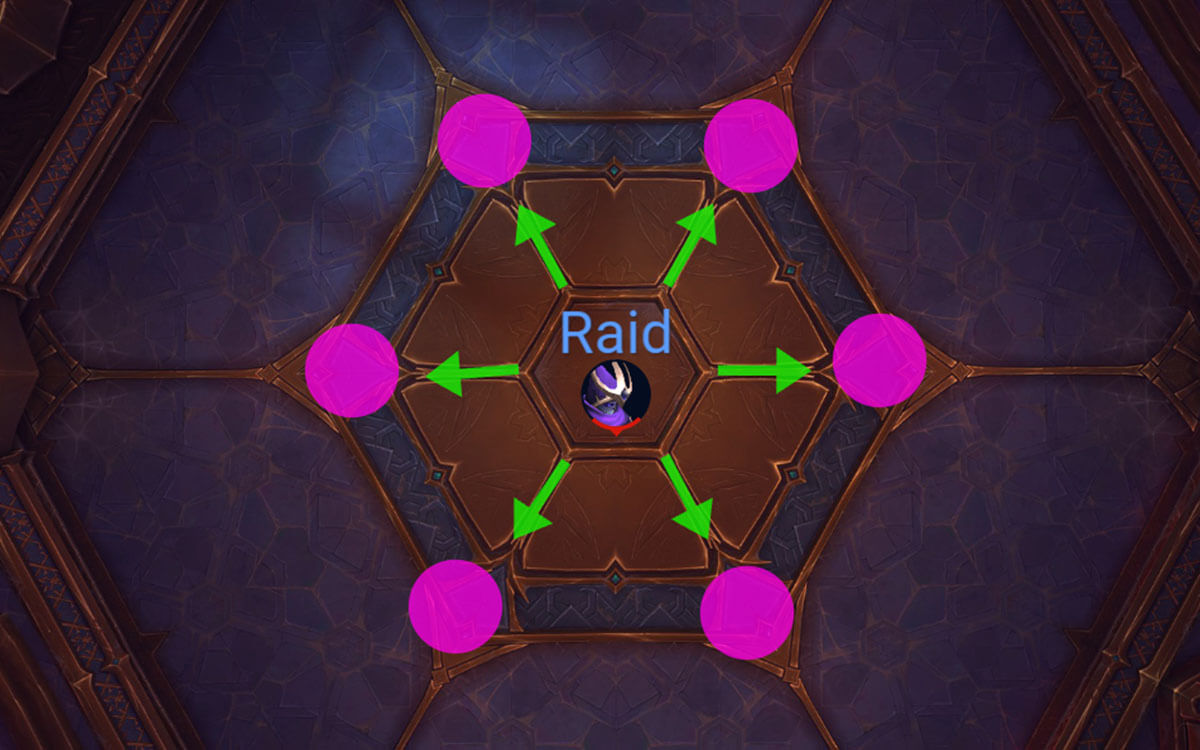
If you are able to place all Nether Rifts in this formation, and the entire raid is in the middle, you won’t be pulled at all, because the Rifts will cancel each other out.
However, it is very unlikely that you will place portals this clean, especially later in the fight, so let’s look at some worse scenarios and how to deal with them.
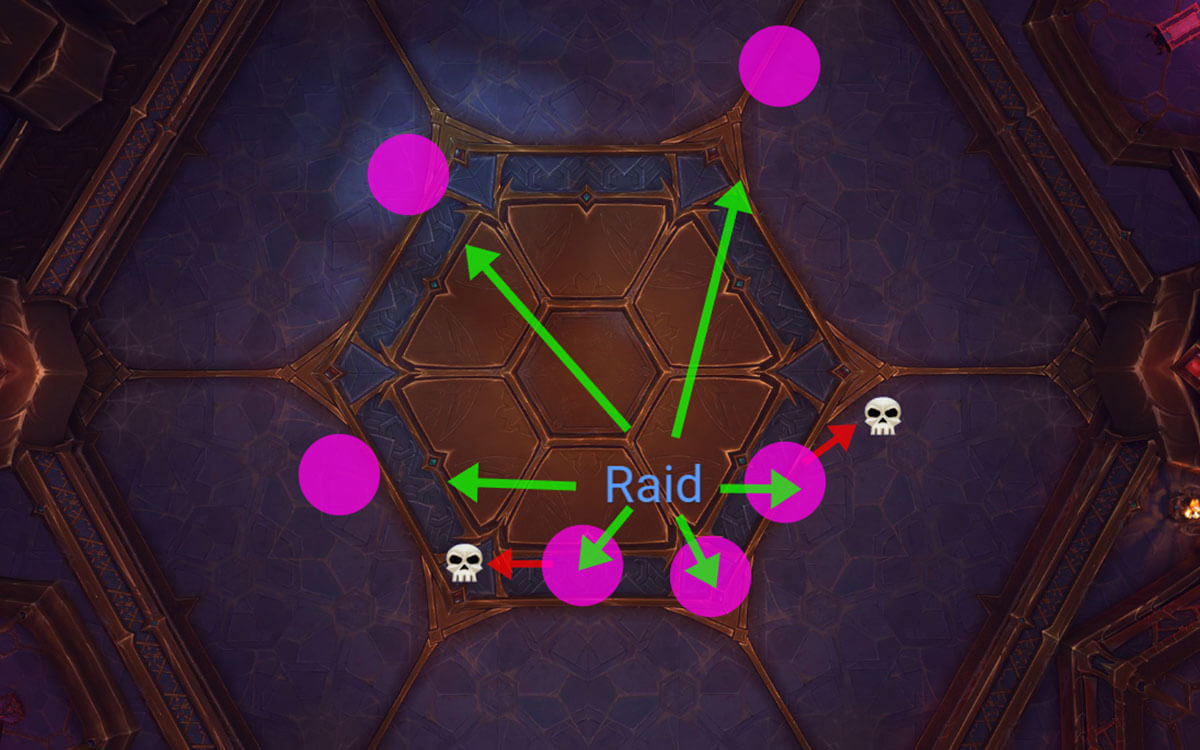
As you can see in this example, the circles are a lot more randomly placed, but this is still completely fine if everyone understands how the Nether Rift’s pull mechanic works and the position of the rifts in this situation.
Shown in the image above, by standing close to the 3 portals you will still get equally pulled from all sides, preventing you from touching any of them. Generally speaking if there are 2 rifts very close to each other, standing between them will always keep you safe, whereas if you stand in one of the Skull marked positions on the image above, the pull from multiple rifts will be too strong and you will get sucked in.
The cast sequence related to rifts is this following:
The Assassination cast that only happens once per phase gives you full control on how you want to place the first rifts, because you have plenty of time to move into position and can simply put world markers down and have each player with Assassination stand on one of them.
Afterwards, those rifts will shift when Nether Phantoms use Twilight Massacre, and your goal here is to try to place it as best as possible. The dream scenario in this case is to have every player that is targeted by the massacre point it towards a marker.
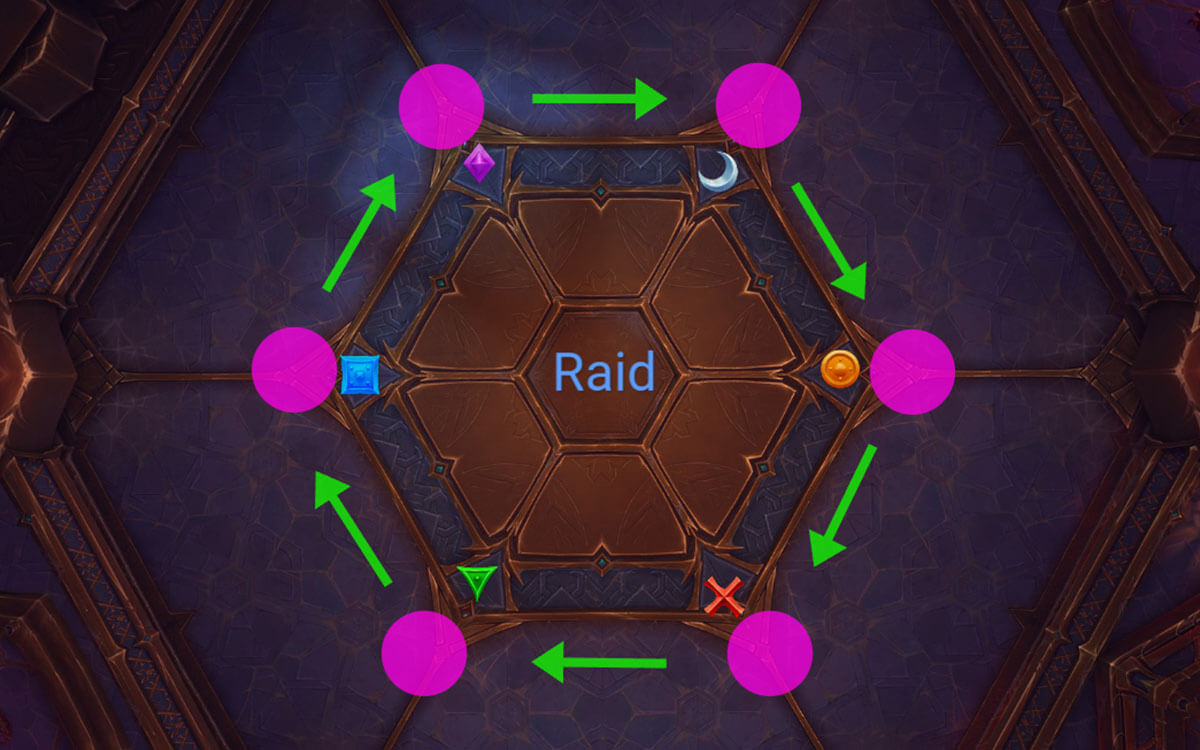
This is easier said than done, so if you pull this off, you should upload the clip.
Because the Nether Phantoms are located where the 1st set of rifts were, you know exactly where, for example, the Green Nether Phantom should go (Blue) on the Twilight Massacre cast. That being said, this is the dream scenario and it won’t look like this 90% of the time, so you just want to have it as close as possible to this formation.
The 2nd Twilight Massacre has no positional requirements as it does not trigger rifts afterwards, and the boss enters Phase 2.
Now that we know everything regarding Nether Rifts positions, let’s talk about other abilities.
The biggest threat in this fight is the Queensbane debuff. When your debuff expires, you explode around yourself dealing massive damage in a 2 yards radius, but also send out several orbs in random directions that deal moderate amounts of damage. This gets applied in two ways:
- Assassination (only targeted players)
- Twilight Massacre (everyone who gets hit by the dash/line)
Both of these scenarios have different issues that you need to deal with.
Assassination Queensbane happens always before the 1st Nether Rift pull, and it is going to expire at the same time as the rifts spawn. This means that the affected players can’t pre-run into the "safe spot” stack because they would explode on top of everyone; which means that they have to find a spot between 2 portals, drop their debuff, and then run towards the group.
The Twilight Massacre is a bit more complicated, in the sense that if someone is to send out a line towards the melee/range stack, you can end up with nearly everyone having the debuff. This would look very cool when it expires and drop your FPS to probably negative 50, but it’s not something you should be doing. Players who got hit by the dash just need to look at their debuff and step to the side before it expires. This does not overlap with rifts.
Apart from this, you need to dodge daggers (lines on the ground), but that's nothing that you need to worry about much.
Just keep in mind that every time you get back to Phase 1, more players will be targeted by Assassination, which also results in more Twilight Massacre targets.
Phase 2
There is actually not much to talk about regarding Phase 2. It’s all about dodging ground effects and healing through the damage taken.
Some general advice is to have ranged players stay to the back, while melees are loosely spread around the boss, this will make it easier to dodge and prevent taking unnecessary damage from Regicide lines (they are the same as Fyrakk’s Blaze lines, just blue).
In addition to the lines, you have a large pizza slice that also needs to be dodged (Eclipse), the best advice here is to always stay close to the edge of the slice, so when it shifts, the chances are higher that you only need to side step into safety.
The 3rd time you reach this phase, you will trigger the boss' enrage, which means after 24 seconds of regular Phase 2, the room will become covered in slices that you can’t avoid and this will lead to a wipe.