
Raid Setup
Introduction
Step right up, adventurers, for an explosive encounter in the heart of Undermine! The notorious Goblin mogul, Gallywix, has taken his casino business to new heights, literally. Seated comfortably in his state-of-the-art mechanical robot, Gallywix sports legs so polished and powerful, they make even Ragnaros' fiery appendages look downright puny. Don’t let his extravagant appearance fool you though, this fight is about to get scrappy.
In this chaotic battle, bombs must be disposed of while fireworks and explosives light up the arena. Players will have to stay sharp, as timing and coordination are crucial for keeping everything from going kaboom. But the real challenge? Healers will be pushed to the absolute limit as they scramble to counter the healing absorb from canisters that players must catch. One wrong move, and it’s lights out!
Fight Style: Single Target fight with adds in the intermission
Recommended Setup: 2x Tanks / 5x Healers / 13x DPS
Useful utilities: Adding additional Healers for easier absorb healing
Hero/Lust usage: At 50% intermission
Easy Mode
- Split the raid into two even groups and alternate frontals.
- Remove absorbs from players as soon as possible.
- Move out of the Big Bad Buncha bombs circle.
- Dodge Swirls to avoid unnecessary damage.
- Move out with Sapper’s Satchel circles.
- Tanks must pop the Duds (big bombs).
- At 100 energy, kill and interrupt adds, then drop a bomb on one of the Giga Coils.
- Remaining bombs should go into the hole or outside the platform.
- Dodge Giga Blast beams.
- Split the raid into three groups to help soak Fused Canisters.
- At 50%, pop Bloodlust and burn down the shield.
- Dodge the spinning laser beams.
- Interrupt before Total Destruction!!! finishes casting.
- Move out with Overloaded Rockets (Blaze lines).
- Soak Tick-Tock Canisters.
- Run far away from Gallybux Finale Blast.
Mechanics
Frontal cone ability, targeted at the current tank, that needs to be soaked by several players to split the damage. Players soaking will gain a large absorb debuff that deals damage as long as it's up. If not healed, it will explode after 15 seconds, dealing damage based on size of the absorb.
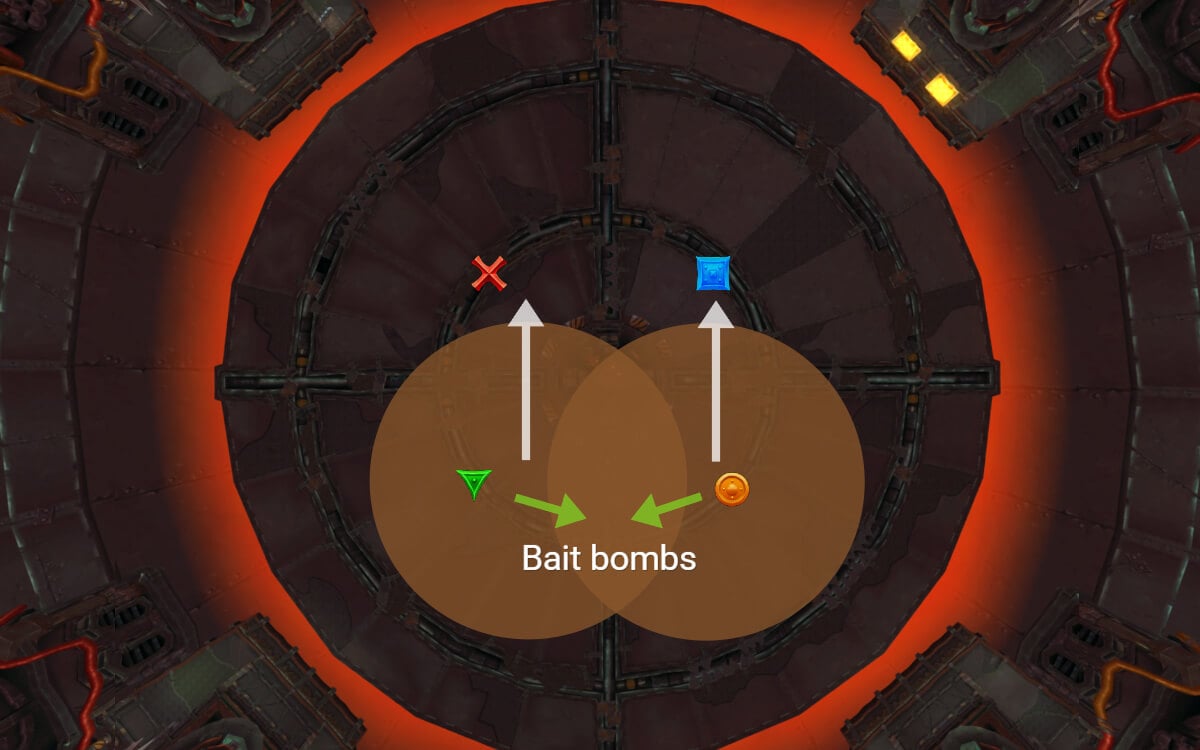
Massive piles of bombs will drop on two random players, creating a large circle that deals damage to everyone within after exploding. Bait the spawn and move away from it.
Mini bombs scattered across the room that explode shortly after; dealing damage and applying a stack of Blast Burns to anyone hit.
Several players gain a medium-sized circle that they need to drop away from others. Getting hit by that bomb applies the same ability to the player hit.
A large bomb that needs to be disarmed by the tank by clicking on it. It will deal heavy damage to the tank and knock them back. After the DoT expires, the entire raid takes a bit of damage.
Boss gains a stack of this every 4 seconds. When he changes targets or reaches 10 stacks, damage is dealt to the tank, based on the amount of stacks.
8 Technicians spawn and when they die, they drop a Charged Giga Bomb that can be picked up by players. Bombs will explode after 40 seconds, if untouched or hit by the big laser from Gallywix.
One player needs to pick up the bomb and move it to the Giga Coils, to interrupt the damage. Other bombs should be thrown in the middle hole or off of the platform.
Inflicts damage to the tank based on the distance. Gallywix is standing still in the middle, so stay close.
Gallywix activates a Coil that deals increasing raid-wide damage. Players need to bring one Charged Giga Bomb to the Coil, to interrupt the cast. Interrupting the same Coil twice will cover that side of the room with electricity, preventing players from standing there.
A massive Beam that needs to be avoided; each Beam cast increases Coil damage by 40%.
If the Beam hits a bomb, it will destroy it and deal massive damage to the raid.
Darkfuse Technicians
Adds that drop the bombs when killed. As they spawn, they put circles on the floor that need to be dodged. The Adds also attempt to cast Juice It!, which deals damage to players within 10 yards, and increases damage done by the Technicians by 10%. This can be interrupted.
3 players will get a circle that explodes after 6 seconds and applies a healing absorb to everyone hit. At least 4 players need to be standing within the circle, otherwise, the entire raid gets the debuff. It is best to split the raid into 3 groups and simply soak this ability.
At 50%, Gallywix shields himself; dealing damage to the entire raid until interrupted. The cast can be interrupted once the shield is destroyed. If it finishes, it kills the entire raid.
These are rotating laser beams around Gallywix that deal massive damage to any players hit and stuns them.
Gallywix drops a massive bomb on the Tank, dealing damage to anyone hit. The Tank needs to move far away from the raid.
Players gain a beam ability that shoots 3 rockets in the direction the beams are facing. Only other players can be hit with it, so move away from others and avoid moving when you’re in a good position.
Throws 3 canisters (small circles) that need to be soaked by at least 4 players. Failing to soak it will put the healing absorb debuff on the entire raid.
The healing absorb explodes after 15 seconds, dealing damage based on the remaining absorb.
Phase 1
Split the raid into two even groups.
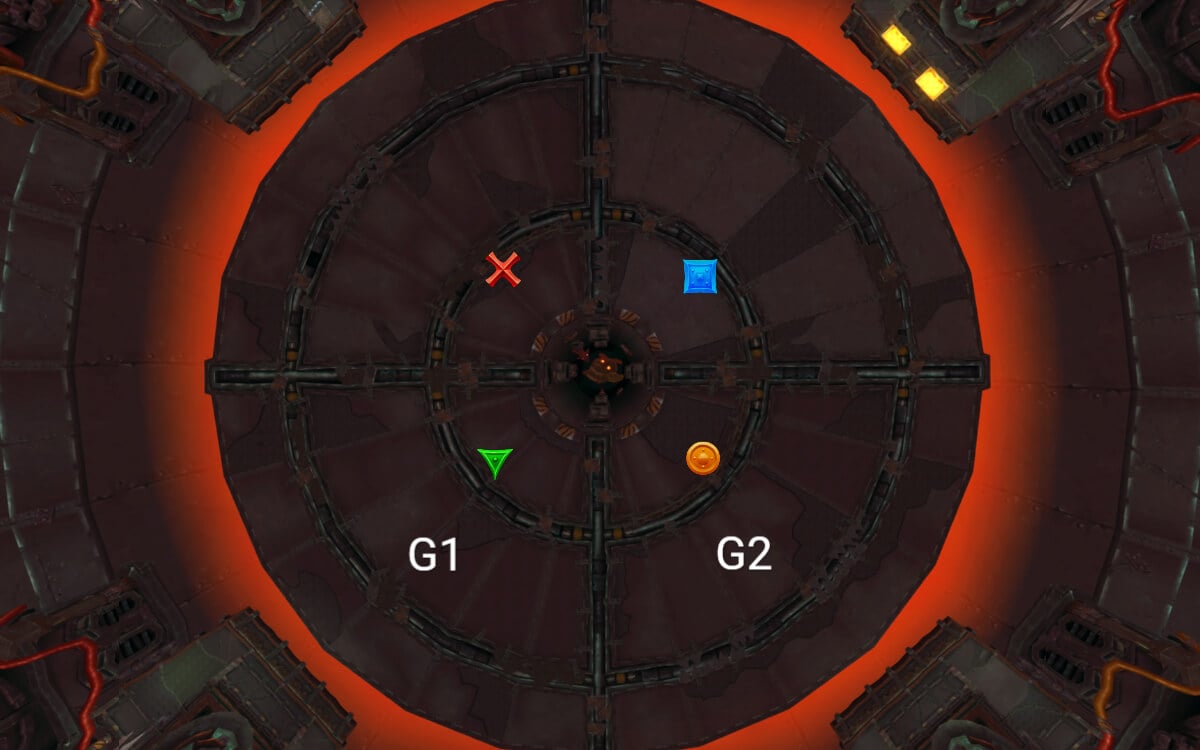
Groups have to alternate between taking the frontal hit, similar to Bloodbound Horror in Nerub-ar Palace. Each group will start on one side of the room and go back and forth between the markers, every time Big Bad Buncha Bombs force you to move.
Once hit, everyone will gain a heavy absorb that deals damage to players (as long as they have an absorb on them). If not healed, after 15 seconds, the player will explode and inflict damage to the entire raid based on the amount of absorb still left.
Heavy healing cooldowns and personals have to be alternated between the hits.
There are also sets when the raid needs to dodge swirls while taking the frontal; getting hit here is very bad and can lead to wipes, due to the chain reaction of one player exploding with the absorb, killing the other and so on.
There are a total of 6 frontals (3 for each group).
Intermission 1
Once completed, Gallywix will reach 100 energy and you will get your first intermission.
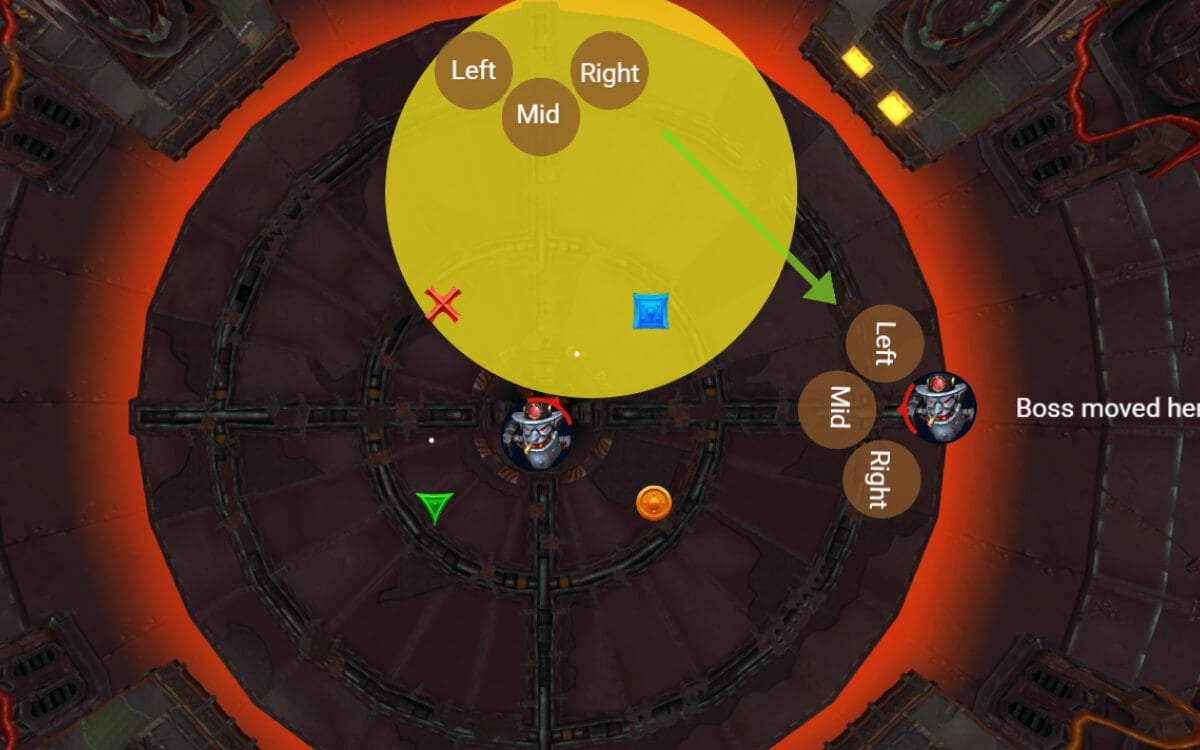
Here, you want to gather up as a group right away, to properly bait the adds to stack up. Adds will be casting Juice It!, so make sure to interrupt this with kicks or stuns.
Once the boss beam is cast, players should dodge to the RIGHT (counter clockwise), in order to avoid it, and move the adds together. This is very useful to get the bombs thrown in the safe side, as you are killing them.
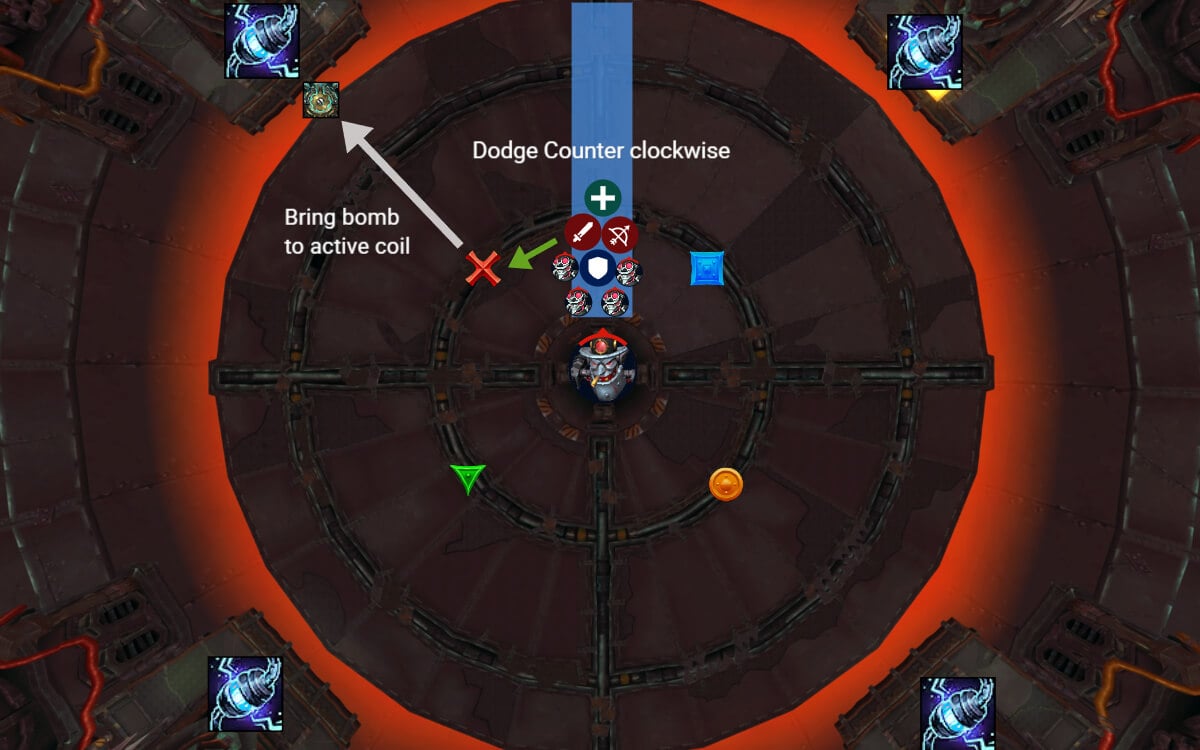
One more mobile player should pick up a bomb as soon as possible, and move to one of the active Coils to interrupt it. This will also stop the intermission and Phase 2 will begin.
All other players should pick up the remaining bombs and throw them into the middle hole, or outside of the platform. Note that the raid damage increases with each Beam cast, so the faster you interrupt the Coil, the less damage the raid will take.
Phase 2
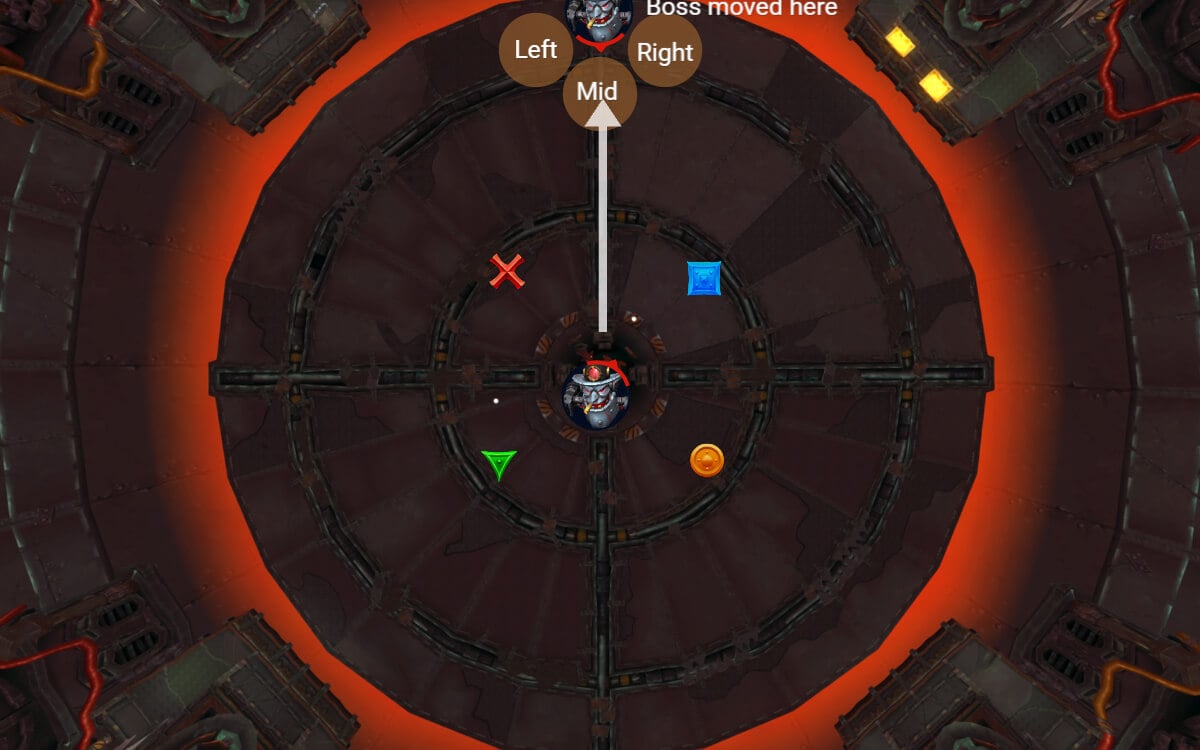
Gallywix is moved to one of the edges and the entire raid should follow.
Tanks will have to take care of the 2x Duds that spawn, make sure to keep them healthy as they are doing it.
The Raid will be dodging swirls and mini bombs here, but shortly after you will get your first Fused Canisters set.
Split the raid into 3 even groups (Left, Middle and Right). Each group soaks their canister and healers need to heal the absorb as fast as possible.
Just after the soak, Big Bad Buncha Bombs will spawn in the area where the raid is standing, so everyone will be forced to move. Tanks should pick up the Duds.
At the new location, players need to move out with Sappers Satchel (bomb circle) and then soak the 2nd set of Canisters.
Make sure to use some defensives for this one, because right after, Gallywix will reach 100 energy and you will have another Intermission.
Intermission 2
This intermission is the same as the first one, with one small difference. All Coils will be active now, so you have the freedom of choice where to bring the bomb to interrupt the cast; but keep in mind, if you place 2 bombs at the same Coil, that entire area will get covered in electricity, so you won't be able to stand there anymore.
It is suggested that you use a different Coil for each intermission from here, but it's not a big issue if you do lose one part of the room.
Phase 2
Gallywix will stay in this phase until 50%, but depending on how low the boss is, you might get a different set of mechanics.
What usually happens is you have to soak the 3 canisters, but also dodge the Big Bomb circle at the same time. This is not problematic, players should just move together while soaking and you should be fine.
However, if Gallywix is under 52%, it tends to skip all mechanics except random swirls and you will just hit the boss until Phase 3 starts.
Phase 3
While, technically, the opening of this phase could be called an intermission, we will not call it that to avoid confusion with the 100 energy intermission.
At 50%, Gallywix will gain a shield and begin casting Total Destruction!!!. If the cast finishes, it's a wipe.
Additionally, 3 lines of electricity will rotate counter-clockwise, dealing damage and stunning everyone hit by it. Ranged players can out-range this, while melees just have to move with it.
Once the shield is gone, you can kick Gallywix; however, you can also decide to keep attacking for extra damage, just make sure to interrupt before the cast finishes, otherwise healing the damage becomes too hard.
From here, the “Real Phase 3” starts.
In this Phase, you will always get the same set of abilities but in a different order, as the fight progresses.
The abilities are:
For Tick-Tock Canisters, you need to make sure to have at least 4 players in each of those. I suggest using the same groups from Phase 2, when you did canister soaks.
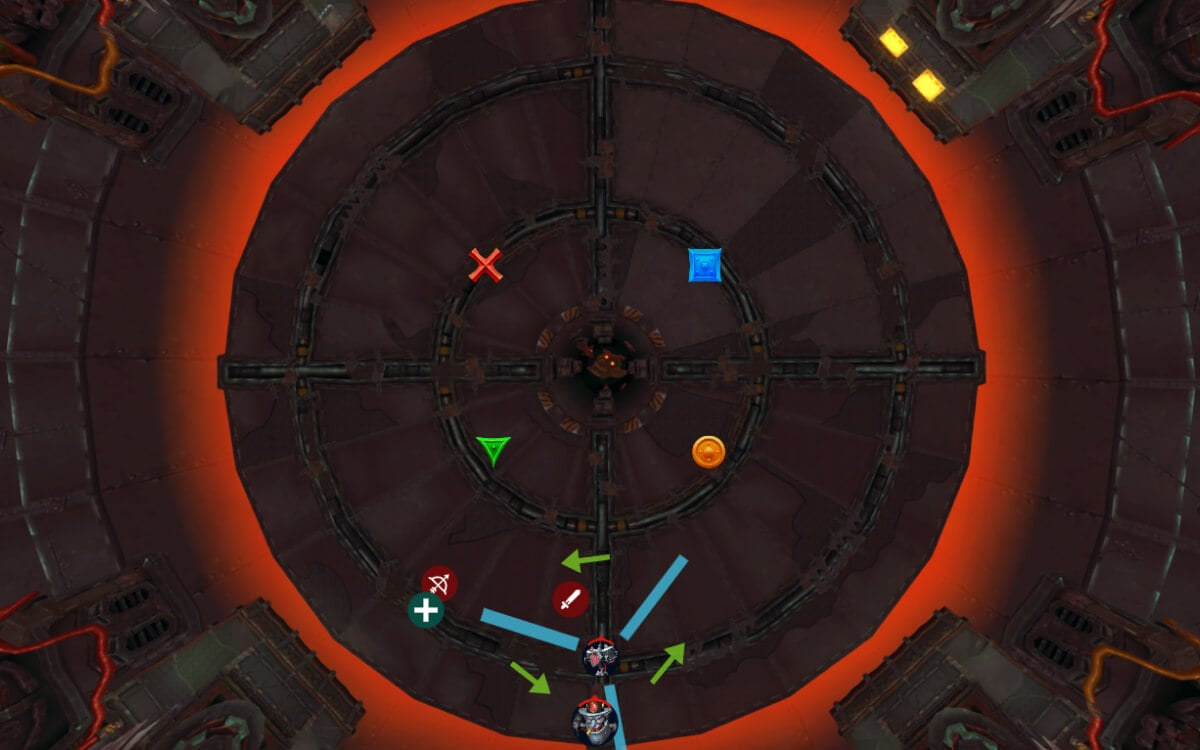
Overloaded Rockets shoot out from the players, in the direction the lines are facing, and will not go further than where the line indicates. This means the Players targeted by this ability cannot hit themselves, unless hit by another player's rockets. Move out and make sure nobody is standing in your lines.
Bigger Badder Bomb Blast is a Tank ability, and will spawn a large circle around the Tank, this ability follows them. The Tank needs to move out and use a strong defensive, because this ability hurts a lot. Afterwards, the entire raid will have to dodge a bunch of swirls.
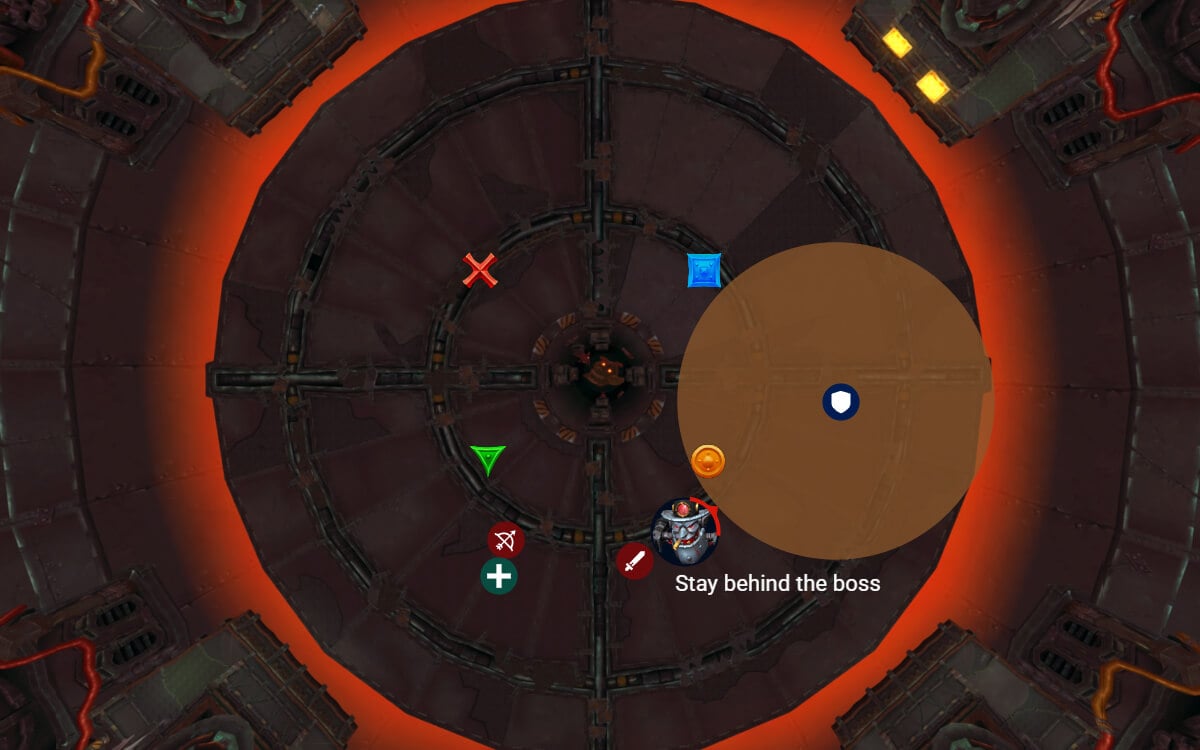
Make sure you are behind Gallywix here, because, even though this is a circle, the boss actually hits the tank in a frontal cone.
Gallybux Finale Blast forces players to move away to reduce the damage it does to them. This ability is very punishing when standing close, and very forgiving when you go far away.
Running away, up to 50 yards, will almost fully negate the damage done by this ability, but standing close will one shot nearly every player. Just run away from this ability.
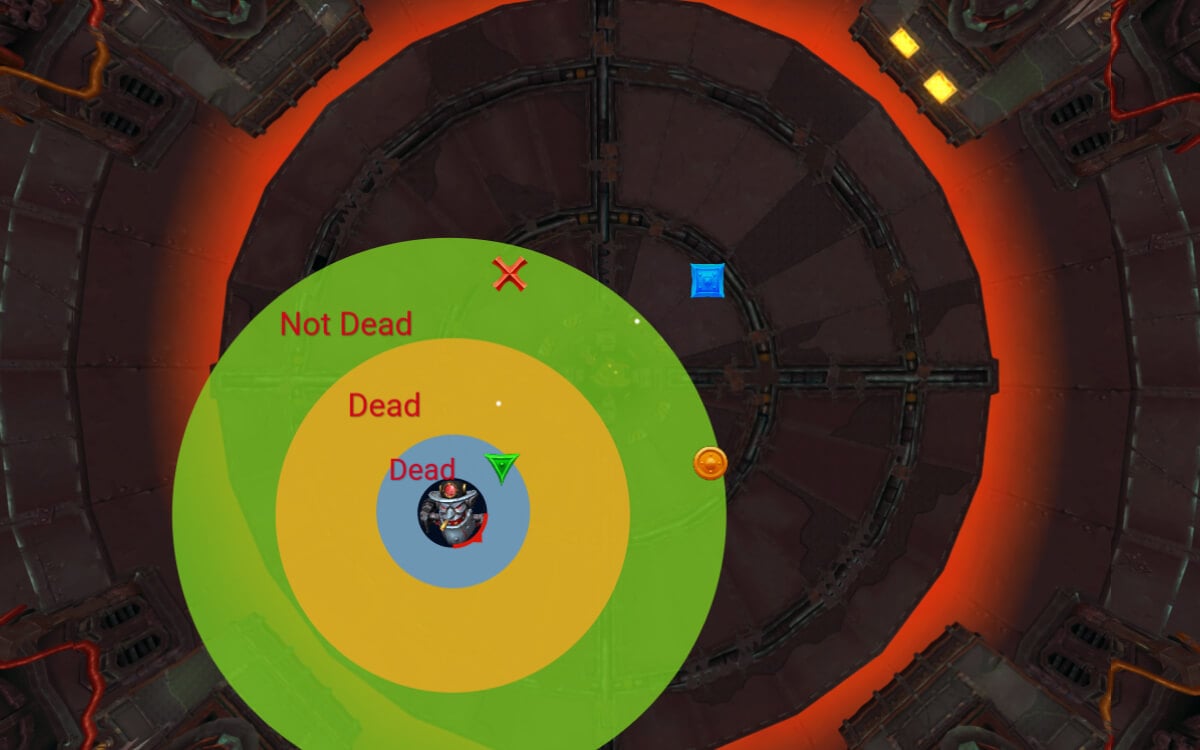
Standing in the yellow area can be deadly, so you will need to use a strong personal. The Green zone is usually far enough to deal almost no damage to the player.
Gallywix will then reach 100 energy and you are playing another intermission, the same way as you did before. Make sure to put the bomb into a Coil that you did not damage before, however, it is ok to also use one that you did already, if you have to; you will have plenty of space remaining afterwards, and the boss should die by the time you do 2 intermissions in Phase 3.
WeakAuras
Northern Sky: Liberation of Undermine WeakAura Pack
This WeakAura also requires the Northern Sky Database and Functions WeakAura.
https://wago.io/NSUndermine