Raid Setup
Introduction
Welcome to our Heroic Mug'Zee boss guide, for the Liberation of Undermine raid. Learn about Mug'Zee mechanics and the strategy we recommend to defeat this boss on Heroic difficulty!
Get ready to face off against Mug'Zee, the two-headed terror who’s more than just muscle, he’s got brains (sort of). Once a promising young bouncer in Booty Bay, Mug'Zee climbed the ranks, eventually landing his prestigious (and possibly cursed) position as Head of Security. His job? Make sure nothing gets past him... and that includes you.
One head is all about precision, lobbing Super Mario-style mines that will chase you down until you’re good and blasted. The other? Well, he’s all about chilling your bones with an endless barrage of frostbolts, keeping you at a freezing distance as he watches your every move. But don’t think the battle’s over when you’ve taken down enough of his health, Mug'Zee’s got a few more tricks up his sleeves.
When he feels the heat, Mug'Zee pulls out dual pistols and spins into action, Matrix-style, blasting his way through anyone who dares challenge him. It’s a fight that’s as chaotic as it is deadly.
Fight Style: Single Target fight
Recommended Setup: 2x Tank / 4x Healer / 14x DPS
Enrage: Hard - 100 Energy in P1 or P2
Useful utilities: Immunities
Hero/Lust usage: At 40%
Method Boss Review
When we first approached this boss, we didn't have high expectations due to the large number of abilities that seemed to overlap and disrupt the flow of the fight. It felt like it could become a chaotic mess. However, the live version of the encounter ended up being far more challenging and satisfying than we anticipated. The mechanics are well-designed and force you to stay on your toes, making each phase feel rewarding to execute properly.
That said, the difficulty is noticeably higher compared to Gallywix, at least on Heroic difficulty, which could be a bit overwhelming for some. The increased challenge is a double-edged sword, though, while it provides a sense of accomplishment, we hope it doesn't become SLG 2.0 in terms of frustration. Overall, while the fight has its tough spots, it feels like a worthy challenge, and with a little fine-tuning, it could become a standout encounter in the raid.
Method Boss Rating: (4/5)
Easy Mode
Phase 1 (Right Side):
- Begin on the right side of the room.
- Split into two even groups to soak Earthshaker Gaol.
- Kill the add inside the prison to break free.
- Avoid the tank frontal attack. The tank should then move around the room to drop the Molten Gold Knuckles debuff.
- Players fixated by the Stormfury Finger Gun should move away from others and stand still.
- Run behind a stone wall to avoid being frozen by the Frostshatter Spear.
- Before reaching 100 energy, swap to the other side of the room.
Phase 1 (Left Side):
- Kill the Electro Shocker MK 2 add and bait mines that spawn on top of it.
- Kite the mines away from others.
- Assign several players to pop the mines one at a time.
- Soak the circles after each mine is detonated.
- Kill the Volunteer Rocketeer add.
- Move away from others if you’re targeted by the Spray and Pray frontal attack.
- Soak the first Goblin-guided Rocket with 5 immunes. For the second set, at least 6-7 ranged players should soak it.
- The tank must intercept the Double Whammy Shot, which targets a random player.
Intermission (40%):
- Bait the charge to an empty space in the room.
- Follow the boss and dodge the incoming bullets.
Phase 2:
- Abilities from Phase 1 are now combined.
- Place the Goblin-guided Rocket between the two prisons, with all players who don’t have the debuff attempting to soak it.
- Freeze mines if you’re targeted by the Stormfury Finger Gun.
- Root the second set of mines and kill the boss before reaching 100 energy.
Mechanics
Depending on which side of the room the majority of the raid is standing on, you will get a different set of mechanics. Mug’Zee gains Moxie which increases damage done by 1% for each stack. At 100 Energy, the boss enrages.
Swapping to a different side of the room will reset all stacks of Moxie.
Two players will get circles that need to be soaked in order to split the damage. Once it hits, players within the circles will get captured in a stone prison. In order to break out, you must kill the Goon add. This add casts a frontal ability that needs to be dodged.
When killed, players will get knocked away from the Goon add.
Affects 2 players with an ice circle. Players move in a slippery motion and ice spears are targeted at them. If hit, you become frozen. Hiding behind a wall will prevent the spear from hitting you.
Frontal cone ability that is targeted at one player and cannot be dodged. The player needs to move to the side to avoid hitting others and just tank the damage.
Frontal cone on the tank that adds Gold stacks. Moving around removes the stacks and drops gold puddles on the floor. Failing to remove all stacks in time will stun the tank.
Several mines spawn that fixate on players and cannot be damaged. Coming into contact with a player will pop the mine, spawning 2 circles on the ground that need to be soaked. Popping the mine applies an absorb to the raid that needs to be healed before the next mine is popped. The same player cannot pop mines again until the debuff drops, but you can soak the circles after each mine pop.
MK2 Electro Shocker
Casts Surging arc on a random player that jumps to 3 other players.
When at 80% HP, this add will become stunned and take 100% increased damage for 8 seconds.
Frontal cone ability that is targeted at one player and cannot be dodged. The player needs to move to the side to avoid hitting others and just tank the damage.
Large line that is targeted at a random player that cannot be dodged. The Tank needs to soak this ability to reduce the damage on the player. Afterwards, the player receives a large circle that explodes after 6 seconds. Kills mines if hit.
Fires a rocket at a random player that needs to be soaked with at least 4 other players to split the damage. Players soaking this have a debuff that lasts for 3 minutes and prevents you from soaking again. It also leaves a permanent fire puddle on the ground.
The boss will charge forward, dealing damage to anyone in his path and then he spins around, dealing cone damage on both sides.
Head Honcho
The boss uses both sets of abilities from Phase 1, regardless of which side of the room you are, and gains 30% haste.
Strategy
Before you pull the boss, there are several assignments that you need to make:
- Prison groups
- Immunity rocket groups
- Mine handlers
Prison Groups
The two groups should be equal in size and damage. You want to kill the Goon adds roughly at the same time.
Rocket Immune Group
The first cast of this ability, you want to have 5 players soak it with an immunity, this will allow you to soak the 2nd set with other players, and 3rd set you will have immunes back.
Mine Handlers
Ideally, you want to have 4 players assigned to handle the mine, since one player cannot be popping several mines in a row.
Once you have the setup, you can start the fight on the right side of the room.
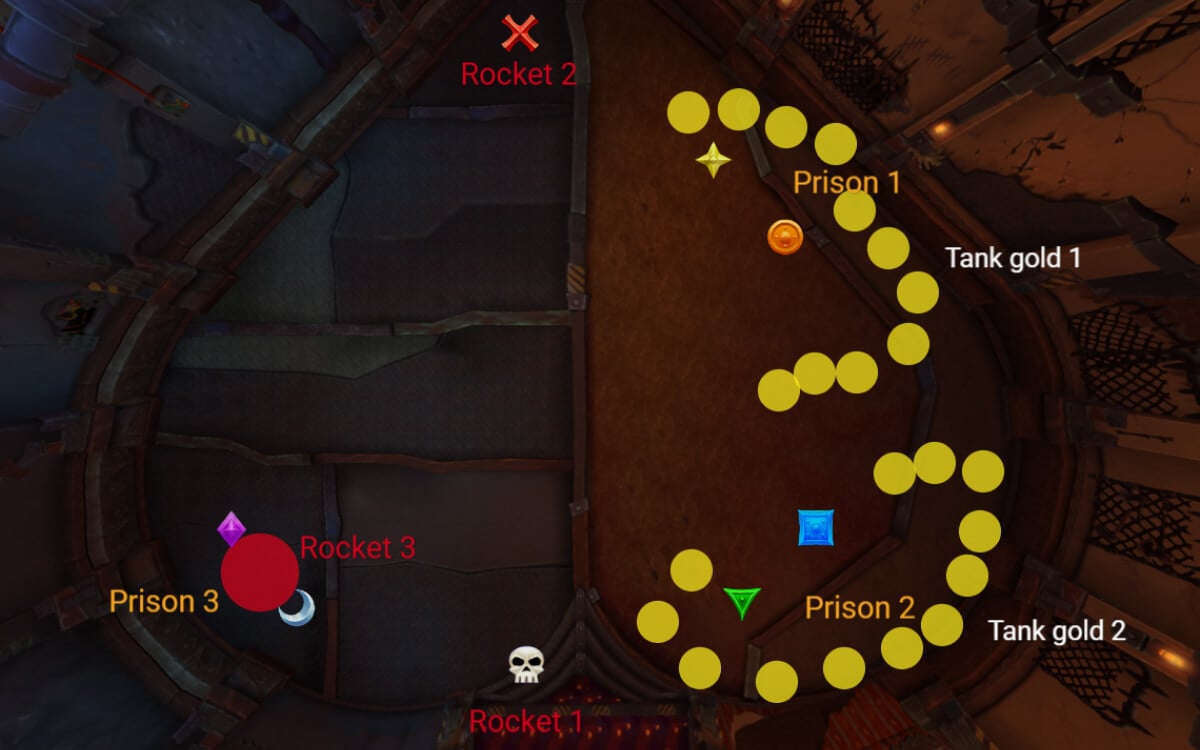
These are the markers that you will need for the fight. The fight is very scripted, so you can ensure that everything happens on those markers.
Phase 1
Phase 1 Right Side
Pull the boss close to the Prison 1 markers and face it away from the raid. Once you get the two prisons, make sure that the circles are not touching each other. You may choose to keep 4-5 players outside of the prison if you need extra boss damage.
Make sure that you do not place the prison too close to the wall so that the tank can run behind the prison to drop the gold.
You will also need 1 healer to stay outside to take care of the tank.
Once you kill the add(s), get knocked towards the boss, but not in front of him because it overlaps with the frontal cast.
Afterwards, you will get the Frostshatter Boots on 2 players and they need to hide behind the wall to avoid getting frozen. Others should look to avoid getting hit by it as well.

Lastly, you will get a cast of Stormfury Finger Gun on someone, that person should just stand alone and heal through the damage.
The boss will be high energy here, so you want to swap sides before 100 energy.
Phase 1 Left Side
As you cross to the left side, you will take damage due to the Elemental Carnage ability, but this is not problematic.
An MK2 add will spawn and you want everyone and the boss to stack on top of it and kill it.
You will get the first mine spawning there, and players need to watch the ground. As soon as they start spawning, swap to the opposite side of the room, where the other MK2 add is located (close to skull marker).
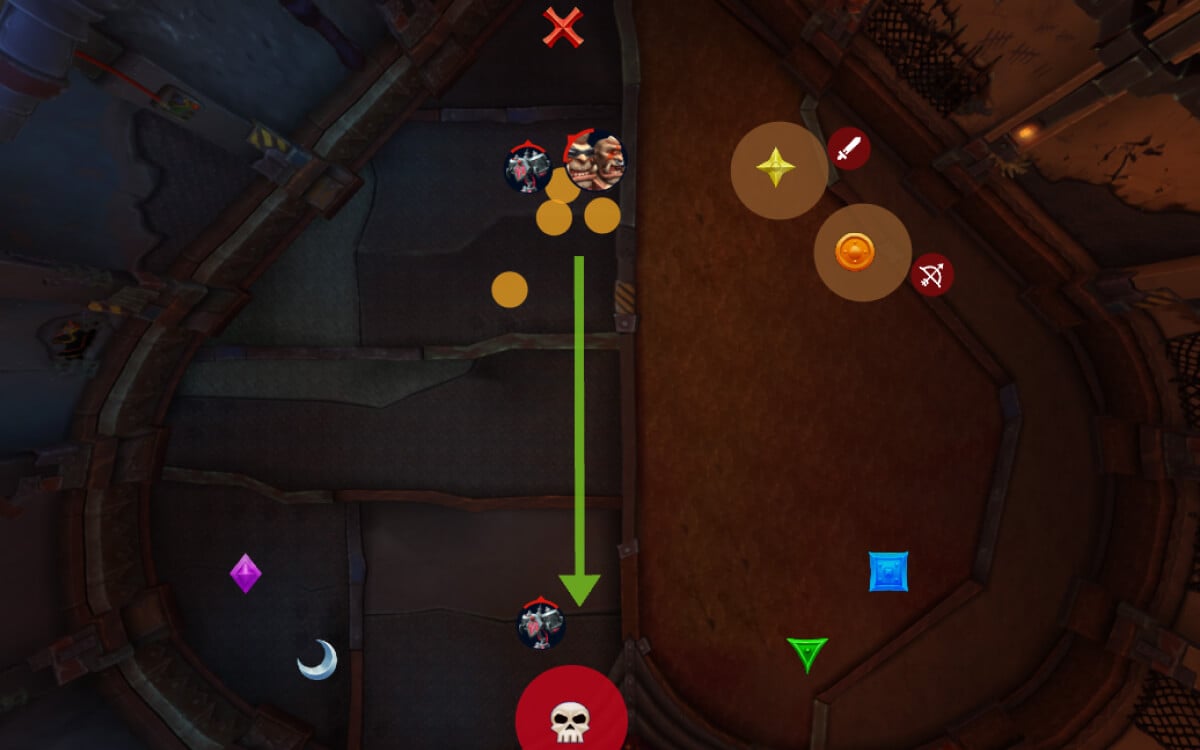
Be careful not to pop mines here by accident.
The assigned players should now pop mines, one by one until all are gone. Remember to soak the 2 circles each time you pop a mine and give healers plenty of time to heal up before the next mine.
At the same time, one random player will have to drop the Rocket circle on the skull marker, and immunity players have to follow them.
Once completed, you need to kill 1x Volunteer Rocketeer add, and move out with the big circle that is cast on a random player. Tanks will also need to intercept the beam targeted at a random player to reduce the damage.
At this point, the boss will be high energy and you want to move to the opposite side.
Phase 1 (2nd right side)
This phase plays exactly the same as the opener phase, except that you are now on the Blue/Green marker for the prisons because this is where you naturally crossed the room.
Phase 1 (2nd left side)
This phase plays nearly exactly the same as the opener phase, except that you are now on the Skull marker at the beginning of the phase because this is where you naturally crossed the room. The only difference in this phase is that you want to place the Rocket at the Red marker and soak it with mostly ranged players to reduce the damage.
Intermission (40%)
Before you trigger this, make sure all the adds are gone so you can fully focus on the boss. This is where you want to pop all dps cooldowns and heroism/lust because here the race against the enrage starts.
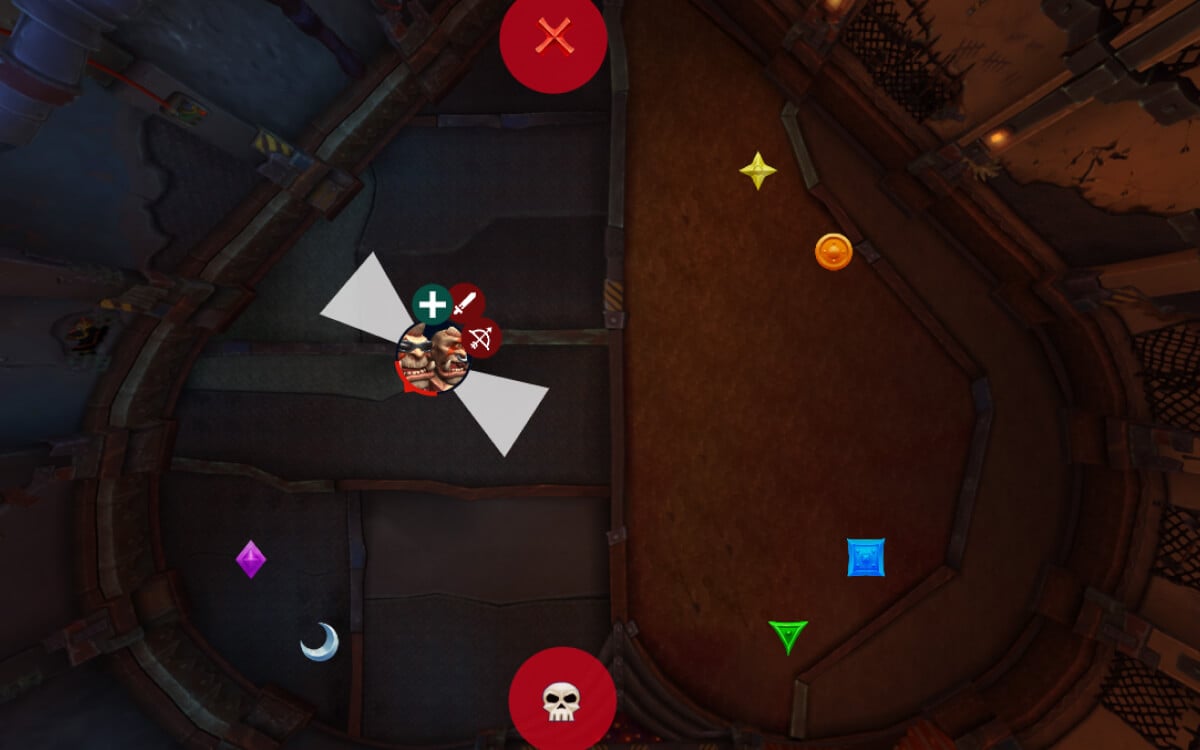
Mug’Zee will target a random player and charge in their direction. When he stops, he will start spinning and has 2 cones on the side that deal massive damage to everyone caught. Just Avoid getting hit by this.
After each charge, most players should move to the side where they want the boss to charge next (preferably a clean side and in the left section of the room).
After 3 charges, Phase 2 will begin.
Phase 2
Mug’Zee now gains all abilities from both sides of Phase 1, and you cannot trigger anything by moving the boss to the opposite side of the room. From here, reaching 100 energy will trigger a hard enrage.
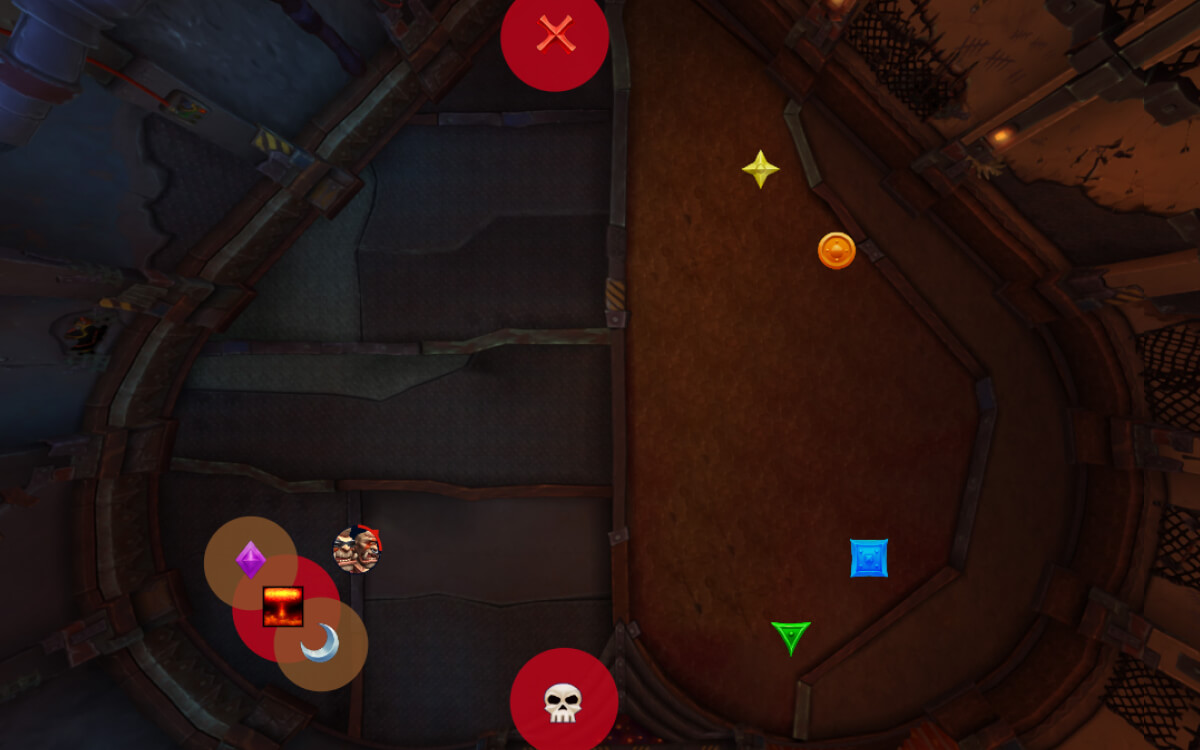
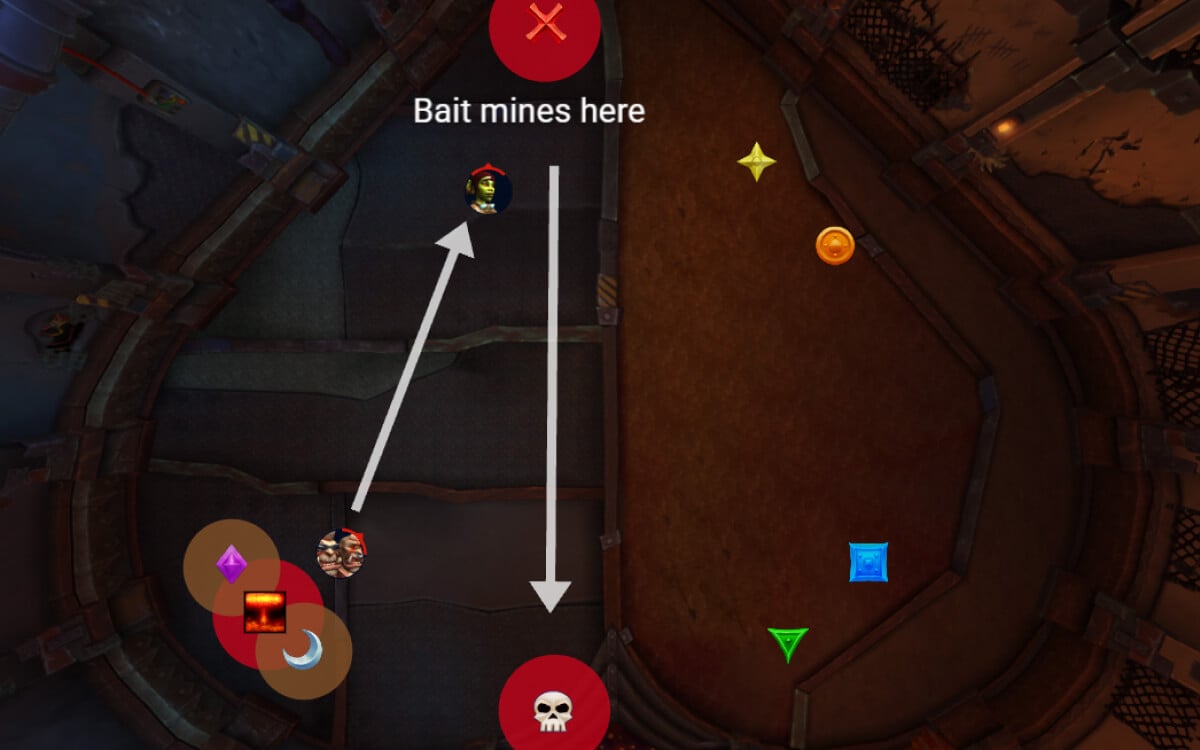
After the charge, you want to move the boss close to Skull quickly, because there will be an MK2 add waiting there.
At the same time, you will have mines spawning, so make sure to kite those and be extra careful not to pop those by accident.
Your goal here should be to pop 2 mines, because shortly afterwards you will get a cast of Frostshatter Boots. The two players can target a mine and get it frozen.
Once this has been done, you will get the last prisons of the fight. Place these to Purple and Moon markers and have everyone go inside to help split the damage.
At the same time, you will get a rocket targeted at someone.
If the Prisons are placed close together properly, you can reach the soak from both prisons.
Here, you want all your players that do not have the debuff from soaking the 2nd set of Rocket, touch the swirly, and all others should avoid it.
Once the Goons are defeated, you will get knocked out of it. Just make sure you do not get knocked into a mine if there are any on the floor.
From here you move the boss towards Cross, and kill the Rocketeer add there.
Shortly after you get the mines spawning, you want to spawn them as far into the corner as you can, but be careful, you get way more mines on this set, so you are not popping those, but you can CC them. As they are spawning, run back towards Skull.
From here you have very limited time to kill the boss as the energy will be very high.
Kill before 100 energy.
WeakAuras
Northern Sky: Liberation of Undermine WeakAura Pack
This WeakAura also requires the Northern Sky Database and Functions WeakAura.
https://wago.io/NSUndermine