Raid Setup
Introduction
Welcome to our Heroic Sprocketmonger Lockenstock boss guide, for the Liberation of Undermine raid. Learn about Sprocketmonger Lockenstock mechanics and the strategy we recommend to defeat this boss on Heroic difficulty!
Gear up for a battle of pure mechanical mayhem as you face Sprocketmonger Lockenstock, a demented genius who’s turned this battlefield into a lightning-charged death trap. With a mind as sharp as his whirling sawblades and an ego bigger than his overclocked contraptions, Lockenstock doesn’t make it easy.
This fight is a non-stop gauntlet of electrified floors, explosive chain reactions, and razor-sharp constructs, leaving you little room to breathe, let alone make mistakes. If Siegcrafter Blackfuse and Painsmith Raznal gave you nightmares, brace yourself, because this is even tighter, even faster, and packed with more fireworks than New Year's Eve.
Fight Style: Single Target fight
Recommended Setup: 2x Tank / 4x Healer / 14x DPS
Enrage: Soft - 15% damage increase every 100 energy, Hard - Popping 2+ mines at the same time
Useful utilities: Warlock Gate and Speed boosts
Hero/Lust usage: On Pull
Method Boss Review
Ever since Undermine was announced, we speculated that we might see a Siegecrafter-inspired boss, and Sprocketmonger Lockenstock delivers exactly that, with a touch of Painsmith’s brutality for good measure. This encounter takes everything players loved (and feared) about those fights and cranks it up to 11, blending high-speed mechanical chaos with precise execution. It’s a masterclass in how to reimagine fan-favorite encounters while keeping them fresh, engaging, and downright punishing.
We can’t wait to see how this fight plays out on Mythic difficulty, especially during the Race to World First.
Method Boss Rating: (4/5)
Easy Mode
Phase 1:
- Soak Mines One at a time, after the 2-second debuff expires.
- Pyro Party Pack: Tank moves away to minimize raid-wide damage.
- Room Swap: Move to the opposite side when your current area gets electrified.
- Rocket Barrage: Dodge incoming rockets from the sides.
- Drill Drops: If targeted, place drills at the edges.
- Magnet Mayhem: Stay clear of magnets to avoid getting pulled in.
- Energy Beams: Watch out for deadly beams firing from the room’s edges.
Intermission:
- Get knocked to the correct side.
- Heal through the absorb shield.
- Dodge swirlies to stay alive.
Mechanics
Several rockets are fired towards players, but are not fixated on them and can be dodged.
Inflicts heavy damage if hit by it.
Magnets that pull players towards them, if a player gets sucked in all the way, they become stunned for 6 seconds.
Similar to the Blazing Beam, this covers a larger area and inflicts even more damage if hit.
Only happens after the first intermission.
Works just like the rockets, but inflicts bigger damage and also deals splash damage to all players around the impact location.
This is the core mechanic of this fight, and it involves clearing 4 mines. Each mine exploding deals damage to the entire raid and affects everyone with a debuff that lasts for 2 seconds.
Popping another mine within those 2 seconds, deals 200% increased damage to everyone.
Additionally, a player who soaked a mine takes 1000% increased damage from popping mines for 2 mins.
A section of the floor becomes electrified, dealing damage to all players standing within it and reducing movement speed by 40%. Running through this field is not recommended as it can quickly lead to deaths due to movement reduction.
Player gets fixated by Drills that shoot out of the ground every 1.5 seconds. Getting hit by this applied a stun and bleed to the player for 6 seconds. It is recommended to move to the side when targeted by this ability.
Unavoidable raid damage that lasts for 10 seconds and deals damage to everyone every 0.5 seconds.
Mini traps on the field that knock players up and inflict moderate damage every 0.5 seconds for 6 seconds. It also reduces movement speed by 60%.
Tank debuff that explodes after 6 seconds and deals distance based damage to the entire raid. Tanks should run away with this debuff.
Melee hits apply a stacking debuff that increases damage taken by 15% with each hit and reduces movement speed by 5%. Tanks should perform a tank swap whenever this ability stacks up too high.
Intermission will start whenever the boss reaches 100 energy. This will last for 20 seconds and once it's finished, the boss will be affected by Upgraded Bloodtech, which increases all damage done by 15%. This stacks up every intermission.
This DoT is applied to the entire raid, it deals moderate damage to everyone and applies a large absorb that needs to be healed through.
The entire area gets covered in swirls that need to be dodged. This only happens during the 20 seconds Beta Launch window and will deal moderate damage and disorient the player if hit.
When combined with the Voidsplosion absorb, this can be very deadly.
Phase 1
In this encounter, your primary responsibility is to ensure that the mines are properly activated from start to finish.
We recommend using a WeakAura (WA) to assign players who are responsible for popping the mines. This is done in a simple, sequential order, with no specific preference for which of the four mines you activate first.
While a WA is the most efficient method, it can also be managed without one by having players take turns and clearly communicate with each other. Just remember: once a player has soaked a mine, they cannot pop another one for the next 2 minutes. Additionally, avoid activating a mine within 2 seconds of the debuff's expiration, as doing so will wipe the raid.
Each phase contains three separate sets of mines.
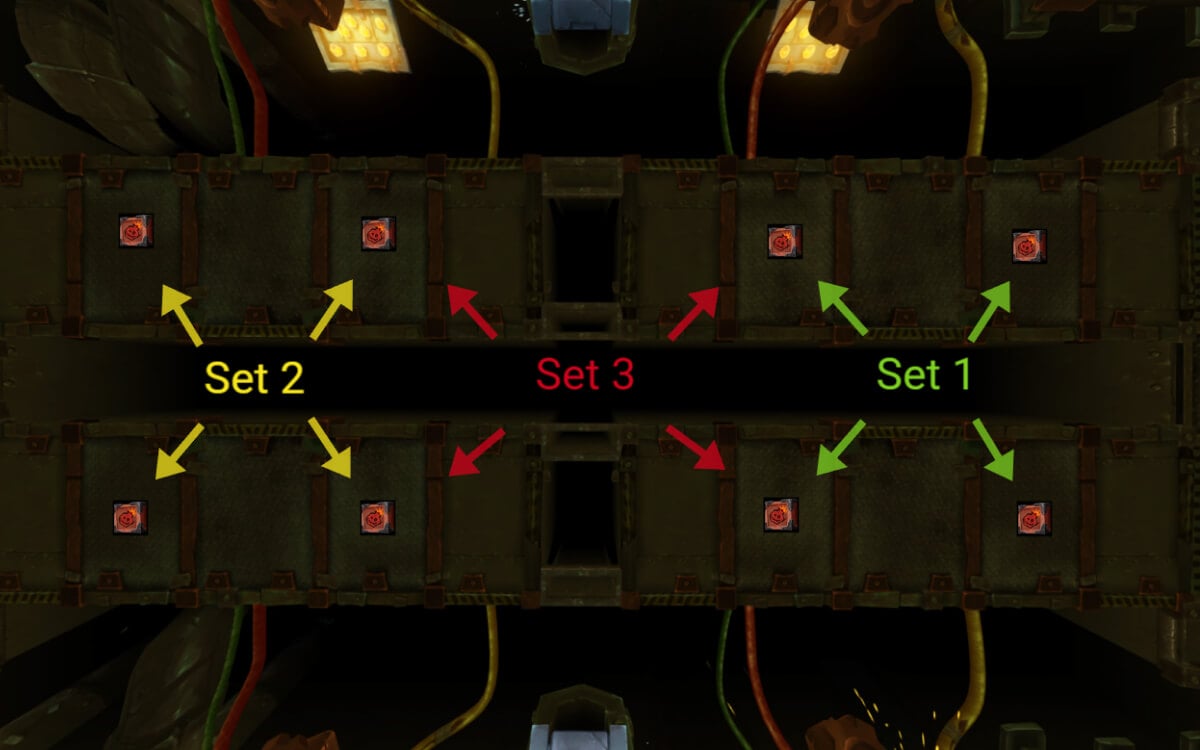
The first set is in the section where you start the encounter. It is recommended to start clearing the Mines closer to the wall, because this is usually the location where Tanks drop the explosive ability, so you do not want players running there to pop a mine while the tank is exploding.
Soon after, you will be forced to move to the next section, because the area will get covered in electricity (Wire Transfer). Using the warlock gate here to move to the opposite side is great!
After the 2nd set, you will get one final 3rd set. This one is a bit different because a small section of the side will be covered in electricity, and mines cannot spawn there. This means you will get 2 close and 2 far mines. You will need 2 mobile ranged players to take care of those mines.
Now, while you are taking care of the mines, there are a bunch of other things happening; you should know that only one invention is activated at a time.

A quick breakdown of the mechanics and what you want to do:
- Flame Cannons (invention): Cover sections of the room with a fire beam.
- Tanks: Always run to the corner to trigger an explosion.
- Magnets (invention): Move along the belt, pulling players toward them and stunning them if successful.
- Rockets (invention): Target random players and fly in a direct line toward them.
- Screw Up: Affects players, spawning drills on the ground that stun and apply a bleed.
- Blisterizer MK 2: Small traps that inflict damage, knock players up and reduce movement speed. Should be avoided as best as possible as they do not serve a purpose other than making you angry if you step into one.
- Electricity: The floor will be covered in electricity, requiring players to swap to another section. Using Warlock Gates is highly recommended for this.
Eventually, the boss will reach 100 energy and intermission will start.
Intermission
All players will get knocked away from the boss and an absorb will be applied to them. Your goal is to reach the boss, and heal through the absorb while dodging the Black Bloodsplatter swirls on the ground.
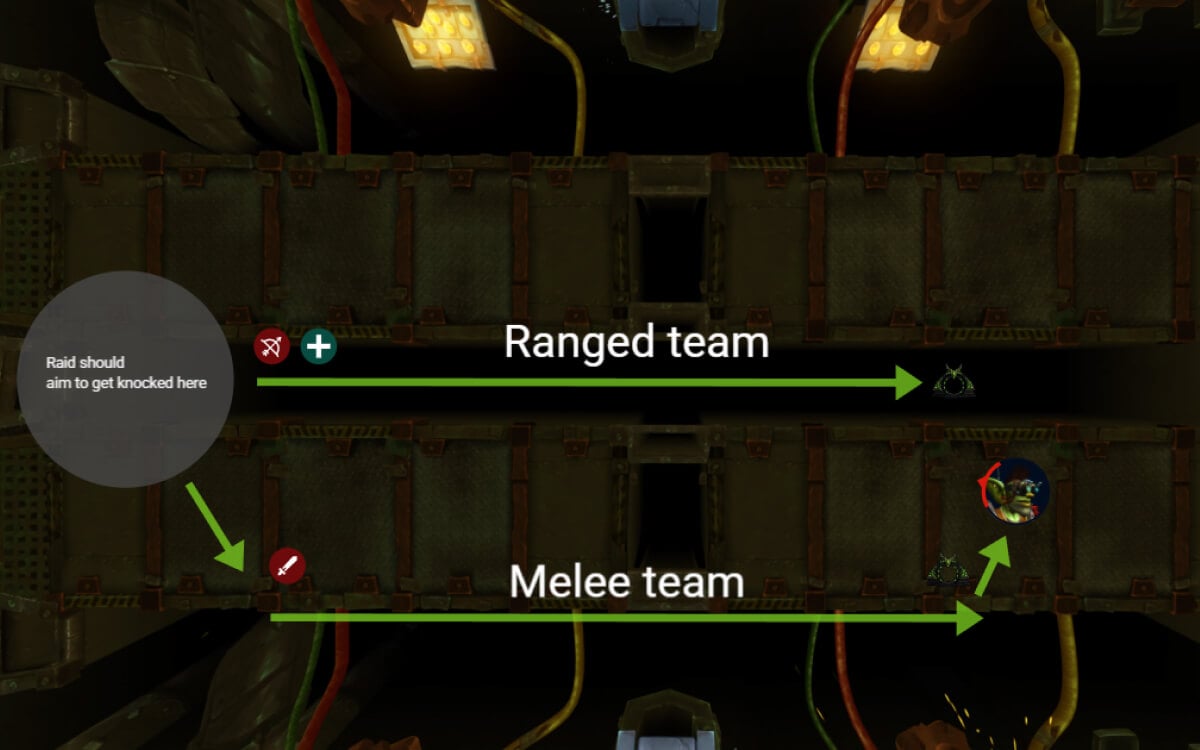
It’s recommended to split up into Melee and Ranged teams after the teleport, which will make dodging swirls easier because they are targeted towards players.
Keep in mind that just before the intermission ends, melees should take the Warlock gate to skip the electricity on the floor that will be cast at the location where the boss is standing. The slow and the damage can quickly kill off melees trying to cross without the gate.
Empowered P1
Once you do your first intermission, you are back to Phase 1, but now certain abilities are empowered, and will stay like this until the end of the fight.
Two notable changes are the Jumbo Void Beams (former Blazing Beam) and Void Rockets (Void Barrage).
Note: The first empowered ability will be the Blazing Beam and Void rockets only become active after you have done the intermission twice.
The beam now covers a much larger area, and the rockets do splash damage.
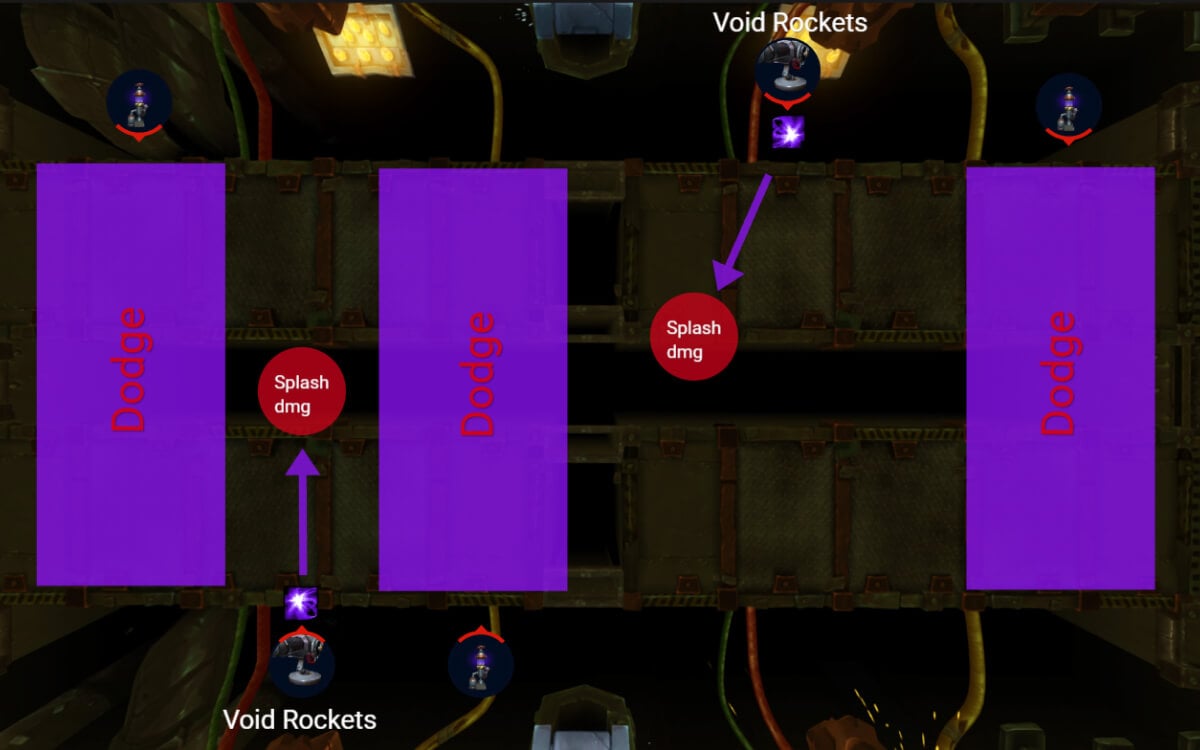
It is important to note here that two inventions are activated at the same time. This means that you will be dodging the Jumbo Void Beams and the Rockets at the same time.
Deal with mines and other abilities like you did in the first Phase 1. You should aim to kill the boss after the 2nd intermission because after that, everything starts to hurt a lot.
WeakAuras
Northern Sky: Liberation of Undermine WeakAura Pack
This WeakAura also requires the Northern Sky Database and Functions WeakAura.
https://wago.io/NSUndermine