Raid Setup
Introduction
Welcome to our Mythic The Silken Court raid boss guide! We will breakdown the Mythic mechanics and the strategy we recommend to deal with this boss on Mythic difficulty.
Fight Style: 2 Target Council fight with shared HP and add cleave
Recommended Setup: 2x Tank / 4x Healer / 14x DPS
Required utilities: Grips, Monk Ring, Poison Dispel, Speed Boosts
Hero/Lust usage: 3 minutes into the fight (1st Dispel in P2)
Mechanics
Whispers of The Silken Court
Initially, when the fight starts, players will have to pick up either Mark of Rage (red) or Mark of Paranoia (Blue) by standing close to the respective boss, and this will persist throughout the fight. If a player fails to pick up any of those initially, Mark of Death will be applied to those players, effectively killing them instantly and this persists through death.
On mythic, getting hit by almost any ability, the player will spawn a Red/Blue orb depending on which team the player is on, this orb stays on the ground for 20 seconds. If not picked up by a player from the opposite colour, it will explode and add a stack of the debuff to players of the opposite colour. A player reaching 5 stacks will instantly die, but it is recommended for players not to go above 2 stacks because the DoT itself ticks pretty hard.
Stinging Swarm
On mythic difficulty, you need to reach 4 stacks on Tak in order to stun the boss and interrupt Cataclysmic Entropy.
The debuff also lasts 2 seconds less compared to Heroic (so 10 seconds).
Each application increases damage done to Tak by 20%.
Strategy
Silken Court Mythic is a mechanically very demanding fight that will require a lot of research and coordination. In order to make progression as smooth as possible, it is important that all your players take the time to read a guide or watch recent kill videos because it is one of those fights that is hard to pick up “as you go” and mistakes are very punishing.
There are 2 popular strategies for this boss. The main difference is how the Web Lines (Binding Webs) are handled to stop the boss's charge. We will focus on the strategy Method used which uses ranged players to stop the charge close to the middle of the room, compared to Liquid’s strategy that had all the lines in the melee.
Orb Teams
You will need 10 players for the Blue side, and 10 Players for the red side.
There is no real rule for how to assign players, but there are suggestions that will make it a bit easier to deal with the mechanics.
In the Blue team, you ideally want Tanks, 3 ranged players doing the web lines and any leftover ranged player that is not doing the lines to play in melee, and then fill the remaining spots with players of your choice.
In the Red team, you want all remaining players, with at least 3 ranged players. They will have the task to bait the Web Bomb spawns and do the lines. Any additional Ranged player that is not doing the lines will have to play in melee and move to the wall every Web Bomb cast in order to avoid spawning a puddle in melee.
Phase 1 Strategy
Now that we have the teams sorted, let’s go step by step into this fight.
There are 2 things that both teams have to do right after you pull the boss.
Blue team players have to run to the wall and bait the frontal coming from Anub (red side) and use a speed boost to get out of it the moment it spawns. It is good to know that Anub will always target Blue team players with the Frontal, while Tak will always target Red team players with it. This is important information that might save you some pulls later into the fight.
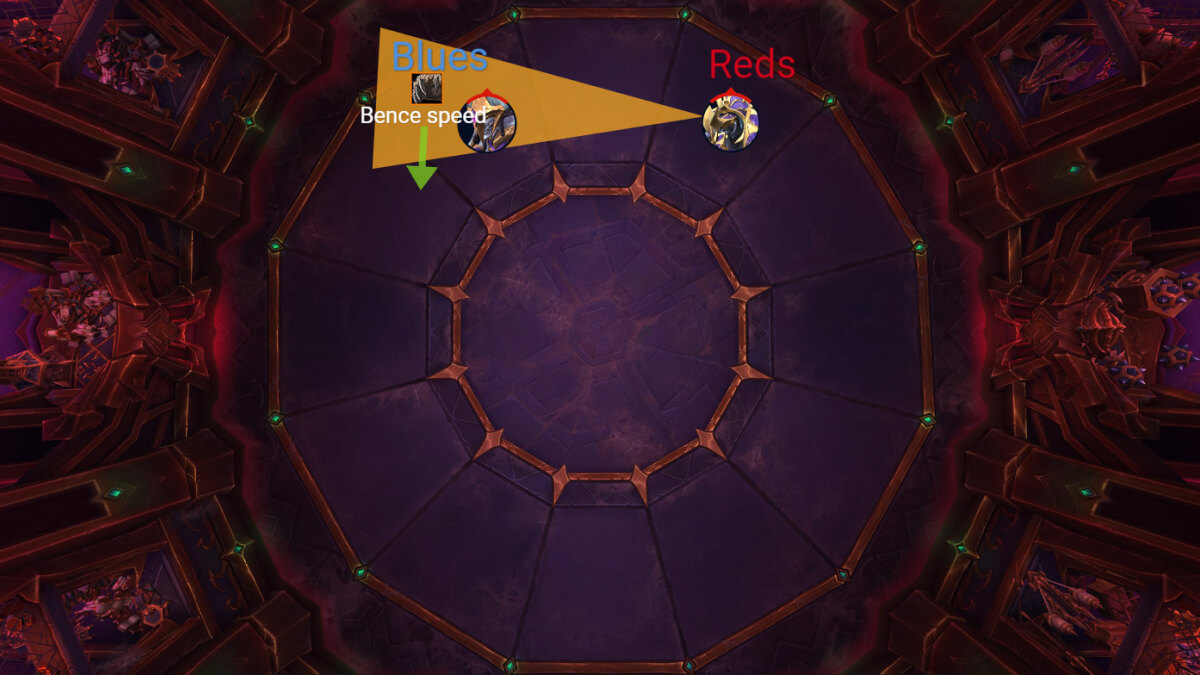
Red team players have to pick up the buff, and then have the 3 ranged players instantly move towards the middle of the room to spawn Web Bomb there.
At the same time, if you have any other ranged players in the Red team that are not doing the lines, they have to go to the wall to spawn a Web Bomb there.
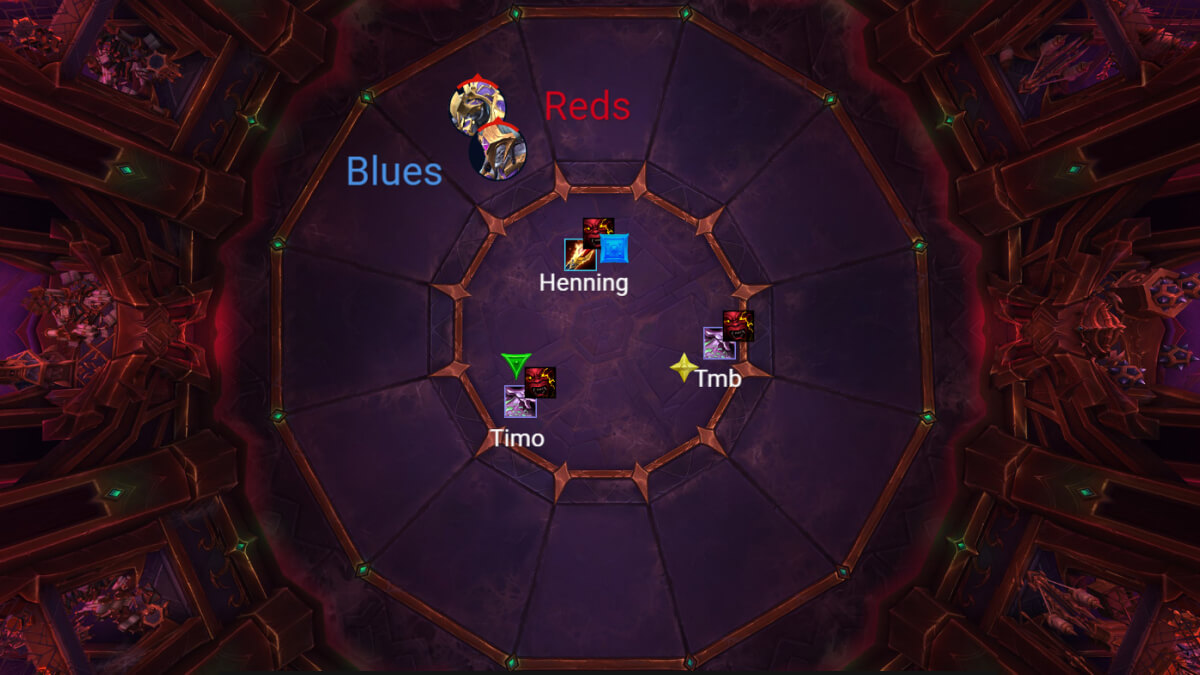
Afterwards you will have your first Venomous Rain cast that will spawn Orbs once it hits players.
You will want to create something like a formation for each Venomous Rain cast, this will reduce the RNG and players getting clipped by a lot. It will also add more consistency to orb spawns which makes it easier for the opposite team to soak afterwards. You will encounter formations like this at every stage of the fight and it is one of the most important things to take seriously.
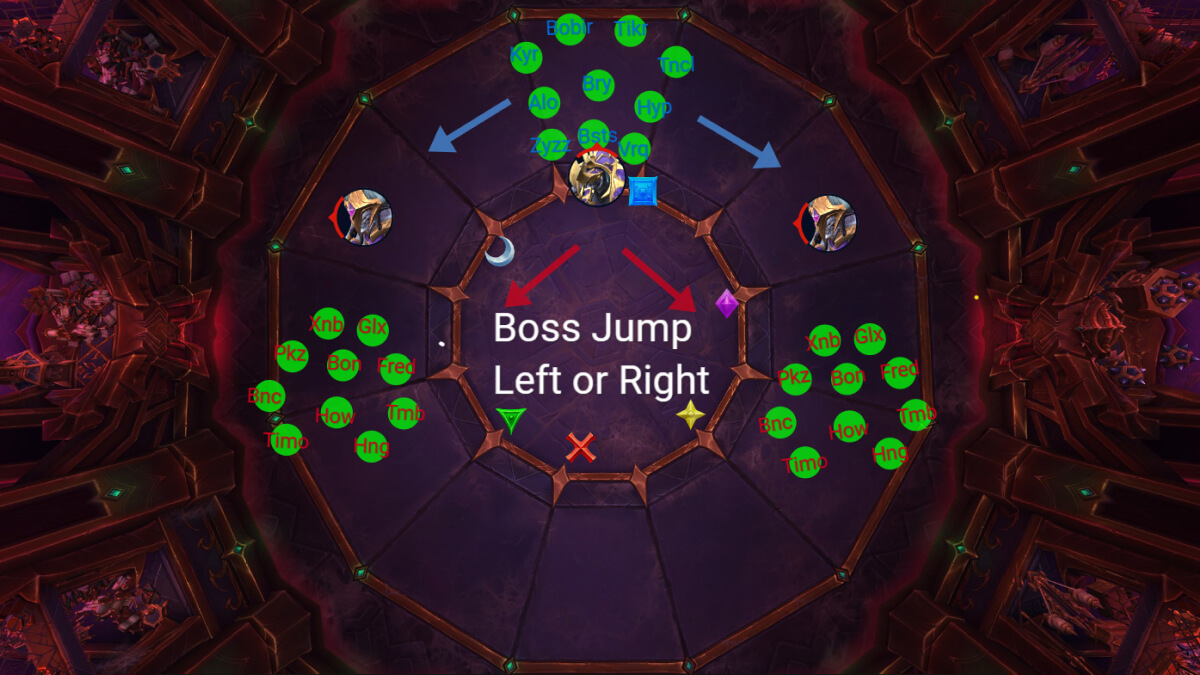
Example how a formation should look like in Phase 1:
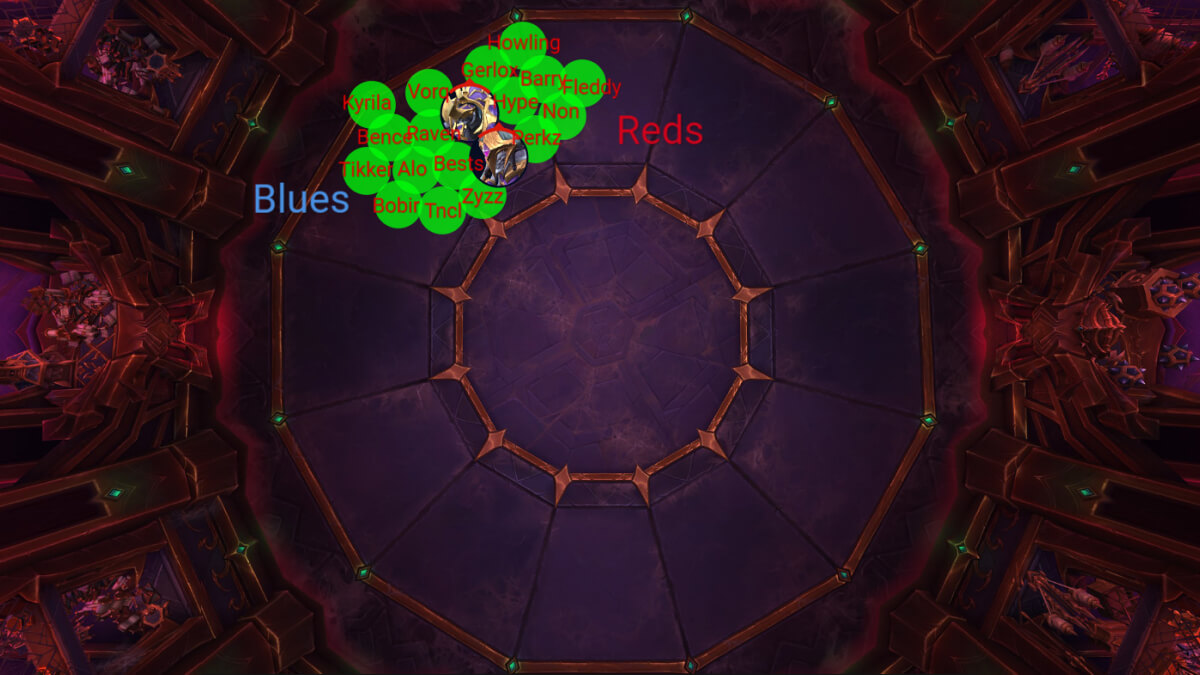
You may have noticed that the Red side has only 7 players, this is due to the 3 ranged Web Bomb players spawning their orbs in the middle of the room. The blue side has their 3 Web Bomb players baiting orbs in their group before they leave, this is done in order to bait the 2nd frontal on top of the blue group to avoid having to dodge the Frontal in the middle of the room.
Once you have spawned the orbs and frontal was cast (happens at the same time), both groups will do a clockwise rotation around the boss, picking each other's orbs.
The 3 Blue players that are doing the Web Bombs will take a Warlock gate instead.
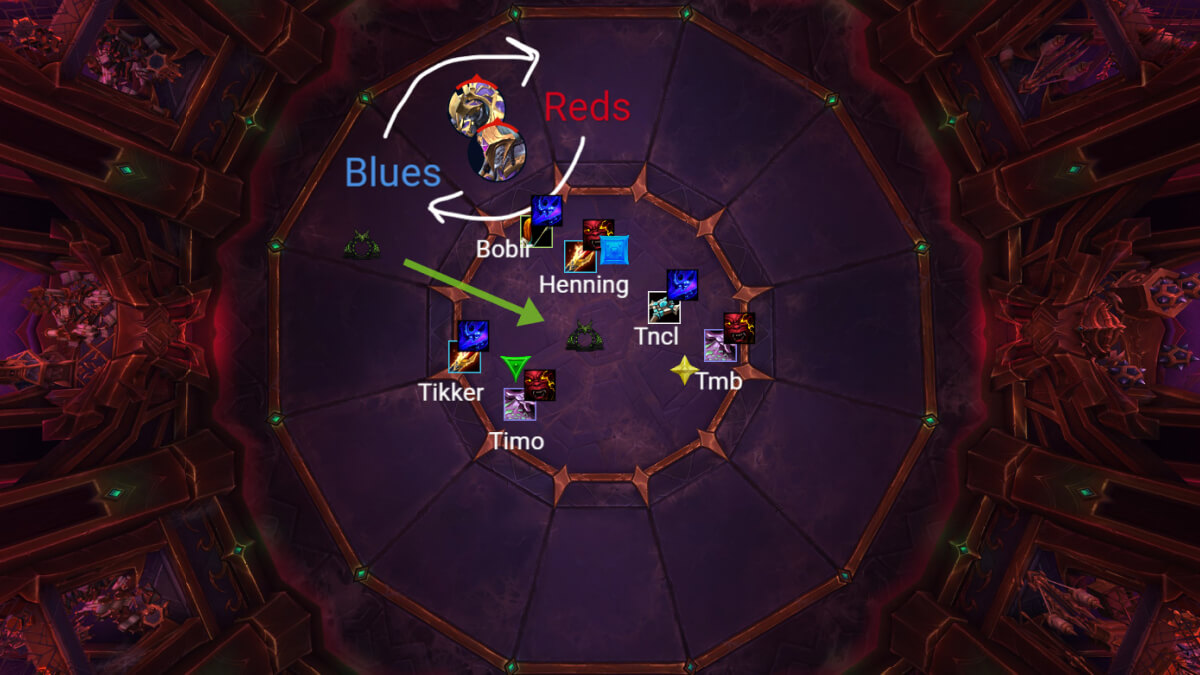
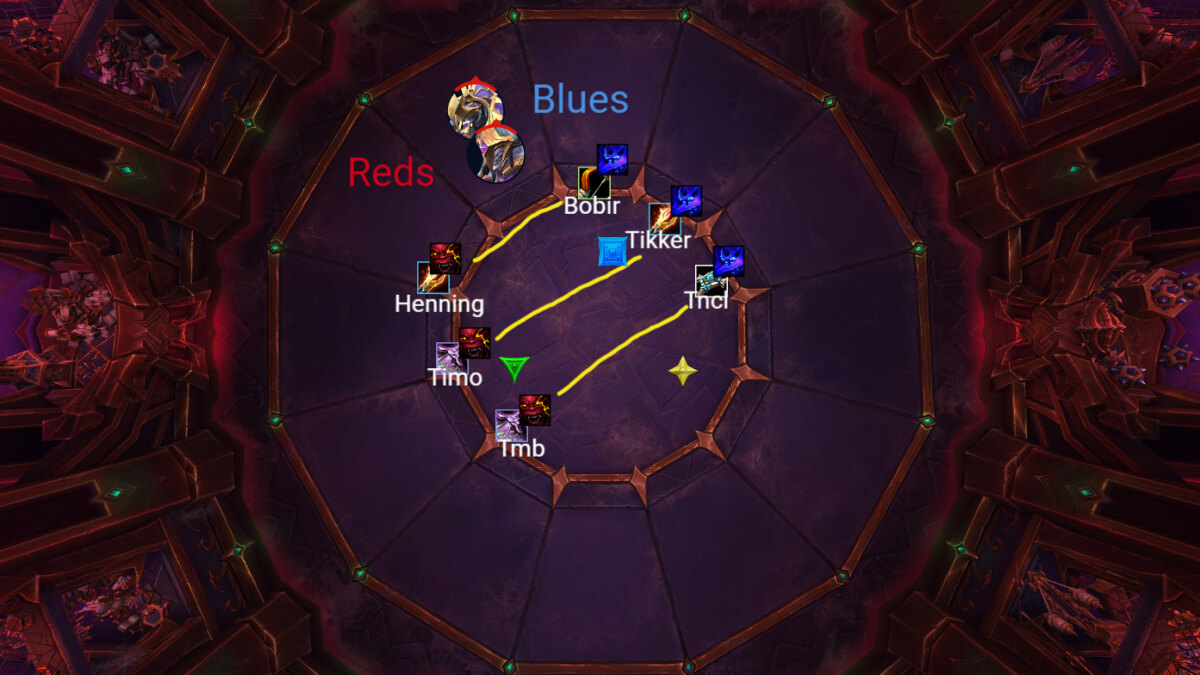
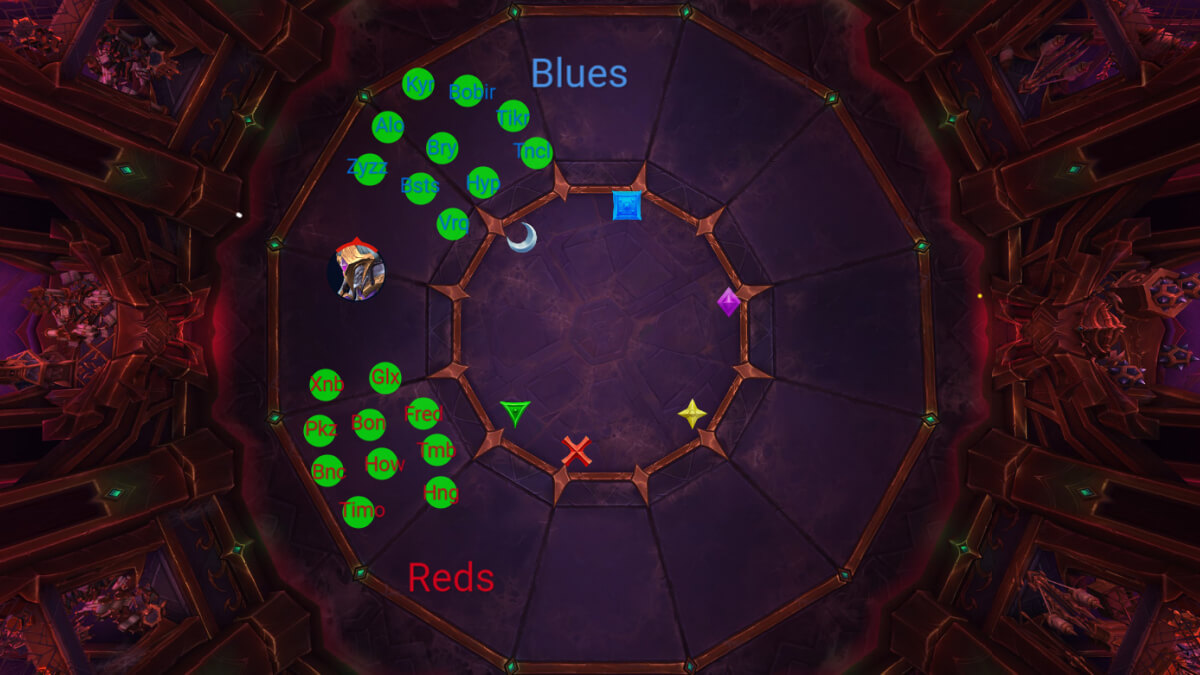
When the 3 blue players arrive, they should go pick up their partners orb instantly. There should be 3 red orbs waiting for them, 1 for each player. It is recommended that the Web Bomb pairs always rotate clockwise when picking up orbs to make this a consistent move and avoid running into each other by accident and this will also put everyone in the correct position for the charge that is incoming.
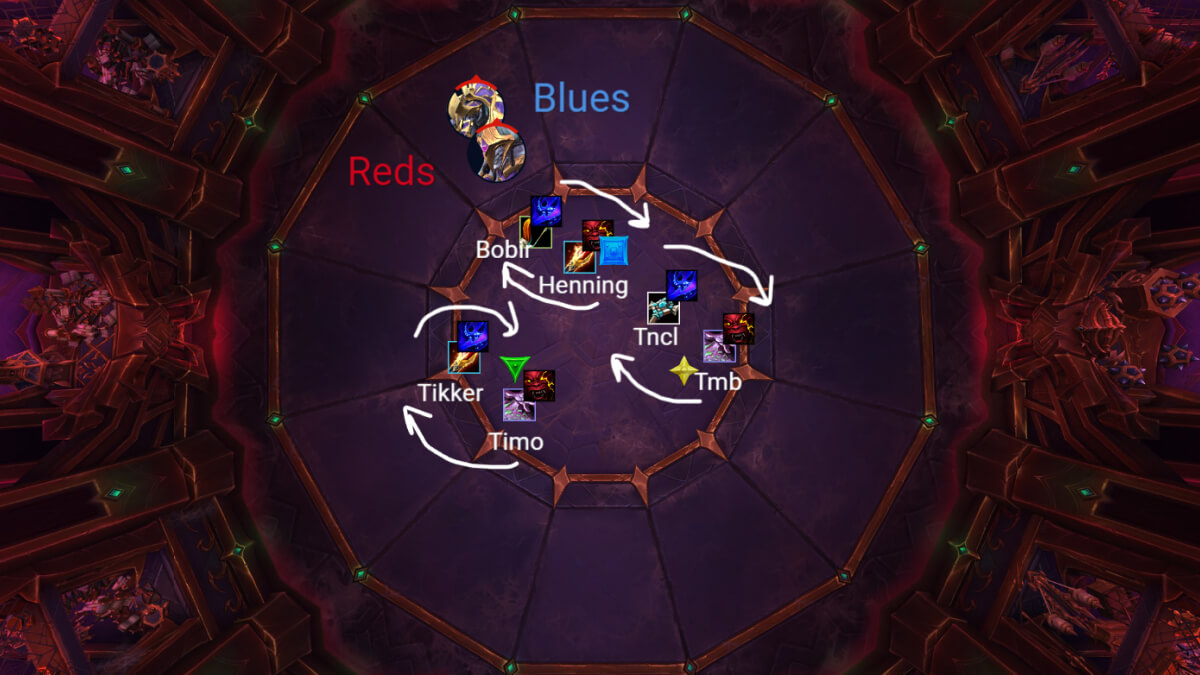
If done properly, you should now have everyone positioned like this:
After the Charge, the boss will do another cast of Venomous Rain, which will spawn orbs on every player and force everyone to do another rotation.
Shortly after, there will be another Frontal cast that can often be tricky if it targets a player in the middle of the room.
Only after the Frontal will you be able to move the boss, and that will be necessary because Tak will jump to one of the sides (left or right).
When you are moving the boss, both teams need to follow the boss and make sure you stick to your side, to avoid touching an opposite team player. Once in position, you will be getting the 3rd Rain cast which is the hardest one in P1.
You will have a Venomous Rain and Frontal overlap, which depending on the position, might force a team to wait a bit with their rotation. This means the opposite team needs to be aware of this and not rush with rotation, because otherwise you will run into players with opposite marks who are not able to pass until the frontal cast has been done.
We suggest using all immunes before rain hits, because an orb will not spawn that way. This will reduce the amount of orbs that you have during this overlap, so it will make this part of the fight overall easier.
Once you successfully complete the rotation, you will now have all the lines ready and positioned for the Charge.
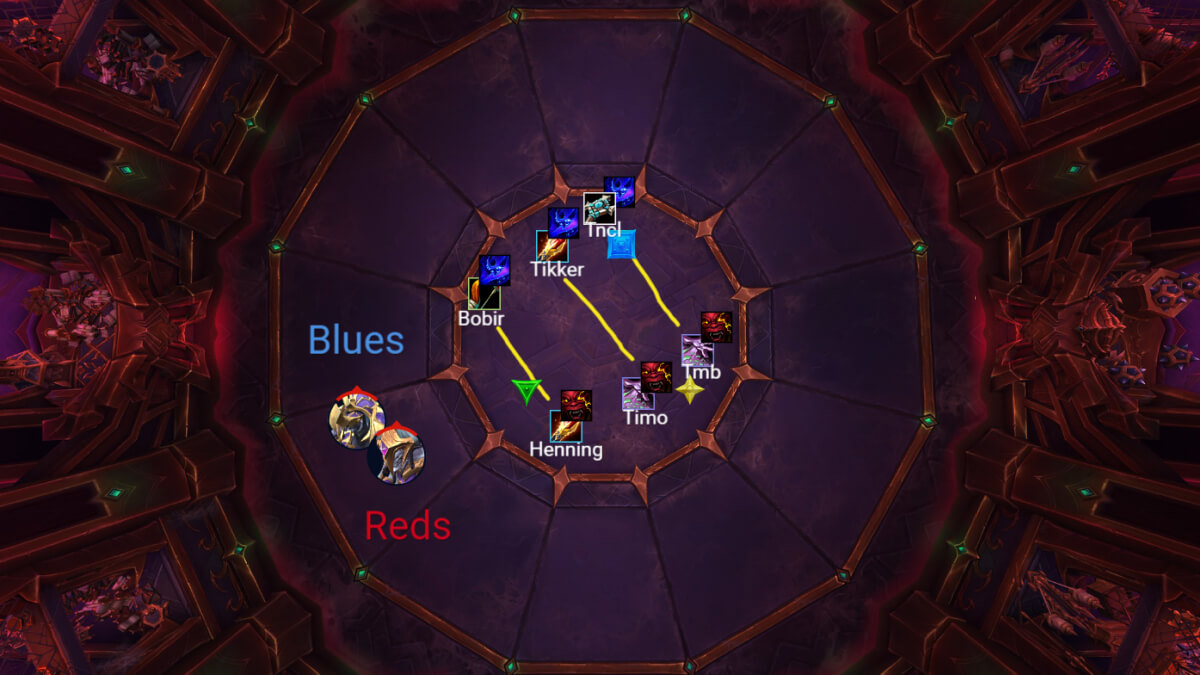
After the charge, bring Anub to the middle of the room and Intermission 1 will begin.
Intermission Strategy
This is a very easy and short phase if simple rules are followed, but it can become a very annoying phase quickly if players refuse to stick to those rules.
Basically it all comes down to following the formation at all times.
Here is an example of how this formation should look like:
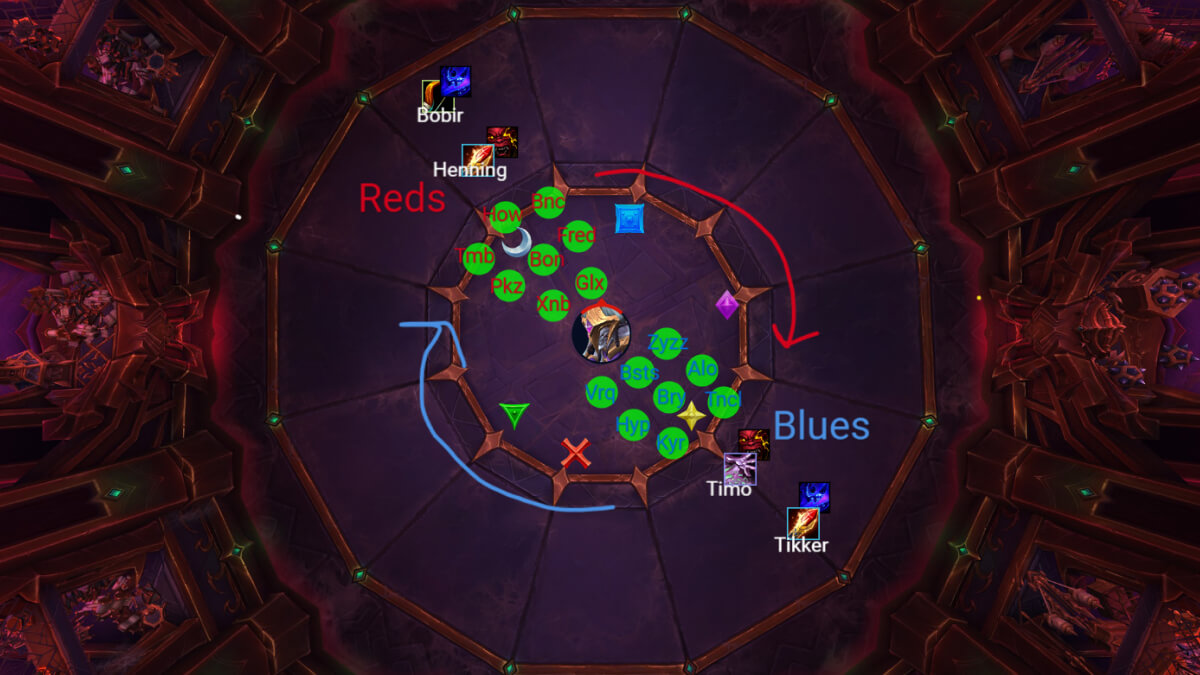
So a couple of notes here.
You may ask, why formation? Well the most common deaths in this phase are players accidentally picking up double stacked orbs and they either die to the DoT or instant death on 4 stacks. With the formation, you will reduce the chance of this happening, and you will also have a better flow of the intermission in the way that after some pulls, players will always go for the same orbs out of habit. So the risk of having an Orb blow up because it's not being picked up will be a lot less.
The second thing you may notice here is that there are now 2 teams outside instead of 3 as in Phase 1.
Those 2 teams essentially always play in the exact same spot the entire intermission. All they really do is dodge the cone, pick up each other's orb and stand in the same spot they were standing at the start of the phase.
The first rotation you do, you will do clockwise and once you reach the opposite side, you will have to “dunk” the orbs in a cone that is one slice behind you. This is hard to explain so take a look at this clip:
Once you spawn the orbs like this, you go counter-clockwise until the end of the intermission and you never have to repeat this dunk again.
When you are dunking, there is also a simple formation you should follow:
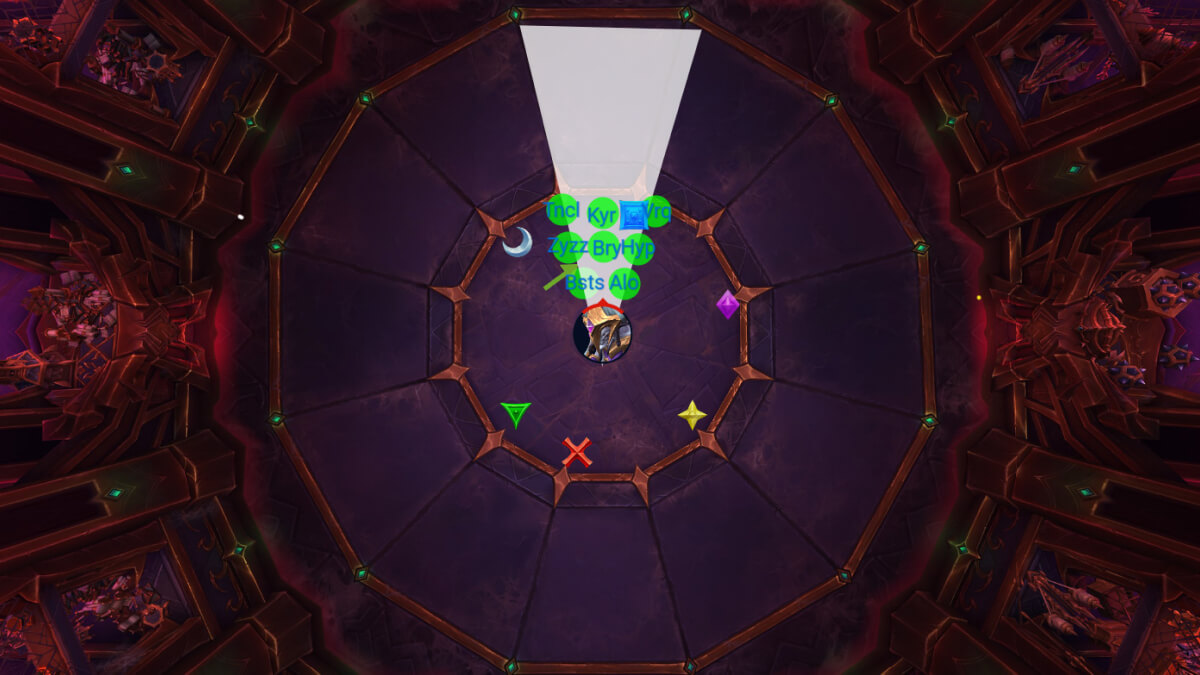
All this does is show you which player should run a bit further ahead during the dunk, and which players should just basically side step into it. This again serves the purpose to prevent stacked orbs during this process.
Damage stop is not needed anymore during the intermission because you are using Hero now at 3 mins.
Phase 2 Strategy
At the start of this phase, the blue team will get a cone cast on them, simply dodge this and get in position. It is very essential that both teams are playing exactly opposite to each other.
Your ideal starting position for the first Web Vortex is the Red and Blue marker.
Note: Sometimes when you reach Phase 2, you might end up on a different marker than usual (like red instead of blue) this is not an issue at all, this just happens because you push intermission at different times, so sometimes you might end up on the inverted side.
The main thing we need to do before the grip is guess what? That's right, another formation!
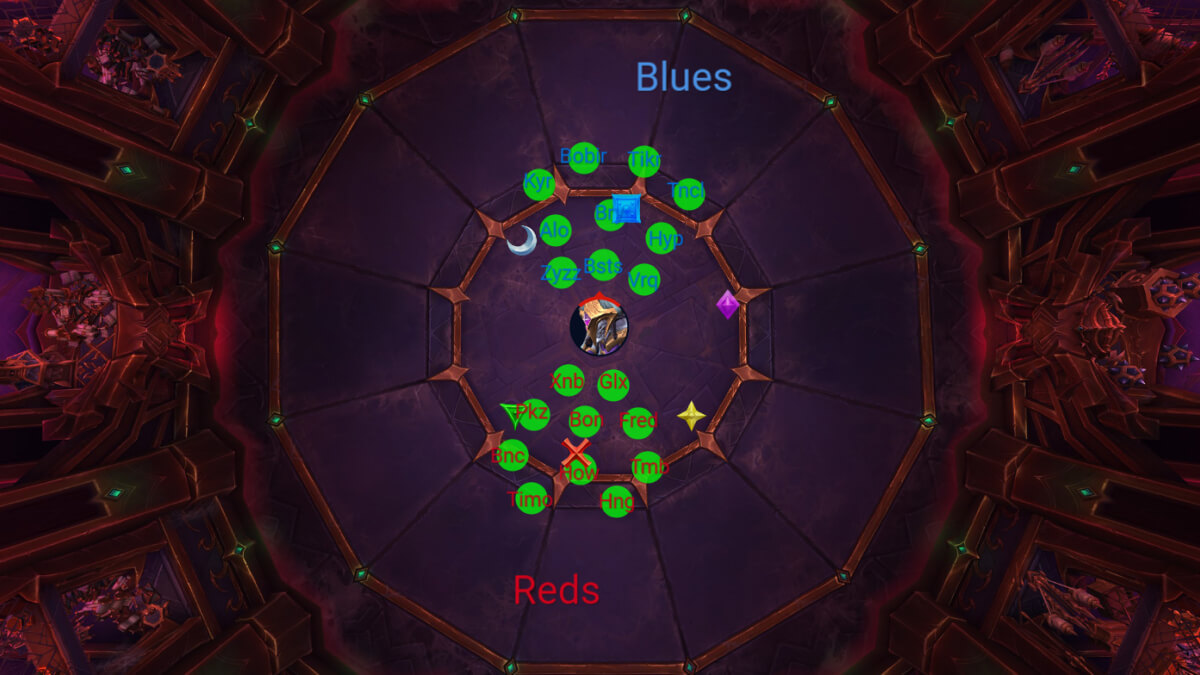
As usual, this is to prevent orb stacking, but in P2 and P3 this has an additional value; because Tak always casts Entropic Desolation after the grip (large purple circle) you want to have as many orbs outside of it as possible so you can have an easier time soaking them.
Web Vortex (1)
The universal rule to Phase 2 is simple.
Whoever gets gripped 1st, goes left and right as soon as possible, and breaks lines as soon as possible after that movement.
Whoever gets gripped 2nd, goes through the middle, collects a few orbs on the way out and then breaks all the lines.
When the Entropic Desolation circle is gone, collect any remaining orbs as your top priority.
Dispel (1)
You are dispelling all 4 people in the middle of the room, under Tak.
The 1st player might be a bit late because they need to wait out the Purple circle, everyone else should already be next to the boss so there should be no delays afterwards.
Because you are using hero here, be greedy and dispel 4th player last second to have damage amps as long as possible. Make sure to actually target Tak here.
Web Vortex (2)
Before 2nd Vortex, both teams will get one Frontal cast on them.
Teams should be standing on the Yellow/Moon marker here and the moment they get frontal cast on them, they dodge to the Right (right as in your pov right side)!
Now Tak will jump away, and this becomes your number 1 priority! Figure out where Tak jumped (it can only be left or right from frontal position) and run there as soon as possible, while making a formation.
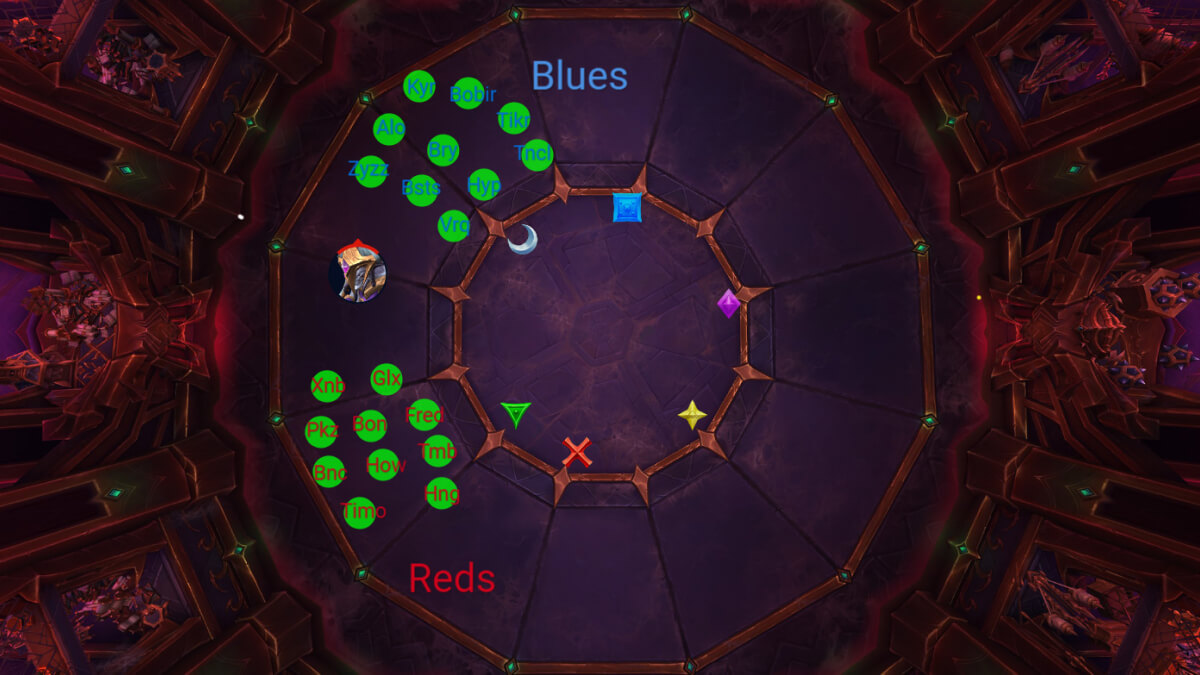
Now, the absolute most important thing here, that will save you a lot of pulls, is to understand that not a single player should try to reach Tak here.
The Grip happens so fast that even if you are the Usain Bolt of classes, you will do 2-3 globals and the grip will come, so it is not worth it.
The further away you are here, the more time you have to react to whatever grip you are getting and you will always spawn every single orb outside of Purple circle, making it easy for everyone to soak afterwards. This Web Vortex overlaps with Dispels so doing this as clean as possible will make things much easier.
Dispel (2)
This is where things get a bit tricky.
Whoever is calling the dispels, needs to constantly remind players what exactly are you doing here.
Your goal here is to dispel 2 players where Tak is standing currently (at the side), and everyone else should be dispelled in the middle of the room after the teleport.
That means that player 1 and 2 on the WA list, should get close to Tak, while players 3 and 4 should slowly move towards the middle because this is where their dispels are going to be.
If done correctly, you will have a few seconds to DPS on Tak and Intermission 2 will start.
Intermission 2 Strategy
Teams should start on the Red and Blue marker. Again you will naturally already be there so sometimes it might be Blue, sometimes it might be Red. As long as each team is standing on one of those, you are good to go.
It is very important for everyone to understand that this Intermission is actually super easy. The only time players will die here is when they try to rush things or play risky.
The reality is that you have absolutely no time pressure to collect the orbs and also no reason to try to play risky. Just slowly move to the other side, dodge everything and pick up an orb when it is safe.
Because you do not have outside teams like in 1st intermission, here is the updated formation on how to spawn the orbs.
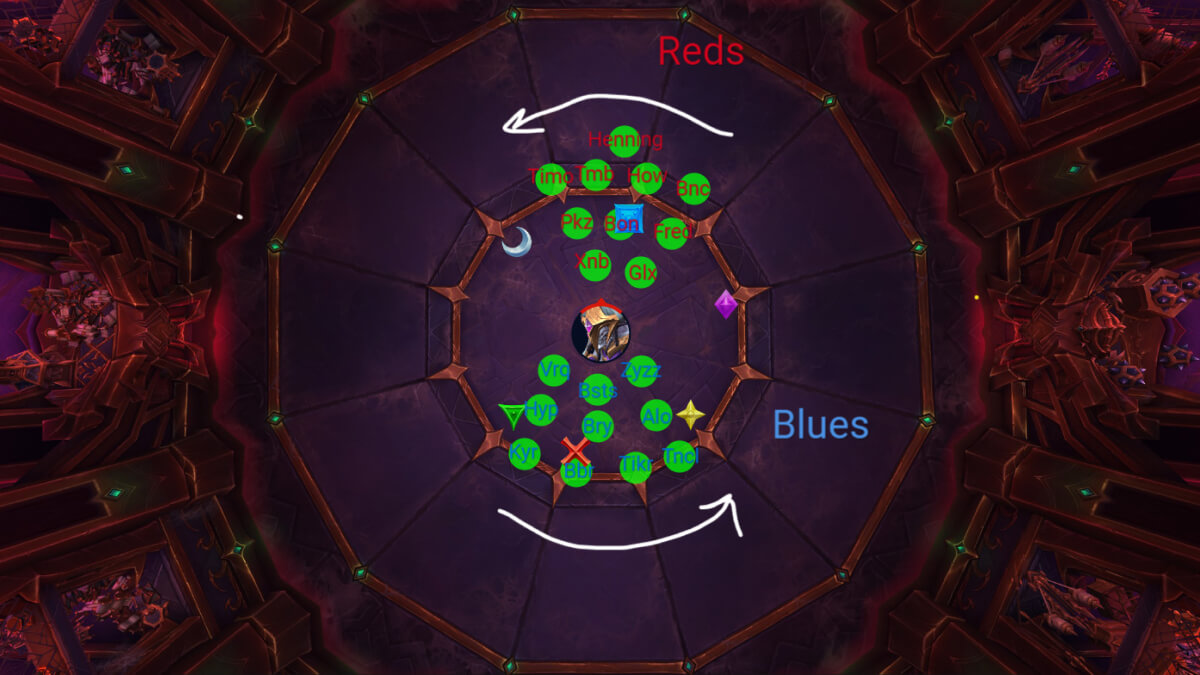
You want to spawn the orbs as spread as possible because you gain nothing by clumping up and it makes it easier to soak orbs.
You will be moving counterclockwise the entire time in this intermission.
The goal is to kill the shield before the 3rd set of orb drops, but this should be a non issue.
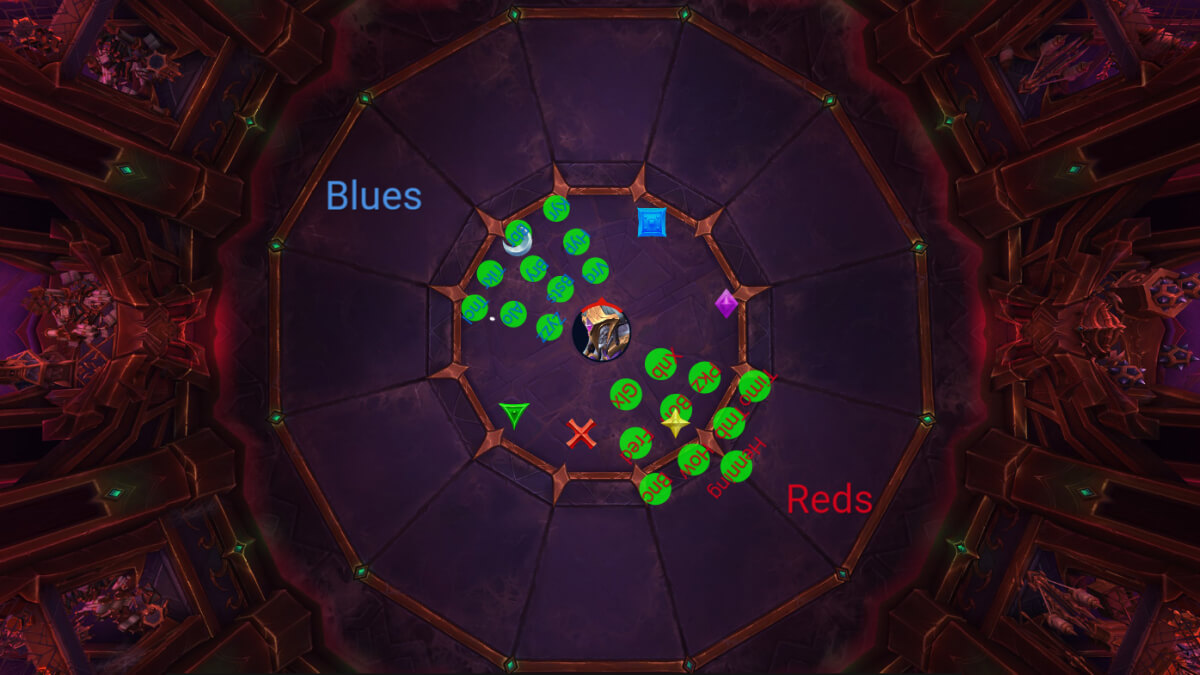
When you do your first rotation, instead of dropping orbs on Blue/Red again, move to +1 marker, so in this example Yellow/Moon. This will simply make the pattern on the floor a bit more friendly to dodge.
Phase 3 Strategy
This phase is a combination of all things you have done so far, with a slight difference on Web Vortex 1 and 3.
Initially when the phase starts, you will locate Tak and move Anub there.
Blue team will be standing towards the middle and the Red team will be hugging the wall after the Frontal bait.
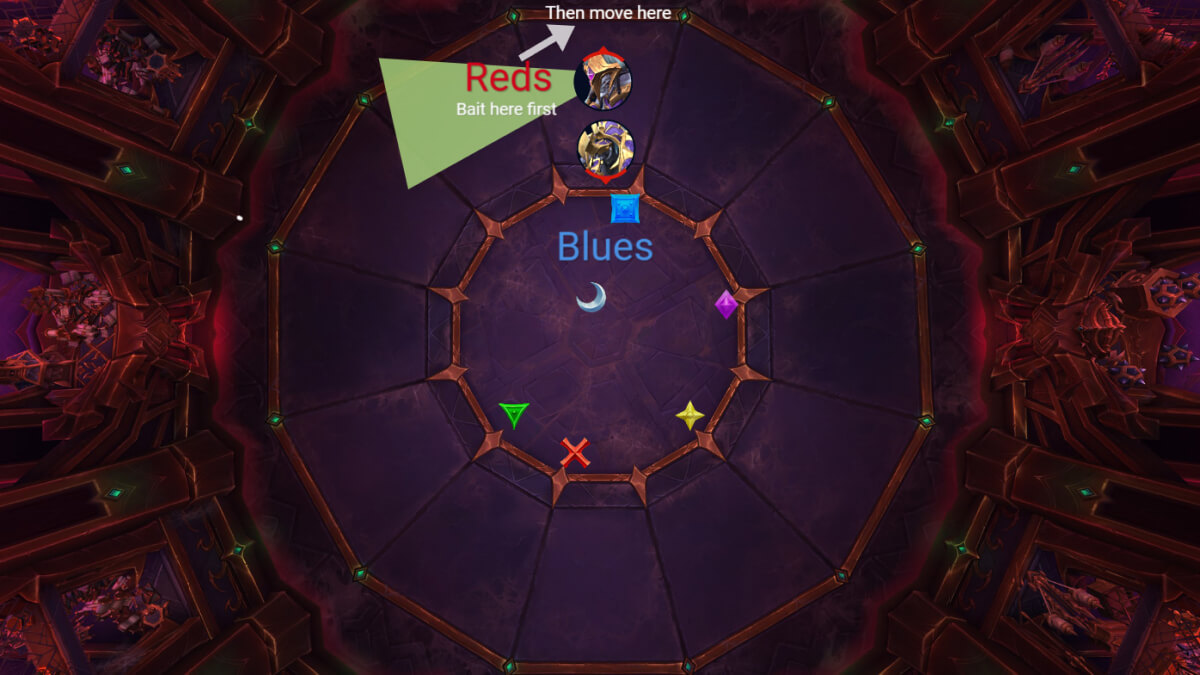
Now you are making a formation again to drop the orbs as clean as possible.
At this point there are 2 scenarios that alter how you play the Web Vortex, and they are determined by which group gets gripped first.
Important: Reds never break Binding Webs lines on the 1st and 3rd Web Vortex until the charge is over!
Web Vortex (1 - if Blue gets gripped first)
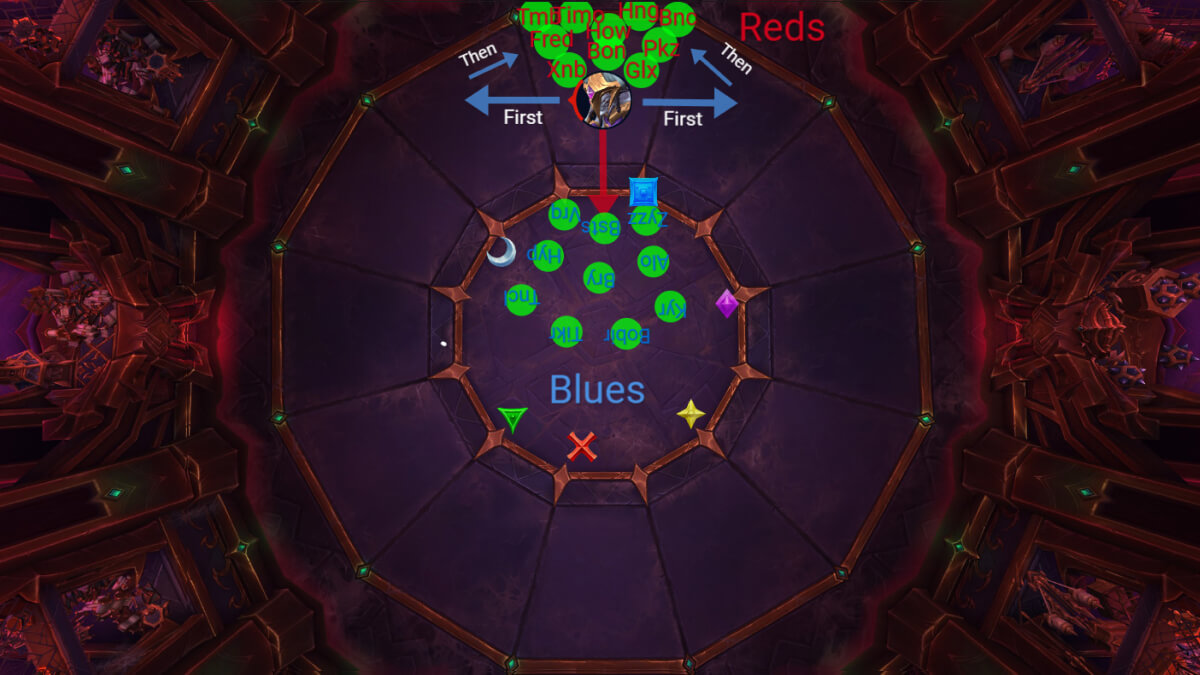
Blues will go Left/Right and break their lines, once the purple circle is gone, they will have to go pick up the orbs as soon as possible.
Reds will go through the middle, keep their web lines, and pick up the orbs on the way out.
Web Vortex (1 - if Red gets gripped first)
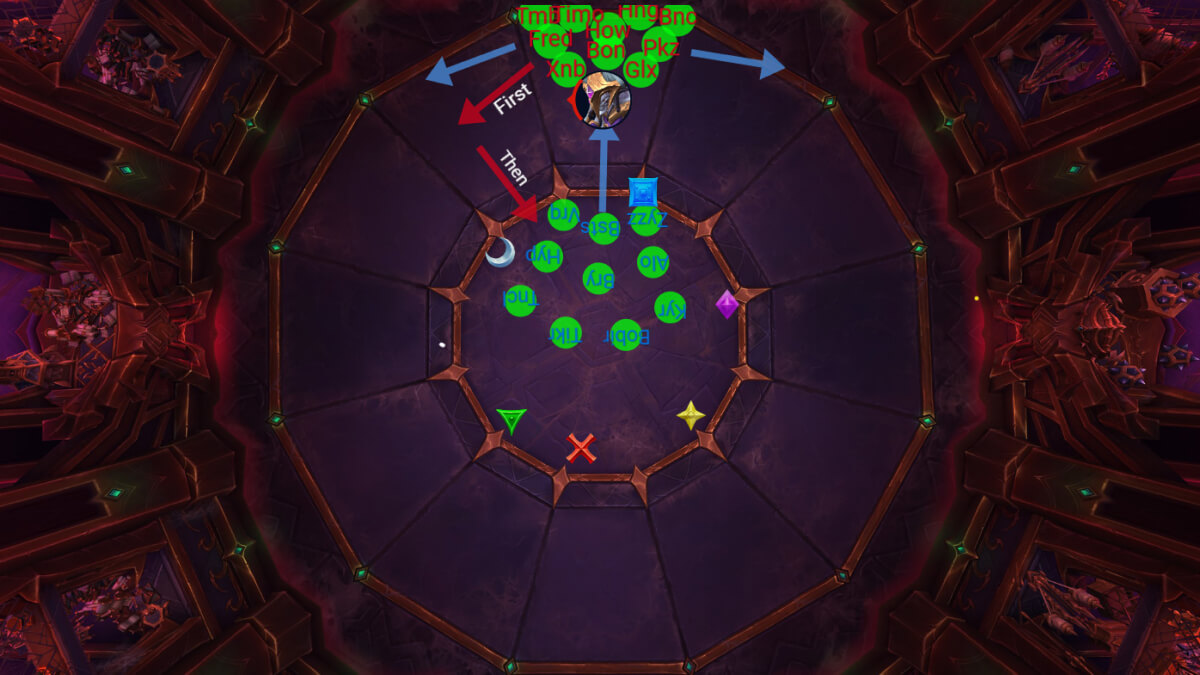
Reds will go to their Right side, all together without breaking the lines. Pick up orbs on the way and get into formation to stop the charge.
Blues will get gripped through the middle, pick up some orbs before going Left/Right to break the lines. Afterwards they need to make sure to go back to pick up any leftover orbs.
In both Web Vortex examples, stopping the charge is always exactly the same.
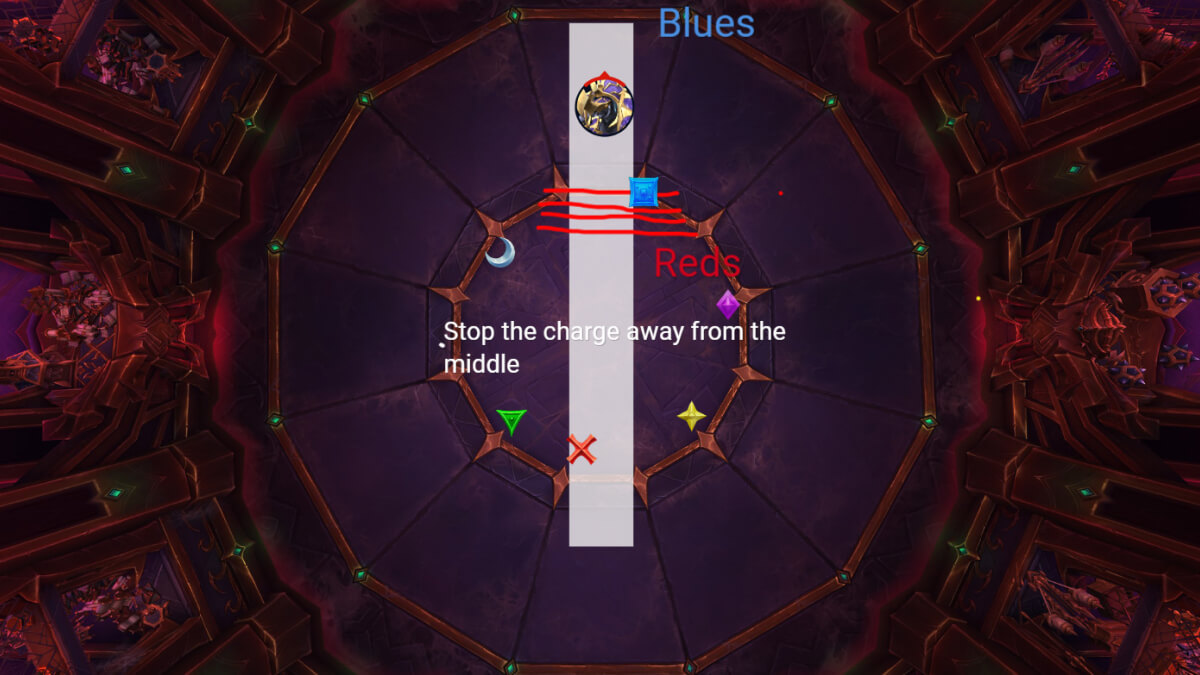
The main thing here is that Reds do not stop the boss in the middle of the room.
Important: Once the Red team stops the charge, you are NOT allowed to stay and DPS the boss. You have to instantly check where Tak jumped and go there straight away. Tak will cast Frontal on Red team players and if you run towards Tak, the Frontal will be baited away from the Blue team.
Web Vortex (2)
Happens only a few seconds after Anub'arash Reckless Charge, and it is exactly the same thing you did on Web Vortex 2 in P2, just with a small adjustment to Dispels.
Dispels (1)
The only thing you have to do differently here is the amount of dispels you want to do before Tak teleports to the middle.
You will dispel 1 player on top of Tak before the jump, and 3 in the middle of the room. Make sure you are very vocal about it because you have less time to do the dispels in P3 compared to P2 (debuff lasts shorter on the boss).
So ideally, Player 1 runs to the boss and gets dispelled and Player 2 is already in the middle of the room, then the moment Tak jumps, that player can be dispelled. If you do this, the remaining 2 should be easy.
Web Vortex (3 + Dispels 2)
Due to current damage numbers, there is a good chance you can skip this part, but on bad pulls and early P3 progress, you might need to do it.
Web Vortex is an exact copy from the 1st one in P3, the only difference here are the dispels.
You also want to stop the boss’s Reckless Charge in the middle now.
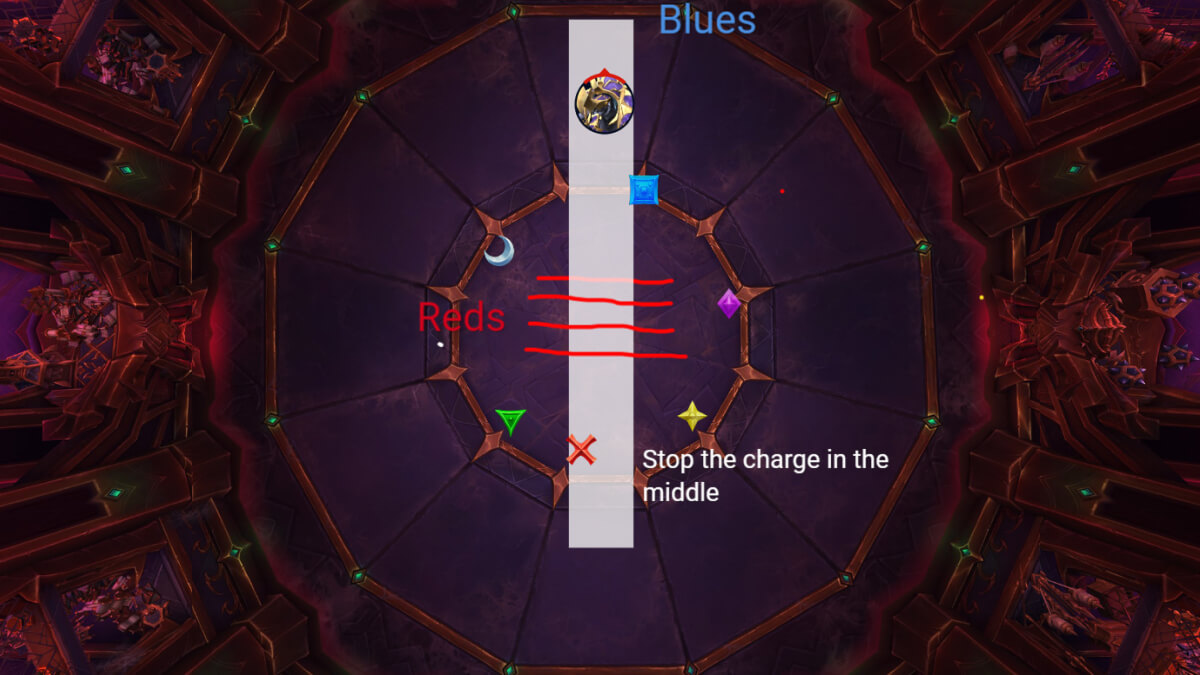
When it comes to dispels, this is a bit tricky.
Dispels come out just after both groups get gripped, and here you want to do 2 dispels before the teleport. You also have the issue that you can’t really do Red players because they are in the middle of the room doing the lines.
So first 2 dispels have to be 2 Blue players. The main rule here is that whoever is 1st, goes to the boss as soon as possible, ignoring everything, including puddles on the ground that spike you. If you reach the boss and die, you will not fail the dispel still as it jumps to the nearest target. The 2nd player also needs to be super fast and close to the boss the moment the first dispel is done. Here you just have to be aggressive.
The next 2 dispels are in the middle of the room; those should be very easy if the first 2 were done correctly because the entire raid moves to the middle naturally.
If you manage to do this, you should have no problem killing the boss at this point.
